Thermostat Confusion? I Have the (a) Solution!

One thing I like about our home is that each level has its own thermostat and can be independently regulated (makes for more efficient cooling and heating and it actually cuts electrical costs). Thermostat technology has come a long way, however if your thermostat is in the wrong location it can cost you money and cause perpetual discomfort.

Situation: Our upstairs thermostat is in the hallway. With no hallway air vents the temperature around that thermostat is mostly dictated by whatever makes its way up from the main floor.

The old thermostat location was not ideal. Air from downstairs would heat and cool the hallway where the thermostat was located. When in use the downstairs fireplace caused a huge temperature discrepancy.

Summer Situation: In summer the upstairs AC will run and run until the hallway cools to whatever temperature the thermostat has been set to. Since the air has to spill out of the bedrooms and into the hallway to reach the thermostat by that time all the bedrooms are too cold.

Winter Situation; In winter the warm air from downstairs keeps the upstairs hallways warn as well. The net effect is that the bedrooms are left unheated if the thermostat is set to a normal heating range. If we compensate by making our heating threshold higher than normal the upstairs AC will run and run until the hallway warms to this temperature. Since the air has to spill out of the bedrooms and into the hallway to reach the thermostat by that time all the bedrooms are too warm.

Solution: My wife pointed out that if we moved the thermostat into the bedroom that would solve all our problems. Since we use an automated system to control our temperature having it in our bedroom isn’t a big deal because others rarely need to adjust it. And thus was the thermostat moved. And there was there peace in the land.

That was all a long-winded way of saying this: If you have a two story home and separate thermostats (main and upstairs) make sure your upstairs thermostat is placed correctly. One alternative option to relocating the thermostat is to use one with a remote sensor.

LiquidArt Fountain Mountain Spring – Install & Operation

Once again, I have decided to undertake a project for no particular reason- I  just get enamored with an idea sometimes. In this case I was thinking about how much I like the noise of our fountain (probably because a friend just installed a very nice water feature in his yard) and how cool it would be to hear the sound of a fountain while sitting on our front porch. All of a sudden BOOM! I had to put in a front porch fountain.

The first step was picking a location and that was easy since there was only one place to put a water feature. I wasn’t a huge fan of the bushes in front of our porch so I was happy to rip a few out to make room. The next step was finding something that would fit look nice and not be too loud. I remembered seeing some fountains at Costco last year so I looked on their website and came across a model called the  LiquidArt Fountain Mountain Spring. I liked the shape, a pondless bubbler was just right and the price was pretty good (much less than buying it direct).

I placed my order and it came within less than a week (shipping from Oregon via a freight company). As soon as it arrived I took actual measurements (it’s 2″ larger than advertised- a tight fit) and started digging. I naively assumed I could just shovel out a few wheelbarrow fulls of dirt and I’d be all set. Not quite. I think all told I ended up emptying five pretty big loads. I dug the hole a bit deeper than needed so I could lay down a couple inches of gravel.

Deciding on a height was more difficult that I thought it would be. I ended up trying to seat the fountain two inches below the side walk to accommodate the rocks I was planning to get (I’m hoping the weight of the water and fountain won’t cause it to sink at all, but I’m mentally prepared to pull it out and readjust it if necessary). After getting the water reservoir installed and cleaned out* I placed the grid on top, placed the pump inside, ran the pump hose through the grill, overlaid the mesh and placed the “rock” (orienting it was tricky and I ended up changing it several times after seeing the actual water flow). Aside digging the hole that was the best part (sarcasm).

*Quite a bit of dirt fell into the water reservoir. The only way I could think to get it out was to vacuum it up. I used this an an opportunity to acquire a new Shop Vac (quite happy with this model). Sweet!

After the main fountain components were situated it was time to get some landscaping rocks. We live right by an American Stone so I headed over to see what they had. Turns out their selection is pretty massive (it was my first time there). Here’s how it works: You weigh in your vehicle and then go fill it up with rocks (keep track of what you get). Then you go a weigh in again and pay for your selection (according to your weight difference). They don’t really cater to jobs as small as mine but I managed to get what I needed. I’m not going to win any awards for landscaping / fountain design, but it turned out pretty nice (I wish I hadn’t pruned the bush on the left quite so much).

Below is a quick video of the fountain running. I think it’s quite relaxing. In fact I would be on my porch right now if allergies weren’t ravaging my body.

Overall: 8/10 – The LiquidArt kit is comprehensive, well designed and attractive. My only two gripes are minimal. 1) The PVC pipe that comes out of the top of the rock isn’t too attractive. I feel like that could have been flush with the surface. 2) Install wasn’t anything close to 3 hours, as described by the instructions.


O Internet, Internet, wherefore art thou Internet?

For some strange and unidentifiable reason there are areas in our home where the Internet simply doesn’t reach via Wi-Fi. The main floor office is one such example. Our primary router (a Nighthawk X6) is in the basement (in the mechanical room) and feeds the entire house and yard quite well. However, that particular network simply doesn’t function inside the office. I picked up a Night Hawk X8 router and set it up in the center of the office thinking it could feed the office and work it’s way out the main and upstairs floors. Not so! The X8’s newly created Wi-Fi network was limited almost exclusively to the office! Even though it was overkill, I left that situation alone for awhile because it got the job done and met our needs. But I knew one day that something would interrupt the status quo.

All was well until I we needed Wi-Fi in the garage (for a computer and the Rainbird Sprinkler box). In hindsight I should have just run an ethernet cable to the garage when we built the house. But I hadn’t (maybe you still can!). There was still a way to potentially run an ethernet cable to the garage though.There’s a network jack in my bedroom which shares a common wall with the garage attic. I could set up a switch and then push a line into the attic and then down into the garage. Realistically it sounded like too much work.

Here’s what I tried first: I picked up a NETGEAR – PowerLINE Wi-Fi 1000 Access Point and Adapter. I plugged one end into an outlet near my router and plugged a LAN cable from my Night Hawk X6 into the Netgear Access Point. I went out to the garage and plugged the receiving end into an outlet. Sure enough! They found each other and linked.  However, the internet indicator was red, denoting a poor connection (I think it ended up being 3-4 mbps). Not great. I was lamenting my problem to a friend who suggested moving the Nighthawk X8 into my bedroom against the common bedroom/garage wall. Huh… that made a lot of sense. Sometimes you need another set of eyes om a problem.

I started the process by moving the Net Gear 1000 into the office. If I repurposed the Night Hawk X8 then my office would need its router replaced. And what do you know? The 1000 linked up just fine from an office plug and after doing some testing I concluded that little Powerline 1000 could easily handle all the internet requirements of the office. Then I moved the NightHawk X8 upstairs. I connected it to the LAN jack behind my bed and stashed the Router beneath my nightstand for the time being.

In this new location the Night Hawk X8 appears to serve the garage much better than anything else I’ve tried (and it also works throughout the upstairs and main floor, minus the office- something’s wrong with that office…). I’m ending up with with about 20mbps download speeds which are quite sufficient. And the signal level seems very strong, and this is, in some ways, just as important as the speed. I really think the relocated Wi-Fi network will be a huge help moving forward.

Long story short: I solved  the Wi-Fi internet dead zone in my garage by moving my Night Hawk X8 to a better location. I added a Powerline 1000 unit to the office to provide Wi-Fi there in the absence of the X8. This was a cost effective purchase and a great example of successfully relocating existing assets. At some point I need to set up the networks so they are, for all intents and purpose, one large mesh network. Anyone want to help me figure that out?

Conclusion; 8/10 – NETGEAR – PowerLINE Wi-Fi 1000 Access Point and Adapter
Works well to create an additional Wifi hotspot. Claims gigabit speeds but it doesn’t seem particularly fast to me. Only broadcasts on 2.4 Ghz frequency (right?).

Rainbird ESP-Me Wifi Sprinkler Control – Mini Review

I have been visiting with a friend who’s doing a major yard overhaul. One change he’s planning to make is to move his sprinkler system to a wireless setup so that watering can be controlled via a phone application. That sounded pretty good to me so I did some research to determine what I’d need to make a similar migration.

It turns out that I didn’t need much! I have Rainbird ESP-Me controller that was installed a couple of years ago when we put in our yard. I noticed that Rainbird offered a wireless module for this controller, however my particular unit was not compatible, due to it’s age. At first I priced out a new controller with the wifi module, but eventually I discovered that I only needed a new control panel (not the actual box with the station controllers).

A quick google search led me to YardOutlet.com. They offered a bundle package with the control panel and wifi module for about $130 with free shipping. They are located in Ogden Utah which seemed like a nice plus. I ordered Monday and, incredibly, I had my package on Tuesday. Whaaat? Everything came well packed and as advertised. Well done, Yard Outlet!

Replacing the panel was incredibly simple. All you have to do is unplug the harness, pop off the old control panel, put on the new one and plug it back in (I think I spent about a minute doing this). I reprogrammed my sprinklers from the panel and then set about linking the sprinkler controller with the Rainbird App.

Initially I had a little difficulty getting things to connect properly. I think part of that, in my case, was because the wifi in my garage is terrible (something I am working on fixing today). The Rainbird wifi module initially creates its own hotspot  and then, from the app, you move the module to your home network. Obviously at that point your phone needs to switch networks too and mine hadn’t which is probably another reason I got the error below. After a few tries everything seemed to be working and I was ready to try out the app.

After perusing the app my impressions are quite positive. It gives you all the same accessibility as the physical control panel. After you make adjustments you save them and the new program is written to your control box. Everything is fairly intuitive and you can even opt to have the app make watering adjustments based on the weather. The app control worked well on my wifi networks and via my cellular service (one thing to note- you can’t switch from a wifi network to LTE while you run the the Rainbird application- you have to close and restart the app for it to work properly).

Below is a quick demonstration of starting and stopping the sprinklers via the Rainbird application (complete with a silly kid in the background). Being able to control the sprinkler zones from my phone will make it infinitely easier to do testing and make repairs.

Overall, I think this is a very solid wifi sprinkler control set up, especially give how inexpensive it is. I’d give it my recommendation.

Overall: 8.5/10

BONUS: A friend pointed out that this system may be eligible for a rebate. It looks like by adding a rain sensor I could get up to 50% back for my purchase. I might just do that…

http://rebates.cuwcd.com/
https://www.rainbird.com/documents/turf/bro_ESP-Me_WiFi_en.pdf

BONUS 2: The RainBird app spends quite awhile getting the schedule and setting information when each connects to the sprinkler box. Originally I had thought this was because I had connected the unit to to a network with very low signal strength. I rearranged things and then connected the ESP-Me to a much better network. Sadly, the app’s load time was the same. I’m docking a half point for that.

Bose QuietControl 3.0 Mini Review

The absence of the earphone jack on my new iPhone 7 has been troublesome. For whatever reason I have earphones / headphones in various parts of the house and frequently switch between them. In lieu of buying 6 “lightning to 3.5mm jack” adapters I decided to try and find a pair of good Bluetooth headphones. I was sick of cords anyway so I figured this would the perfect opportunity for a change.

I tried a couple less expensive brands like this set from Senso. The drivers in the Senso (and comparable $30 models) was miserably underpowered. Still, they sounded okay and they fit on my ears quite well. The deal breaker was that they lost their connection with the phone when I went outside (intermittently, but frequently).

Eventually, almost in desperation, I picked up a set of the Bose QuietControl 3.0 ear buds. I have a couple other pairs of Bose headphones that I really like so I figured I had nothing to lose. Well, except some money- the QuietControls are pricey, running around $300. To their credit, they have a profusion of features, some not present in other Bluetooth models.

For starters the battery is situated in a comfortable neck band, as opposed to being in the actual ear piece. In addition to increasing the battery life this makes the portion that sits in your ear much more comfortable (the earpiece also has Bose’s “stay hear” fitting which is very effective). The on and off button is situated in this neck band. Syncing with your device is very simple and pressing the button multiple times lets’s you cycle through up to three connected devices (I use it with my phone and laptop). In my opinion the best feature is the noise cancelling technology. While not perfect, it’s effective enough at muting background noises that I was able to mow the lawn while listening to an audio book. There are several levels of noise-cancelling- I think I would have opted for on/off as cycling through 10 levels (or whatever) is cumbersome. In addition to noise cancelling controls, there are the standard volume and pause buttons as well as a microphone for calls.

Audio quality is excellent. Compared to the other models I used the QuietComfort’s sound is deep and full of detail (excellent base, considering this is really a set of ear buds). Drop out is minimal and I have used the headphones mowing, biking, running and shopping with very few problems.

The QuietComforts are not perfect, by an means. Here are my gripes:

  • When you turn your head left and right sometimes the earphones can actually get pulled out.
  • The neck band will periodically rotate and become uncomfortable (it’s very easy to readjust it).
  • When the noise cancelling feature is turned down the headphones almost seem to amplify ambient sounds and there is a strong “white noise’ present in the phones.
  • Even the QC’s Bluetooth occasionally cuts out.
  • A little more expensive that I think they should be.
  • The built in microphone seems to do a poor job filtering out background sound.

And here’s what I like:

  • Battery life is very solid and the charge quickly.
  • Neck band is comfortable and allows for smaller more comfortable ear buds.
  • Noise cancelling feature is a welcome benefit.
  • Audio quality is excellent.
  • Good solid construction.
  • Pairing is effective and the connection is generally very solid.

With all that being said it’s probably not clear where I stand on the QuietComfort 3.0 line. You might even be thinking that I don’t like them all that much. But such is not the case. Despite a few limitations (negative quirks) these have become my go-to headphones. I typically have them on all day and they have literally replaced every other set that I own. I would recommend them to anyone who’d looking for a pair of solid Bluetooth ear buds and who’s willing to settle for very good, but not great.

Overall Initial Impression Score: 7.5/10

I’ll follow this us with a long term usability score  after I’ve used the headphones for a few months.


2010 Projects

First off, I’ve been busy. Really busy. Not kinda busy. Not sorta busy. Really really busy. However, all this time I’ve been secretly working on a slew of blog posts. I haven’t had the time to write out literary masterpieces for each one, but I’ve decided they must finally see the light of day (or whatever blog posts see). So, here they are!

2009 Has come and gone. All in all, a mighty fine year.

The Hughes Family 2009 Report: Nothing too major here. Everyone got a year older. Mike is now in school. He reads pretty well, he’s very good at math and he loves video games. Claire is taking gymnastics, she’s learning to read and she’s a little crazy. Gabe is a good natured, fun loving and I can almost understand him now. Fran holds down the fort with finesse and dedication. She’s been hard at work doing digital scrapbooking, home improvement projects and accounting for our company.

The Cam Report: 2009 was a good year for my health. I think I mentioned in a previous post that I’ve been doing much better (only a couple colds and a 24 hour flu). I found a little more balance last year (and it’s going even better this year). Not much progress on the weightloss  front (I just love ice cream… so much… so much), but I have high hopes for ’10. Nothing of statistical significance is coming to mind. Another year down.

 The BladeHQ 2009 Report: My company has gotten larger that I ever dreamed possible (don’t get me wrong, it’s still small, but I never thought I could make a living selling knives).  I am especially grateful that, for the most part, it seems nearly unfazed by the recession. We moved into a new facility this past year which has allowed us to continue our growth.

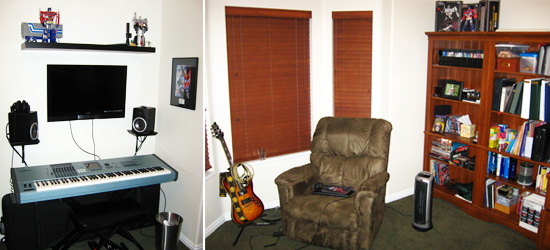
2010 has started off strong with a series of room modifications. I don’t know why, but I get obsessed with projects from time to time. Almost like I need to have more than I can do on my plate. My first goal was to finish up my office at work:

It’s still not quite done, but it’s come a long way. I have my toy filled curio next to the love seat. I found a gorgeous picture of the Justice League by Alex Ross (great artist, by the way). And I rounded out the decor with a matching desk & shelf set. I have a sweet Transformer poster that’s in the process of being framed too. Maybe one day I’ll get to use all this cool stuff (right now I work downstairs).

I don’t know how many people were familiar with my “man room.” It was a closest sized room in the basement where I went to relax. It had my piano, guitar, lazy boy, a television/dvd combo, books and miscellaneous hobby items. I would retreat there when the world encroached on me. In a nutshell, it was cool. But I gave it up for love…

Fran has long extolled the virtues of a mud room. A place where the kids can take off their shoes, hang their jackets and stow their crap. With the washer and dryer, our main floor laundry room was too small for much of anything besides laundry. But without the washer and dryer the room would be a perfect mud room. Where to put the laundry room then? Why in my old man room! And so…

manroomoffice.jpg

I moved everything out of the man room and into the main floor office.  Just like the man room, but more open, more convenient, and much classier. So… not like the man room.  I’ve got half of the office and Fran has the other half. Truthfully this is a better set up. And then…

manroomlaundryroom1.jpg

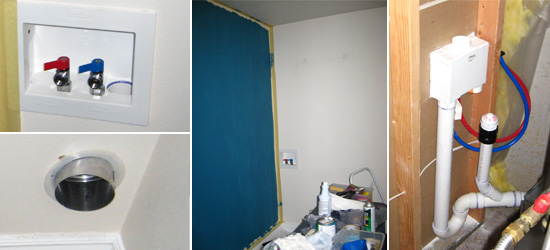
The old man room became our new laundry room. Not an easy process. We had a plumber run water lines into the room for the washer hookup. We had Holmes install a dryer vent run. My brother in law, Vard, came and added a 220v outlet. I laid floor tile (to replace the carpet) and Fran and I created a blue accent wall. Everything turned out excellent. In fact, things were going so well that we decided to carry the washing machine downstairs ourselves. Tip: Don’t turn a front loading machine upside down. The drum is often suspended by two heavy duty coil springs. Your drum will come of these springs. It took us about two hours take the washer apart and reseat the drum. All’s well that ends well though.

new_laundry_and_mudroom.jpg

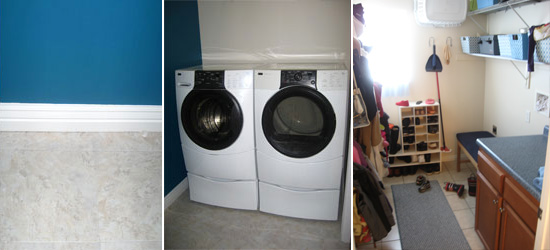
We now have a downstairs laundry room. That’s where they all used to be, right? Maybe we can rekindle the trend.  The new laundry room and the old one are identical in size, but we utilized the space a lot better than before. We still have some work left (cabinets & organizing) but we’re super happy with the result. And now we have a mudroom upstairs too.