
I have undertaken another stereo installation! This time I partnered with Luxe Automotive and had the opportunity to work on this project with their 12-Volt master, Diego. On the surface this probably seems like a fairly simple install: Four speakers and an amplifier. Between the two of us (mostly Diego) there is well over 100 hours of work in this project… and there’s still more to do!
Stage 1 of the build is complete! Epic.
I am thrilled with the results. The volume can be cranked up and the sound and detail remain crystal clear and it doesn’t feel uncomfortable to the ears. No clipping, no distortion and a surprising amount of bass even without the subwoofer. Some may say it’s a crime, but it’s loud enough to overpower the car’s V12 engine noises which is exactly what I wanted for those occasions when I’m not driving around at 9K RPMs. Luxe was incredibly accommodating and let me help with the entire install.
Below is a quick montage of our stage one efforts:
Below is a breakdown on some of our thinking on the project (the time stamp info relates to the video).
0:05: The Sensonum system is bad- there’s really no other word for it. Specifically it’s bad because it drowns out the vocals, distorts at medium-high volumes and shoots out the most ear piercing shrillness I’ve ever heard in my life. The treble and bass adjustments do nothing to alleviate the problem. Perhaps the system is just terribly underpowered. At the very least poorly tuned. I am truly genuinely baffled as to how this system came to be in any car.
After fiddling with all of the hardware I realized the only real solution was to replace the amplifier. Of course, if we’re replacing the amplifier then we might as well replace the speakers. Originally I was planning to do a JL Audio C7 and VX-based build but Diego, over at Luxe Automotive, convinced me to try out Morel speakers and AudioControl for the amplification. The Morel Supremo component speakers consist of a 1.1 inch tweeter and a 6.5 inch mid driver as well as two crossovers (0:08). The amplifier is an AudioControl D-6.1200 (0:11- there is an additional amplifier pictured here which I’ll discuss later).
0:15: This video contains what is essentially “stage one” of the build. Originally we planned to include a subwoofer but after getting deeper into the project we realized it was more complicated than we had anticipated and so we broke it up into two parts. This first part is the installation of the four Morel speakers and the D-6 amplifier, along with the accompanying wiring and amp rack.
0:15: The first part of this video is showing the inside of the door panels. The carbon fiber covers have been removed at this point (as a side note- they are very easy to take off).
0:25: These are the stock speakers- nothing impressive. Eight inches of paper with a microscopic magnet. From what I understand the Sensonum system does not give you upgraded speakers, just a different amplifier.
0:28: We decided to remove the passenger seat from the car to make our work a bit easier. It’s probably possible to do an install like this without removing the seat but… why? Incidentally, you’ll need to reset the car’s airbag warning light after reinstallation.
0:32: You’ll need to pull out the frunk bucket (is that that official name?) so you can access the battery.
0:36: The amplifier is behind this trim piece in the back seat.
0:41:This is a picture of the amplifier and at this point I’ve cut all the wires in anticipation of the modifications we’re making. You would never want to cap wires together like this in a finished system. Fun fact here: if you look closely you can see that I wired some of the amped speaker wires backwards just for fun to see if it made any difference to the stock system. I don’t think it did.
0:44: It’s hard to see in this video but the speaker in the dash here are C5 JL Audio tweeters that I had installed previously (you can check out my last video to see more on that). They actually made a dent in the muddy vocals, although not enough to save the system.
0:46: You can see the original tweeters here. I had pulled off the factory harness (well, cut it off) when I installed the JL’s and we used them again for the Morel speakers.
0:53: Diego Was able to separate the original speakers from the stock housing- more on that in a moment though.
0:57: There was more disassembly than I had anticipated but thankfully almost everything in the Aventador is clip-based.
0:59: The component speakers are really beautiful and the crossovers striking as well. Because the AudioControl D-6 is a DSP amp we didn’t have to use the Morel crossovers but we really wanted to display them and there are still some advantages to using analog components in a build like this.
1:08: This is some of our wiring. I was really impressed with the Stinger line of products.
1:14: Those badges were tough to get off. Lost an hour of my life to those guys.
1:24: The Acoustics inside of the Aventador aren’t great and the SVJ, in particular, is especially bad with its carbon fiber door panels. The doors needed a sound barrier application but you have to be cognizant of how much weight you add to the scissor doors. They still need to open easily and stay up.
1:33: All the cables were run through the factory firewall; that’s always the right way to do it (thankfully Diego didn’t listen to my ideas about how we could half-ass things).
1:37: We used the original OEM speaker mounts and made adapters. We did a couple prototypes and Diego put together a simple and elegant plate adapter (which you will see shortly). We had watched an install that Brian (Brian’s Custom Audio) had done with beautiful aluminum mounts but for the sake of simplicity and weight we opted not to go that route. There was also the fact that no one would ever really get to see the mounts that discouraged us as well.
1:48: This is an interesting moment here. What we’re doing is actually testing to see if sound is coming out of the head unit directly and if the volume is controlled at the head unit or factor amp level. Originally we discussed leaving the factory amplifier in place and then running the signal into the AudioControl D-6 (they can accept high voltage signal inputs). However, we determined that the head unit was outputting a useable line level signal and we could completely remove the factory amplifier. This is why you see me flipping off the unit here in this next clip. Whatever is happening inside this amp is not good and removing it was a highlight for me. I’ll also mention that there were some CanBus wires going into the amplifier and we were initially worried that there was some kind of functionality loss that would occur, but there has been nothing ascertainable.
1:54: Given that we’re working on an SVJ (a racecar) it was important to me to not add too much weight to the vehicle. This is another reason why we took a harder look at the subwoofer situation. We wanted to create something that was removable both on the sub and the amplifier level in case the car needed to perform at a higher level (like a day at the track). Ultimately with the D-6 amp, the rack, speakers, Sound Shield and cabling, we probably added about twenty five pounds of weight to the car (the sub, sub amp and box would have been another thirty).
Incidentally we lost the stock amp and the frunk divider (which is made out of metal and is about four pounds) so the net increase to the car is probably a little more than twenty pounds.
2:10: The wiring job in this car is top notch. Wrapped, clean, solid. No shortcuts on this one (well, you could argue that butt connectors are shortcut but I’d have to roll my eyes). Kudos to Diego for his meticulousness.
2:24: These are the plate adapters that I had mentioned earlier. They’re really just two rings that are seated together and then the speaker fits inside. I’m really happy with how these turned out.
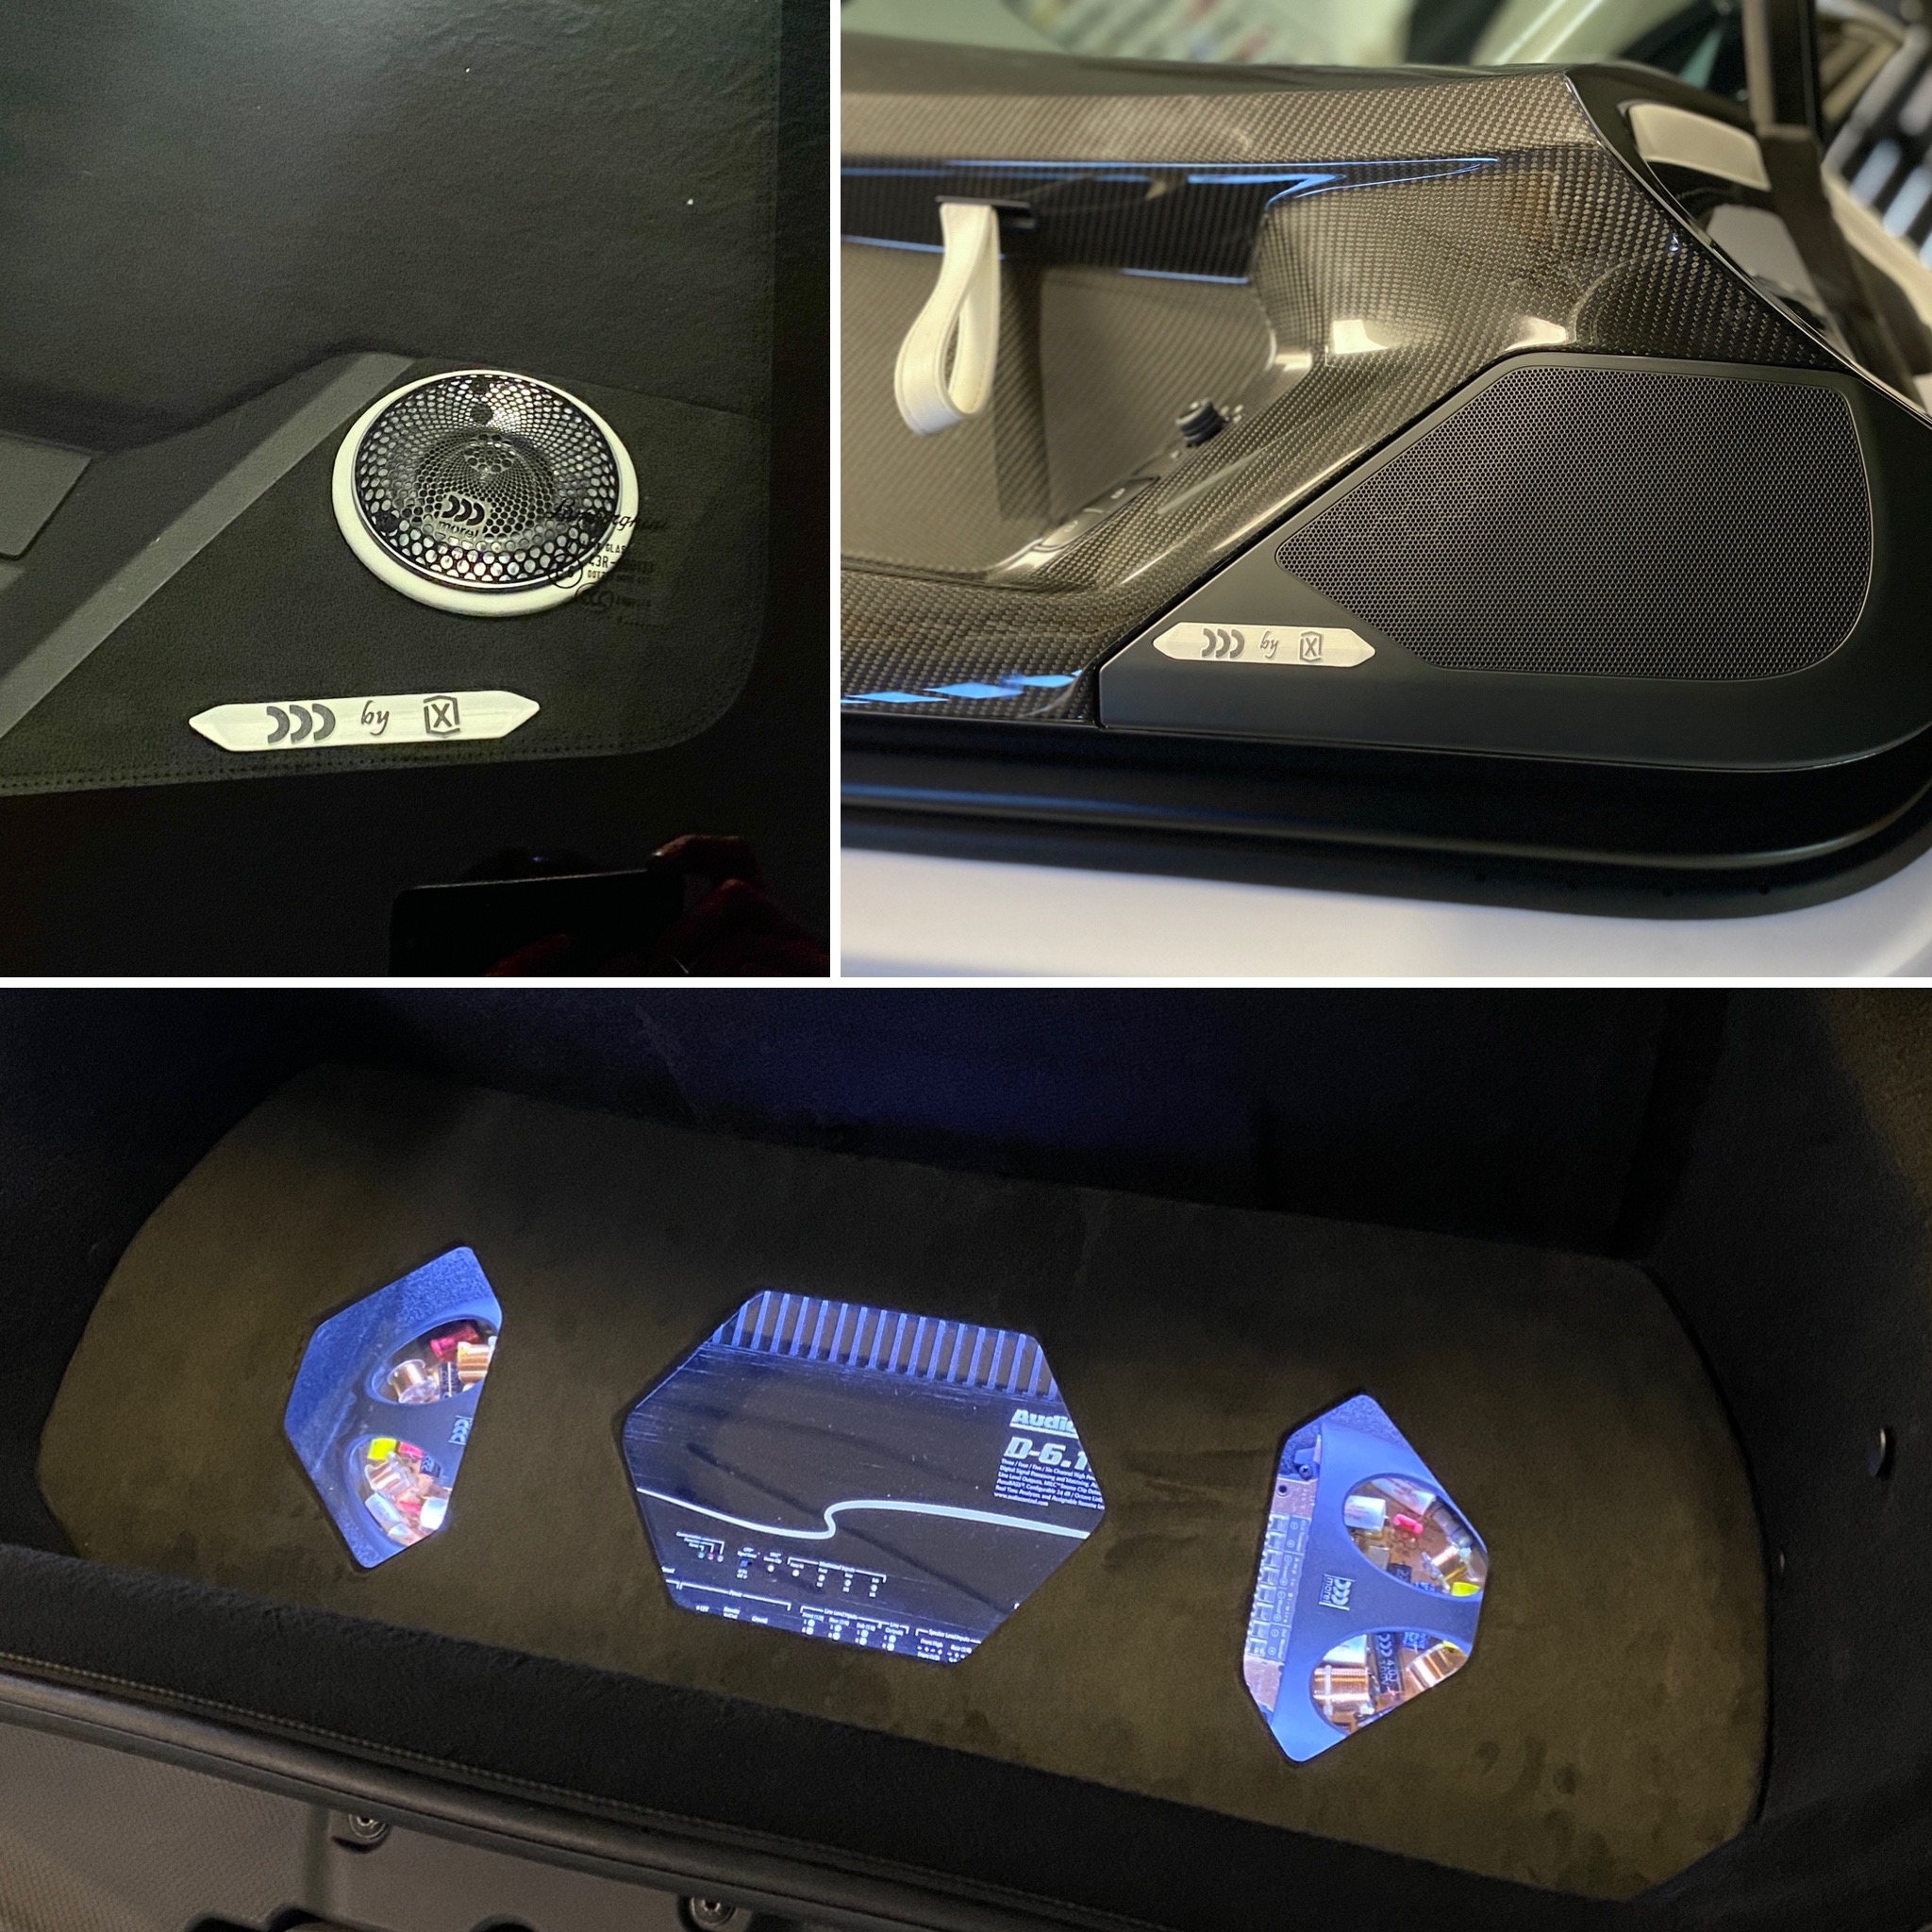
2:58: This is the amp and crossover layout that will sit at the bottom of the frunk (on a removable rack).
3:03: Remember to do basic testing to make sure your polarities are correct. With a system like this you really want to hook things up correctly.
3:04: This video wanders around a bit because we worked on a bunch of different things at once and it’s just filmed in sequential order (for the most part). This is just a quick shot of the stock tweeter harnesses with the wiring from the JL Audio Tweeters (removed for the Morel install), the Morel tweeters and the fuse install (put it close to your battery), In retrospect I wish I’d found something better to include than these ugly lookin harnesses. I hope no one thinks we used them they way they looked in the video- that wiring & soldering was removed.
3:14: We hooked everything up to take it for a quick test drive (not a literal test drive). I should have picked a better clip for here (one that shows there is some audio signal). As I mentioned the audio control amplifier offers a lot of customizable functions like a thirty band graphic equalizer and time alignment. You can configure everything from a computer via a USB port and you can buy an optional Bluetooth adapter, which we did, so you can even use your phone.
3:21: This is the speaker in the door with the trim back on. After the grill is reinstalled you can’t see it at all- a shame. We looked at some options to redo the grill but ultimately we just left of alone for now.
3:23: This is Alcantara – which is like a synthetic suede – which we used to cover the stock tweeter trim. The tweeter install ended up being a bit trickier than we had anticipated. You can see how we had originally intended to seat the tweeter directly on the alcantara. These tweeters are incredibly deep and this ended up being a issue- more on that shortly.
3:46: Here’s Diego cutting into the dash. In addition to being thick, the Morel tweeters are quite wide and we had to remove some of the dash plastic so they would fit. For me this was actually the most nerve-wracking part of the build. One tiny slip and you could be dragging your router bit across the dash, scraping a window or cutting into a seat.Thankfully nothing like that happened. However, after cutting out the dash we realized there was a structural bar that ran right below where the tweeter sits making the area very shallow. Too shallow for the Morel tweeters…
3:51: What you see here is the creation of some acrylic ring spacers. After being covered in white leather they added a little more than 1/4 of an inch of depth and allowed the tweeters to seat into the dash. In my opinion this ended up being a kind of a happy accident because I really like the white leather accents on the dash.
4:07: The amp rack has base has been finished- the holes for the wiring are done and the top design is brewing.
4:13: This is the AudioControl knob and the installation became another fun adventure. After searching around for a good place to put it we finally decided it had to go on the center console. Diego upped the ante and ran the two LED lights (which indicate amplifier functions) into the console vents- a fantastically effective but subtle location.
4:32: This is a quick shot of a Photoshop mockup of the new speaker badges we were imagining on the car. After getting the design done in CAD we 3D printed a set of badges and opted to paint them for the time being. In stage two we’ll mill them out of titanium and do a bronze anodization to match the interior stitching. For now the 3D printed and painted badging looks just fine.
4:43: Here’s a look at the final wiring on the amplifier and crossovers.
4:55: The amplifier cover turned out great- a lot of thought and effort went into it. Some people might not realize that a lot of the shapes in the Aventador are hexagonal. The gas lid, intake grates, wheel design and even the ignition cover. The amp rack is sort of an homage to this design aesthetic. The rack itself is MDF with plexiglass underneath. The MDF is covered with Alcantara and the interior is lit with white LED lights.
5:24: After deliberating about the best way to have the covering seated in the front of the vehicle Diego opted for a pull strap (he did his own sewing on that strap!).
5:27: Overall we are very happy with how this project turned out. I really like the additional white accents on the dash. And looking into the frunk is a glorious treat.
______________________________________________________________________
I absolutely understand that for some people a vehicle stereo isn’t all that important. Most SVJ owners probably don’t spend a lot of time in their cars listening to music- they have a glorious V12 that they keep at 9000 RPMs. I like that too. Sometimes.
It’s hard to convey just how good this upgrade sounds by talking about it. Similarly it would be difficult to demonstrate fidelity by playing audio clips. Considering that we’re working with a 4 speaker system my personal opinion is that the outcome is incredible. The Morel and AudioControl components produce a level of clarity, detail, and richness that I seldom hear in any vehicle audio systems (the amount of bass that the mids deliver is impressive).
Phase 2 will be our effort to install a subwoofer and an additional sub amp and have those both be removable and installable in just a matter of minutes. There are some engineering details to figure out but I think that it will be a fun project! Additionally we will be doing one other fun (obnoxious?) upgrade but I won’t spoil the surprise just yet. Bravo Diego and Luxe. Thanks for letting me be a part of such a cool upgrade!