You Win Some, You Lose Some…

I did manage to get the clutch installed before the last race at Rocky Mountain Raceway (RMR). More on that in a bit. First, I’ll do a quick review of the clutch. As I mentioned the clutch I went with was the ACT T1S-G01 (BTW- I ordered it from AA Corvette and I can easily recommend them as a great source for parts).

After getting the clutch installed (another BTW- clutch installs on the Z06 models are a PITA!) I only had  a couple of days to break it in before th race so I drove the car a lot. I’d been warned to expect harsh engagement and a lot of noise from the clutch, owning to the fact that it’s a twin disc model. I found the engagement to be very smooth. In fact I can put the car in  gear and just slowly life my foot off the clutch and it and it rolls forward without so much as a shudder. No problem on that end.

Noise-wise there is a lot of chatter in lower gears (when the RPM range is sub 2K). Occasionally when the clutch is disengaged it will even sound like popcorn popping (I’ve got not better way to describe it). The sound goes away when the clutch pedal is depressed. My understanding is that this is normal. In any event, I can live with the noise so it’s not an issue (my stock clutch had almost as much chatter)

Performance-wise the T1S-G01 is a rock. The clutch grabs perfectly and my street tires spin out in 1st, 2nd and sometimes 3rd . In fact, I had no idea just how often my previous clutch was slipping until now. The stock Z06 clutch weighs in at 55 pounds (I popped in on a scale when we got it out). The T1S-G01 weighs in at only 39 lbs. That’s a difference of 16lbs of rotating mass! It took the car a couple of weeks to adjust (it was surging at stops pretty bad from the change).  The new clutch is rated up to 85o lbs of torque so it should last me awhile (I’m only sending about 670lbs to it so there’s still  room for a few upgrades). Overall I really like ACT T1S-G01 and would recommend it to anyone wondering who’s considering it.

And at the same time I decided to upgrade the sway bars in my car. I went with the PDAFT Z06 Light Rate Racing Sway Bars and so far I really like them.

 

The stock sway bars hit the turbo piping in the front of my car. The PFADT bars are adjustable and so we were able to make them fit better.  They still hit a little (when going over larger bumps) but it’s much better than before. Additionally the car’s handling is improved  it sticks to the road even better than before. Another upgrade that I’m very happy with.

But you can’t win them all. It was sway bars or slicks. Since it was the last race off the year at RMR I decided to skip the slicks and do the sway bars. (there were still months of driving left). The clutch wasn’t quite broken in, but I decided to go for it. I actually ended up near the front for my first run so the track was really fresh. I wasn’t completely comfortable with the clutch, but I was not prepared for the spinning. I launched and spun… and spun… and spun. I ended up running a 13.8 at about 117 mph. Ouch. I got a second run too which wasn’t much better. Next year I’ll be ready though. Slicks and some practice and I’ll bet I can hit the 11’s. Fingers crossed (again).


Posted November 06, 2010
Blog Migration. A Tale of Helplessness.

Control, people. It’s all about control. You know what I hate? The feeling of being powerless. Time to update Word press. Oh, but it’s installed on some crappy shared server with 2,500 other websites and my brother installed it for me and there’s actually no way to update it from the back end. Powerless. So, I took matters into my own hands. I got a dedicated server, learned how administrate it, learned how to install and maintain Word press and then migrated my blogs to the new server. Now I’m in control and I feel a little better. There’s one drawback: When things go wrong there’s no one to blame…

Baching It

4/30/2017 – This post is part of a large release of “DRAFT” entries. Many of these these entries were never finished (and may still not be) or were composed but never published for one reason or another. If you run across one of of these in a strange spot or out of chronological order that may be one reason.

Fran and the kids went to see her parents. That’s a big deal since they are in Reunion. That’s two eleven hour plane trips. When you travel that far you’re gone for a few weeks. And your husband gets to paaaarrrtyyyy! Alright, so I didn’t do that much partying, but I’ve gotten a lot done.

I eat when I get stressed. That’s how I cope (emotional eating). With the family gone, as much as I hate to say it, it knocks out a big chunk of my stress. It I can keep my stress under control then control my eating. 1600 calories a day (give or take a hundred) for over XXXX weeks now!   This is a fun little calorie calculator. It shows roughly the same thing I found out in a nurition class at BYU. Given my stats (m, 32, 280 lbs, 6’3″- that’s where I started) & being alsmot complety sedentary (10 resting, 10 very light & 2 light- I think I underestimated)  means that I burn a little more than 3500 calories a day.  Throw in one super workout every day (moderate cardio & weight training for a couple of hours) and you can burn another 400-500 calories. That means I run a calorie defecit of about 2400 a day. The result is weight loss.

So how has 1600 calories a day been? Honestly, not too bad. The trick is, of course, to eat the right things. You can’t feel hungry. I cut out nearly all candy (I find that gum & a piece of hard candy can really help, but things like peanut butter cups, Twix, donughts and the like just don’t work). No sugar soda. I try to eat three small means and then have snacks in between (fruit, nuts, juice, etc).  You have to make sure that you still give you body what it needs though- fiber, sugars, protein, etc. You can’t just drink apple juice the whole time (well, you can- but it won’t end well). I can still eat at In-n-Out: two Protein Style cheesburgers with a total of 680 calories. I’m eating like a king and losing weight!

The best part- I can run a mile in X minutes now instead of 13 (took me a little over a month to get there, but it happens).

For Mother’s Day I put up Fran’s laundy room cabinet! I also installed a new stereo in her mini van! She wanted a way to listed to her iPhone while on the road. Now she’s got it.

What’s that? Why yes, I do have over 700 wheel horsepower! Thank you for noticing.

My car had been getting really crankey (idling issue, suring problems, boost pressue malfunctions) and driving it was kind of a downer. I had finally gotten the wideband (esential if you’re going to try to tune the car) installed so I took it over to the fine folks at STS (Squire Turbo Systems) in Orem. Marc M. was kind enough to be an HP Tuner expert. He fixed the wastegate reference hoses, upgraded the car’s OS, switched to a 2-bar system, and reworked the tune. And since the car was there I had them put in a methanol system. Normally the car runs six pounds of boost but when the methanol is on it boosts to 8 pounds (courtesy of an electronic boost controller) and this is what creates the whopping 700 whp and 680 pound of torque (easily a “10 second car“).  Marc did a great job with the tune and if anyone in Utah has an a Chevy that needs a tune he’s your man. The car drives like a dream now and the power on tap is unreal. Now it just needs to make it through the summer!

Race / Clutch

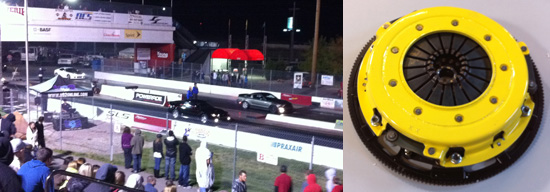
I went to Rocky Mountain Raceway last Friday to watch some friends race in the midnight drags. I’m hoping I can go next week, but I have a problem. My old clutch was slipping so I ordered this beautiful yellow thing (ACT T1S-G01 twin disk clutch rated to 850 lbs of torque! Plus it’s lighter that the stock assembly) but I have to get it installed and broken in by next Friday. The clock is ticking…


Originally Posted September 12, 2010

The Sound of Music

I’m sure everyone is sick of hearing about my car projects. So here’s another one! In past posts I have mentioned various stereo upgrade projects (head unit, amps, sub). But the stereo wasn’t complete…until now. I finally replaced my stock speakers (mids & tweeters). Overall, I am extremely happy with the cumulative results.

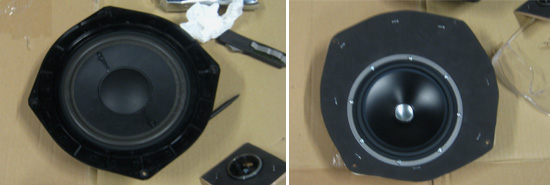
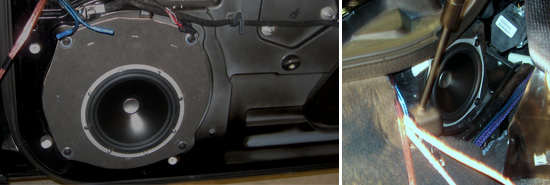
I picked JL Audio ZR-series component speakers (ZR-650CSI for the front and ZR-525CSI for the back) based on reviews I’d read and because I have liked my JL Audio sub so much (the ZR series speakers produce very clear and accurate sounds). The original speakers in the C6 are these monstrous 10″ paper things. Nasty. I had to make adapters to fit the JL Audio 6.5″ set. I used 1/4″ oak ply covered with foam. Same thing for the tweeters.

The speaker install was pretty painless. The hardest thing would have been running new speaker wire but Sound Warehouse had done that last year. Getting body panels off can be tricky, but the C6 Vettes are pretty straight forward.

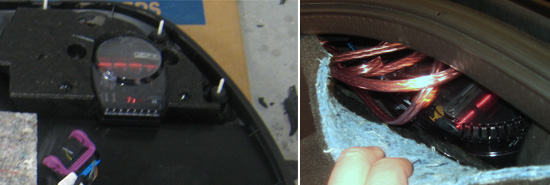
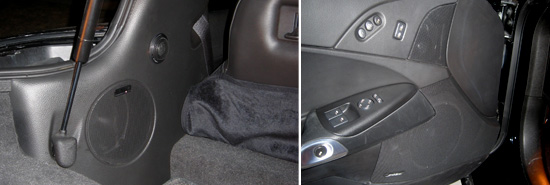
I decided to put the front crossovers in the doors. Instructions will tell you never to  put them inside the door, but there’s a right way to do it.  I mounted them in the side impact foam- they are perfectly safe from water and dirt.  I mounted the rear crossovers behind a carpeted body panel in the trunk section- safe and accessible

With the panels back on everything looks great. I mounted a component set in the back as well. Jim helped me tweak the setting on the amps and crossovers. We pumped out some Enya and tingled. When your stereo makes you tingle you have a winner.

Below is the total rundown of my project. The labor time listed includes fabricating parts, carpeting, installation & testing/tuning. I’m not going to discuss price, but you’ve got everything you need if you really want to know. The bottom line is that I’m thrilled and I feel like it was worth the time and money I put into it. The stereo is finished. Now it’s time for the engine. Maybe. Probably. Yes, definitely. Getting close…

Pioneer Avic Z1 head unit with the Sirus/XM radio, blue tooth and iPod modules (install by Sound Warehouse).

JL Audio ZR component speakers: 650CSI in front and 52sCSI in back  (custom front speaker plates & install by me, 12 hours).

Kenwood XR-4s amp  for the mids & tweeters and Kenwood XR-1S amp for the sub woofer (custom amp rack by Justin & me and install by me, 8 hours).

JL Audio W6 10″ sub (custom sub box by Justin & me and install by me, 7 hours).

PAC Steering wheel control interface (install by Jim & me, 1 hour)

Wiring for head unit (RCA cables from Lightning Audio), subs, and speakers by Sound Warehouse


Originally Posted March 21, 2010

Yet More Car Stuff

It’s true. You’ve heard right! I have done more stuff to my car. No one cares and I get that. But I care. It’s fun for me to post these little enhancements on my blog. And you never know- they might actually help someone who’s putting in the same stuff. If you decide to read this, fine. But I’ll just be upfront: this will probably be very boring and mildly technical. And naturally I’ll give you the “these pictures don’t do the mods justice” disclaimer. They are puzzle pieces of a much larger picture.  Once the puzzle is done I’ll wow you with some full body shots. Yeah, you can’t wait. I know.

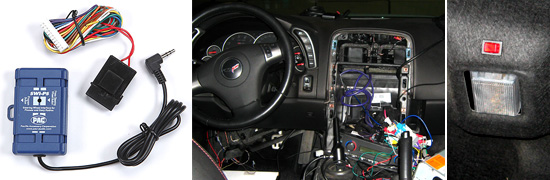
Guess what I have on my steering wheel? Anyone? Stereo controls. It’s been bugging me for a year: steering wheel stereo controls that don’t control my stereo. But it’s okay now. I’ve remedied the situation with the PAC SWI-PS steering wheel control Pioneer stereo interface.

My Pioneer Avic Z-1 was ecstatic (”For me? Really? Oh wow. I don’t know what to say!”).  All I had to do was wire the PAC unit in and control away! After I got the car’s center console removed I had second thoughts (deja vu, right?).  After attending several years of trade school to become an electrician I began the project. First off,  I just want to say that I found the instructions for the PAC system unnecessarily confusing. They provide three different sheets of instructions (programming info, stereo harness diagrams, and car / PAC interface / version info). If you’re going to install this little guy just use the online instructions.

I got the PAC unit wired into the car’s original stereo harness just fine but I had a heckuva time finding a 12 volt power source that was tied to the ignition system. Jim to the rescue! Jim’s knowledge of electrical systems surprised me (and possibly him too) and he proved an exceptional ally as we waged war against the mess inside my car. We found a suitable 12 volt source and a ground and had the PAC interface working in nearly no time. The Z06 steering wheel has a  larger “1-6″ button that the PAC really doesn’t accommodate. I’d recommend mapping the “mute” function to it (a very handy function).

After all the excitement with my stereo I decided to take a break and tackle an easy problem.  When you work on a car sometimes you need the hood up (to pull a fuse, run a wire, charge the battery, etc). The Z06 hood has a small light that comes on when it’s open. The light never goes off.  I used to pull out the bulb, but then I had to put it back in. Out, in, out, in. What a nightmare.  I decided to put in a switch. Now when the hood is up and I don’t need the light I just switch it off. Best thing ever.

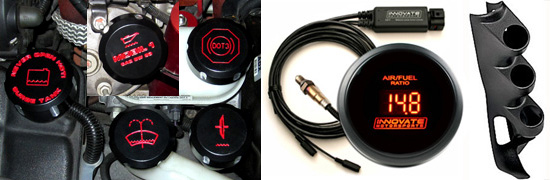
Well, except for black anodized custom painted aluminum engine caps…  I’m trying to get a black/red color scheme going for the engine. I bought these black aluminum caps and then painted the vehicle markings on them myself. They actually turned out really well.  Vanessa loves them. Remember, Vanessa is the car. Who’s crazy?

Anyway, it was finally time for a wideband. In a nutshell a wideband is a sensor that will tell you the air/fuel (A/F) ratio of the exhaust. With that information you can determine if your car has too much or not enough fuel. I bought HP Tuners awhile back and now I’ll be able to [more] safely use it.

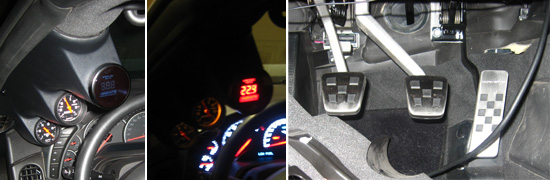
The wideband installation was a job. I purchased an Innovate Motorsports LC-1 kit (which so far I would recommend). It comes with a gauge to display the A/F ratio. Cool! But that meant that I had to switch out my two gauge pillar (which has fuel and boost pressure gauges) with a three gauge pillar. No sweat, right? Advice: When switching out gauge pillars don’t try to make anchor pin holes in the same spot as the old gauge pillar. Just pull out the pillar trim, drill new holes, wire everything up, attach the gauge pillar back to the trim and put it back in.

Getting under my car is tricky so I took my her to Vince (of Lung Automotive). I had him weld in a sensor bung and then run the LC-1 control module. He poked the leads out through the shift boot which seems to work really well. Thanks Vince! And once again Jim came to the rescue and assisted me with the wiring portion of the project. Advice: The instruction manual for the LC-1 notes that there are two wires which have to be soldered together. It’s not kidding. Crimping won’t work. You have to solder them. Jim proved to be an adept soldering iron handler as well. It would have been difficult to achieve such exceptional result without his help. Thanks again Jim!

The gauge itself is pretty basic (I might upgrade to the XD-16 if the wideband proves to be useful). It’s a bit bright  and the constant flickering as the A/F changes seems like it’s going to get annoying. Maybe the gauge will need a switch like my hood light! I know a guy…

And finally I decided that I’d upgrade my pedals. In retrospect I don’t really know why. The clutch and brake portions of the upgrade are just cosmetic overlays, but the whole accelerator is new. Advice: Don’t try and unhook the wiring harness on the accelerator without being able to see what you’re doing. You should be able to get both of the bolts (13mm btw) out and remove the pedal with the harness still intact. Then you can pull the pedal out and see how to unhook things. It’s a super tricky harness (with good cause).

And finally, it was time to say good by to Mr. AcDelco. That’s my old battery. It served me poorly for the last year before finally giving up the ghost this past winter. It’s actually very difficult to find the correct battery replacement for a 2007 Corvette z06. In fact I couldn’t. I ended up getting a DuraLast with similar specs (same cold crank amps- very important). Justin helped me purchase and install the battery. The battery is located in a compartment in my trunk and I have my amp rack and speaker wires sitting on top of it. Advice: If you have you battery inside the car like I do and you end up getting a replacement that’s not quite the same as the original remember to make sure the new battery is vented.

Well that blog post was almost as much work as actually doing the car mods. Next up, I’m going to finish my stereo and then start working on my new engine (LSX block). 1000WHP ready or not, here I come.


Originally Posted March 21, 2010

Locked Out? But That’s Impossible!

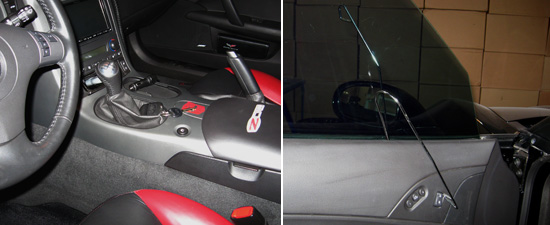
I got locked out of my car about a month ago. That may not seem like a big deal, but it is. When my key fob  is near the car door it automatically unlocks (and when I walk away it locks- very nice).  The car will only start with the key fob in the cabin and if you forget the fob when you get out and close the door the car reminds you to grab them (serious). So, with the fob in the car, and the door closed it shouldn’t be a big deal. Except that this one time my car decided the fob wasn’t there and locked the doors with the keys inside (the left is a picture of where the keys were). Technology is cool, but it can really hurt a guy.

I had a hot date (with my wife) and I really needed the car that night. I called Onstar.  “Sir, you could be anyone. I can’t open the car for you.” “I just need you to fax over your registration. It’s in the car? One moment, let me see what I can do.” “Click.” I was frustrated, but in retrospect it’s obvious they couldn’t help me. I did the only think I could think of…

We sell lock pick kits, so I busted one out. One of the coolest gadgets is a device that slides down under the window and pops up in the cabin. Once it’s inside you can hit the lock buttons. The second picture shows what I mean- half outside, half inside, button pressed. I was absolutely shocked at how easy it was to get inside my car. It might have taken five minutes. No alarm, no snags, no damage. Once I learn how to hot wire vehicles I’ll be on my way to grand theft auto academy.


Originally Posted December 12, 2009

September 2009

A couple weeks back Jim, Justin and I hit the Rocky Mountain Raceway for some midnight drags. Anyone who hasn’t gone should check it out- $5 to go watch people dual it out in the quarter mile. And a mighty dual it was. Corvette vs. Corvette vs. Camaro I  ran a 12.1 at 131mph, Jim ran a 12.2 at 121 and Justin ran a 12.3 at 117mph! It was a super close race between Jim and I- he had me until about 90mph. You can check out one of our races and some pictures on Jim & Cindy’s blog. We were all hoping for 11 second runs, but we’ll have to get a little faster. 

 Speaking of a little faster… That’s what I plan to be shortly. I recently picked up a copy of HP Tuners. This nifty little software package gives the user control over every aspect of the car’s engine computer (yes, this can be very dangerous) . I need to pick up a few more things before I’m ready to start seriously tweaking, but I predict a predict a lot of fun… or tears. 


Originally Posted September 28, 2009