Porsche 2018 Photo & Video Shoot

I do a lot of cosmetic stuff to my car and so periodically it makes sense (to me) to grab a few pictures of these changes. Since I fancy myself an budding car photographer I took on this mission personally (and no… this is not my iPhone camera). I figure posting six pictures of my car should be plenty since I also cobbled together a video montage. I’m certain this kind of obsessiveness will delight whoever ends up with my car someday. In the meantime I’m slightly less sure it will delight the Internet.

Plain in many ways, but beautiful…

That backside. Nothing better.

She waits patiently. But when we get underway she’s a monster.

When something is this pure the gossip is hard to come by. [Huh? What does this stuff even mean – Ed]

Some say no one “needs” a car like this. They are exactly right.

Black wasn’t my first choice when I got the car. But it’s my first choice now.

I can’t help but sing the praises of this car just a bit. In many ways it’s a nondescript monster. The handling, power and precision are unmatched. It’s the only car I’ve owned that hasn’t left me disappointed (yet). I think it’s okay to splurge on one thing. This is my thing and it’s worth every penny.

Want to hire me to take pictures of your car or put together a fun little video? That would surprise me. That being said, feel free to drop me a line if you’re in Utah.


Skip the Skip Shift

The last few Corvette generations contain the very annoying “ship shift” technology (CAGS- Computer Aided Gear Selection). Under certain -usually relaxed- conditions the driver is compelled to shift from 1st gear to 4th gear. In addition to irritating the driver this action allegedly increases fuel economy. Love for the earth aside, this is just not how civilized people shift.

Luckily the skip shift is easily defeated-  you simply need a “skip shift eliminator.” These can readily be purchased online for between $15 – $20. You can do the installation yourself- all you need is a safe way to get under your car, minimal skill and an impassioned hatred for the “system.”

skip-shift-eliminator-installation-install-c7-z06-2015

The first pic shows what a skip shift eliminator looks like including both plug ends. Following are the install instructions on a 2015 Z06.

1A – Cut off the zip tie.
1B – Push the cover off of the skip shift plug on the transmission.
2A – The skip shift harness exposed. Make sure you find the right one!
3A – Unplug the harness. There is a tab you need to lift up and the the harness unplugs.
4A – Plug the skip shift eliminator into both ends of the old plugs.
5A – Use a new zip tie to secure the wires back to the car’s frame.
5B – Fold the new harness together and then you can slip the cover back into place.

Take your modified car for a spin (hint: if you can’t shift into reverse you tapped into the wrong plug). No matter the driving conditions you should now be able to shift from 1st gear to 2nd gear with no impedance. Happy driving!

ZR1 Spoiler Install

After more than five months I decided it was finally time to put on my ZR1 Spoiler.

I bought the spoiler on eBay back in June. I had the OEM part on my watchlist and one day it went on sale so I snagged it. When the item was relisted it was about a hundred bucks more. I love a good deal. But all good deals have a secret cost. I had to wait for over a month to get the spoiler and it when it finally arrived the paint wasn’t as nice as I’d hoped. But my car’s not perfect, so I decided I could live with it. See? I’m not the snob you thought I was.

At first I had no idea how to go about putting the spoiler on the car. Luckily YouTube provided me with an excellent tutorial (which I have shared below). Here’s how you do it: Pop out the tail lights (Torx, don’t remember the size though). Reach in and unscrew the four bolts from the stock spoiler. Don’t drop anything in there- you’ll have a heck of a time getting it out. Put paint on the six outer  ZR1 spoiler bolts and then press the spoiler into place.

The paint markings will show you where to drill. I did this several times and double checked the symmetry with a tape measure. Drilling into the body is not a good feeling, but take courage knowing that they will soon be covered up. Swap the third brake light into the new spoiler, fit the spoiler into place and then tighten the bolts (not too much). Put your rear lights back in and Voila!

I spent a good deal of time adjusting the brake light and getting the fit just right. I keep reading about “thirty minute” installs. Not me- I spent at least an hour on this. When I was done I polished the back of the car up a bit and I think the ZR1 spoiler, despite some small paint imperfections, looks awesome. I’d recommend this modification to anyone.

Here is the install video I watched:

Replacing the Corvette Clutch Pedal Return Spring

The other night I was getting gas and decided to shake out my floor mats. As I pulled driver side mat out of the car I noticed part of a coil spring was nestled comfortably near the back. I drove back home, pulled out a flashlight and discovered the clutch pedal return spring had snapped. I pulled the remaining portion of spring out (super easy if your spring has snapped: just push the center portion of the spring over the groove on the back of the clutch pedal and twist it out). A quick Google search revealed this was a pretty common occurrence.

I have no idea when my spring broke. I don’t recall noticing a change in the feel of my clutch pedal but I have noticed that shifting gears is sometimes tricky (I chalked this up to the new ACT clutch).  My guess is that the spring has been broken for a year or more.  A lot of people seemed to advocate swapping out the C6 spring with a C5 spring or leaving the spring out altogether. I’m all for innovation, but I decided to just replace the spring with the original part (10376347 for anyone curious).

Installation is super simple (with some help). First you need to put the ends of the spring into the two white bushings (above). You can put one end in first and then compress the spring and put the other end in (make sure you have the spring facing the right direction). Now you need to press the pedal all the way down (this is a where it’s nice to have a friend). With your hand behind the clutch push the U shaped portion of the spring over the catch groove on the back of the clutch pedal (lift and pull it toward you- it will slide up, over and in with very little effort).

That’s it- your new spring is in (I borrowed the picture above-right  from The Clevite Kid on CorvetteForum.com – great clean pic of the installed C6 spring).  Remember to grease your new spring! I drove the car around for a bit to see how it felt. There is a definite difference in the feel. With the spring the compression takes less effort. I almost want to say it’s spongy, but that seems negative and there’s nothing bad about the clutch feel, per se. People seemed to complain about uneven tension, but I didn’t notice anything like that. Overall I think it’s an improvement from no spring.


Posted by Cam, March 26, 2012

A Bright Idea (How to Change Your Accent LED)

I saw this mod mentioned on CorvetteForum.com and it looked like a fun project. I actually had no idea there was an accent LED!  The light is located on the clip that holds in the passenger sun visor (it’s a super dim orange bulb). Taking off the visor clip is cake. Just use a Torx 15 on the screw and carefully pull out the harness.

Now the fun part: Pick out your new accent LED. You’ll need a 5mm sized LED. You can find these at Radio Shack or online from websites like SuperBrightLEDs.com. LED color choices are plentiful and the accent light can be as dim or as bright a you want. Light output is measured in mcd’s (millacandelas). The more mcd’s your LED has the brighter it will be. For reference I used a red 3000mcd LED from Radio Shack. The bulb simply pops right of the plastic harness. Just cut the contacts on your new LED and pop it right in.

The voltage going into the accent LED (from the car) is about 7.6 volts. Depending on what LED you pick you may need to replace the resistor. You can find online calculators (such as www.led.linear1.org/1led.wiz) to help you figure out which resistor to buy. If you decide to use a new resistor simply snip out the old one and solder the new one in its place. I used a 220 Ohm resistor with my LED. One you make the mods just put your LED harness back in and try it out. If it’s too dim or too bright you can try different bulbs until you find just what you’re looking for.

And here is the finished result. My goal was to produce a good amount of red light to illuminate my center console. Overall I’m really pleased. I just put in some Autometer ES series gauges and this is a great way to balance the the red interior lightning. Even though the light is fairly bright it’s not distracting at all. Other people have done blue but I haven’t seen any other pics of red yet. This is the cheapest ($3), fastest (10 min) and proportionally satisfying (9/10) mod yet!

This might be my last post for a bit- we just had a beautiful baby girl and the holidays are coming (I’m in retail and this means way more work). Time will probably be in short supply for the next few months.


Posted by Cam, October 20, 2011

This project was originally suggested by DSteck over at CorvetteForums.com. He posted a great tutorial about how to swap your C6 Corvette accent LED. I used a couple of his pictures here in my blog post (with his permission). The source post has some interesting info that’s not included here so it’s worth a look.

Autometer ES Gauges (How to Install C6 Corvette Gauges)

Once you start down the road of car customization there is no end. There’s always one more accessory, another change, and a quick tweak that turns into a major project. “I’m going to replace my gauge pod… and my gauges… and I guess my whole A-pillar trim and hell, I may as well pull the steeling column panels out and rewire everything since it wasn’t quite right before.” So that’s what I did.

I decided I was sick of the incandescent edge lit Autometer Z-series gauges in my car (and even more sick of the fact that they are wired in such a way that they are always lit).  I really liked the look of the red LED backlit Autometer ES series gauges and so I picked up the fuel pressure and boost models. I think the lettering font on the ES gauges looks much better too and I like the fact that the letters are white when they aren’t lit. The ES gauges also go really well with my Innovate AF gauge.

A Few Installation Notes

My gauge pod was in bad shape from being pulled off several times (warping,  misaligned panel fasteners, extra holes) so I decided to get a new one.  I recommend Speedhut for gauge pods for the C6 Corvettes (both 2 and 3 gauge). They pods are inexpensive, good quality and Speedhut offered fast free shipping. No issues. The extra lights and switch on my pod are for the methanol kit, btw.

If you’re putting in your gauges from scratch then there’s a great document from A&A Corvette Performance: C6 boost and fuel gauge installation  on the A-pillar (as a side note: I got my last clutch from A&A Corvette and they were great). I didn’t have to run the wiring for the fuel pressure or boost gauges this time (I used the old wiring harness & tubing), but I did end up taking off the paneling below the steering wheel to tweak the wiring and I have a few things to add to the A&A instructions.

When you pull off the paneling it’s important to note that the bottom panel (below the steeling wheel) actually has a bracket that the dash panel clips into. You need to pull the dash panel out a bit to remove the lower one (left picture). Then just for reference this is what you should see minus the red & purple wires on mine (right picture).

I don’t see a need to remove the ignition button as mentioned in the A&A doc. But you will need to remove the small microphone (left picture).  There’s no harness for this part and the best way I could think to remove it was to use a Torx 10, a socket wrench and and hex head adapter. This will give you the angle you need to unscrews the microphone (you could just prop the panel up on something and not actually take it off but it is more convenient if you remove it).

The dimmer harness is easily accessible from under the dash (it’s right behind the dimmer switch). I don’t think it’s even necessary to pull the harness out. I spliced into the wire and used a T crimp clamp to run power to my gauges (just the power for the backlighting). It is really nice to have the lightning in the gauges functioning with the headlights in the car (I also wired in my wideband gauge to that it dims at night).

Like I said, I didn’t do any of the hard stuff this time around, but I wanted to add a couple of suggestions and pictures from the work that I did do. So there you have it- my pod and gauge swap. And it’s just like the saying goes, “Gauges make the man.” Or something like that.


Posted by Cam Hughes, October 17, 2011

Sticker & Emblem Insanity Post Update

B&M Sport Shifter (How to Change Your Shifter)

I decided upgrade my shifter, shift boot and shift knob.  For the shifter I decided to go with a B&M 45044 precision sport shifter. The shift boot & knob are OEM two tone cobalt red & ebony.

First things first. If you decide to swap out your stock shifter here are the tools you’ll need:  3/8 &  7/16 hex head socket bits & T-25 torx bit. You’ll also need drivers for the hex and Torx bits as well as a pair of pliers. Optional but also recommend: some high density flame retardant foam and pair of scissors.

Shift knobs come and go. The stock shift knob has a great feel, but I felt like the throw was too long and didn’t particularly care for the color on the gear pictograph. I swapped to a ball knob last year -which has the effect of lowering the shift knob thus reducing the throw- and I liked that okay, but when I saw the red & black boot and shift knob I knew it was time to swap again. One one little issue: the new knob was for a 2008+ Vette and I have a 2007.

I have actually had a B&M short shifter for a year or so, I just never bothered to put it in since it wasn’t compatible with my ball knob. I had originally considered the B&M shifter and a Hurst shifter, but chose the B&M model because it seemed to have a better design (more closely resembling the stock Z06 shifter).

In any event, I was determined to get the OEM 2008 red & black knob onto my B&M shifter… B&M makes a 2008+ shifter model but no one was able to tell me if the shifter itself was compatible with my 2007 Vette (the transmission was changed on the 2008 Vette so it’s possible the shifters would be incompatible). I did the only thing I could think of- I bought the 2008 B&M shifter and swapped the shafts. Now I have a B&M shifter that I know will fit a 2007 Corvette and will take a 2008 shift knob (visually there did appear to be a slight difference between the two shifters).

Swapping out the shift boot is cake. It’s easiest if you remove the Corvette center console (which you have to do anyway to swap shifters). The leather boot is attached to a plastic ring with tabs. From underneath you just pop out the tabs from the console. Then pop in your new shift boot. Oh two tone shift boot, how did I live without you?

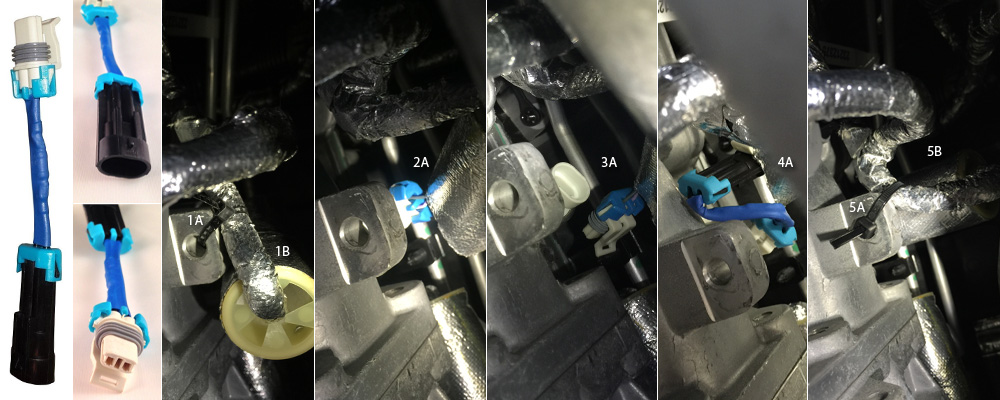
Swapping out shifters is also pretty painless. Once the console if off it should only take about 10 minutes. Just pull off the yellow rubber cover and unscrew the four bolts (3/8) and move aside the black rubber seal (your car isn’t going to have the wires coming out from the transmission- these are for my wideband). Next remove the 4 screws that hold down the stock shifter (3/8).

The stock shifter just pulls right out (put the car in neutral while you make the swap). You need to take the black plastic cap off the stock shifter (pliers) and then pop it on the B&M. Next bolt down (7/16) the B&M where the old shifter was (I left the stock gasket) and put your black seal back on. There are a number of other steps you might need to take if you’re working with a C5 Vette but they are documented in the instructions. Shift through your gears to make sure things are working okay. Since the B&M doesn’t seal quite as well as the stock shifter I used foam to make a sound dampener.

Make sure everything is nice and tight, shifts well and is put back together correctly. Then you can reassemble your console and admire your work [One side note that I didn’t document with any pics- the shifter screw included with the B&M kit is a T-25 and the head was so large I had to grind it down a ton get it to fit over the boot collar]. Personally I love how the new shift boot & knob match the seats and door handle wraps.

B&M 45044 precision sport shifter (Corvette) Review

Now that I’ve used the shifter for a few days I have to say that I’m pretty impressed. The shifts with the B&M are short and crisp. The shifter centers tightly making it much easier to get into third gear, as well. It takes a little more effort to move through the gears but the shorter throw makes up for this hands down. In fact, there’s almost something appealing about the extra force that’s required (especially when using an OEM shift knob). There’s no extra noise from the B&M and vibrations are about on par with my old stock shifter (in other words, very minimal). The stock Z06 shifter is very easy to move, but it always felt spongy and it was too easy to miss-shift. The B&M has and does everything I felt was missing and really makes the car more fun to drive. I would recommend the 45044 to anyone who’s considering it.


Posted by Cam, September 24, 2011

Wax On, Wax Off (How to Prepare & Wax Your Car)

The other day I decided to really clean my car’s exterior. I gave it a quick wash and did a thorough inspection of the body to look for scratches, bonded containments and stains. There were actually quite a few, so I decided to make a quick pit stop at AutoZone. I generally use supplies from a company called Meguiar’s and overall I’m really pleased with their cleaning products (no one has paid me to say this- I wish!). Here’s what I used for my project:

1. Meguiar’s Smooth Surface Clay
2. Meguiar’s Quick Detailer spray
3. Meguiar’s Scratch X 

4. Meguiar’s Ultimate Liquid Wax
5. Lots of microfiber towels! You can use cotton terry cloth if you want too, but I don’t care for it personally.
The last picture in the sequence below is actually a reflection. I took the picture with my iPhone pointed and the car to show the finished results. Just for the sake of science I also took pictures in the reflection of my freshly waxed black truck (very little prep work and a different wax though).  No comparison; the rich glossiness of my Vette is unreal.

For the car wash I just go to the local Pay ‘n Spray (that’s not what it’s actually called) and I use their water & soap. I don’t feel like I need to spend big bucks to spray off the road dirt. After the rinse I toweled  off my car and got to work.

I scoured the car for light scratches, stains (bird poop is nasty stuff- it can leave residue that will not wash off), and scuffing. Scratch-X is perfect for this kind of light damage. Just put a bit on the affected spot and buff away.

After the Scratch-X I moved on to the clay. You need to make sure the area you’re working on is lightly lubricated. I sprayed on some Quick Detailer and then rubbed the clay over the misted areas. Clay is cool stuff- it will actually pull out any little particles that have bonded to your car (the stuff that washing won’t get rid of). People may not realize it, but the surface of your car should be perfectly smooth to the touch. If there are any tiny little bumps or any kind of grittiness to your finish the clay will remove them.

After the clay it was time to wax. I like to wax my car by hand and listed to music- I find it very therapeutic.  This was my first time using liquid wax and I thought it was pretty convenient and it applied easily. What I really like about Ultimate Liquid Wax is that it rubs on nearly clear (in other words, it didn’t leave that yellow goo in the cracks of my car). When I went to polish off the wax I got a shock- it took a lot of extra effort beyond what I’m used to. I had to buff it hard in order to get maximum consistency and gloss. Taking it off was more work than putting it on!

But the finished results were well worth it. Proper preparation is essential to achieve the best results.  I don’t think I’ve ever seen my car look this good. But now I have to detail the wheels, engine bay and interior! It must be love.


Posted by Cam, September 10, 2011