What can I say? I love cars (and trucks). This section of my blog contains all the posts about my favorite hobby.
If you want to view posts by vehicle just click on the link below to visit Cam’s Car Index
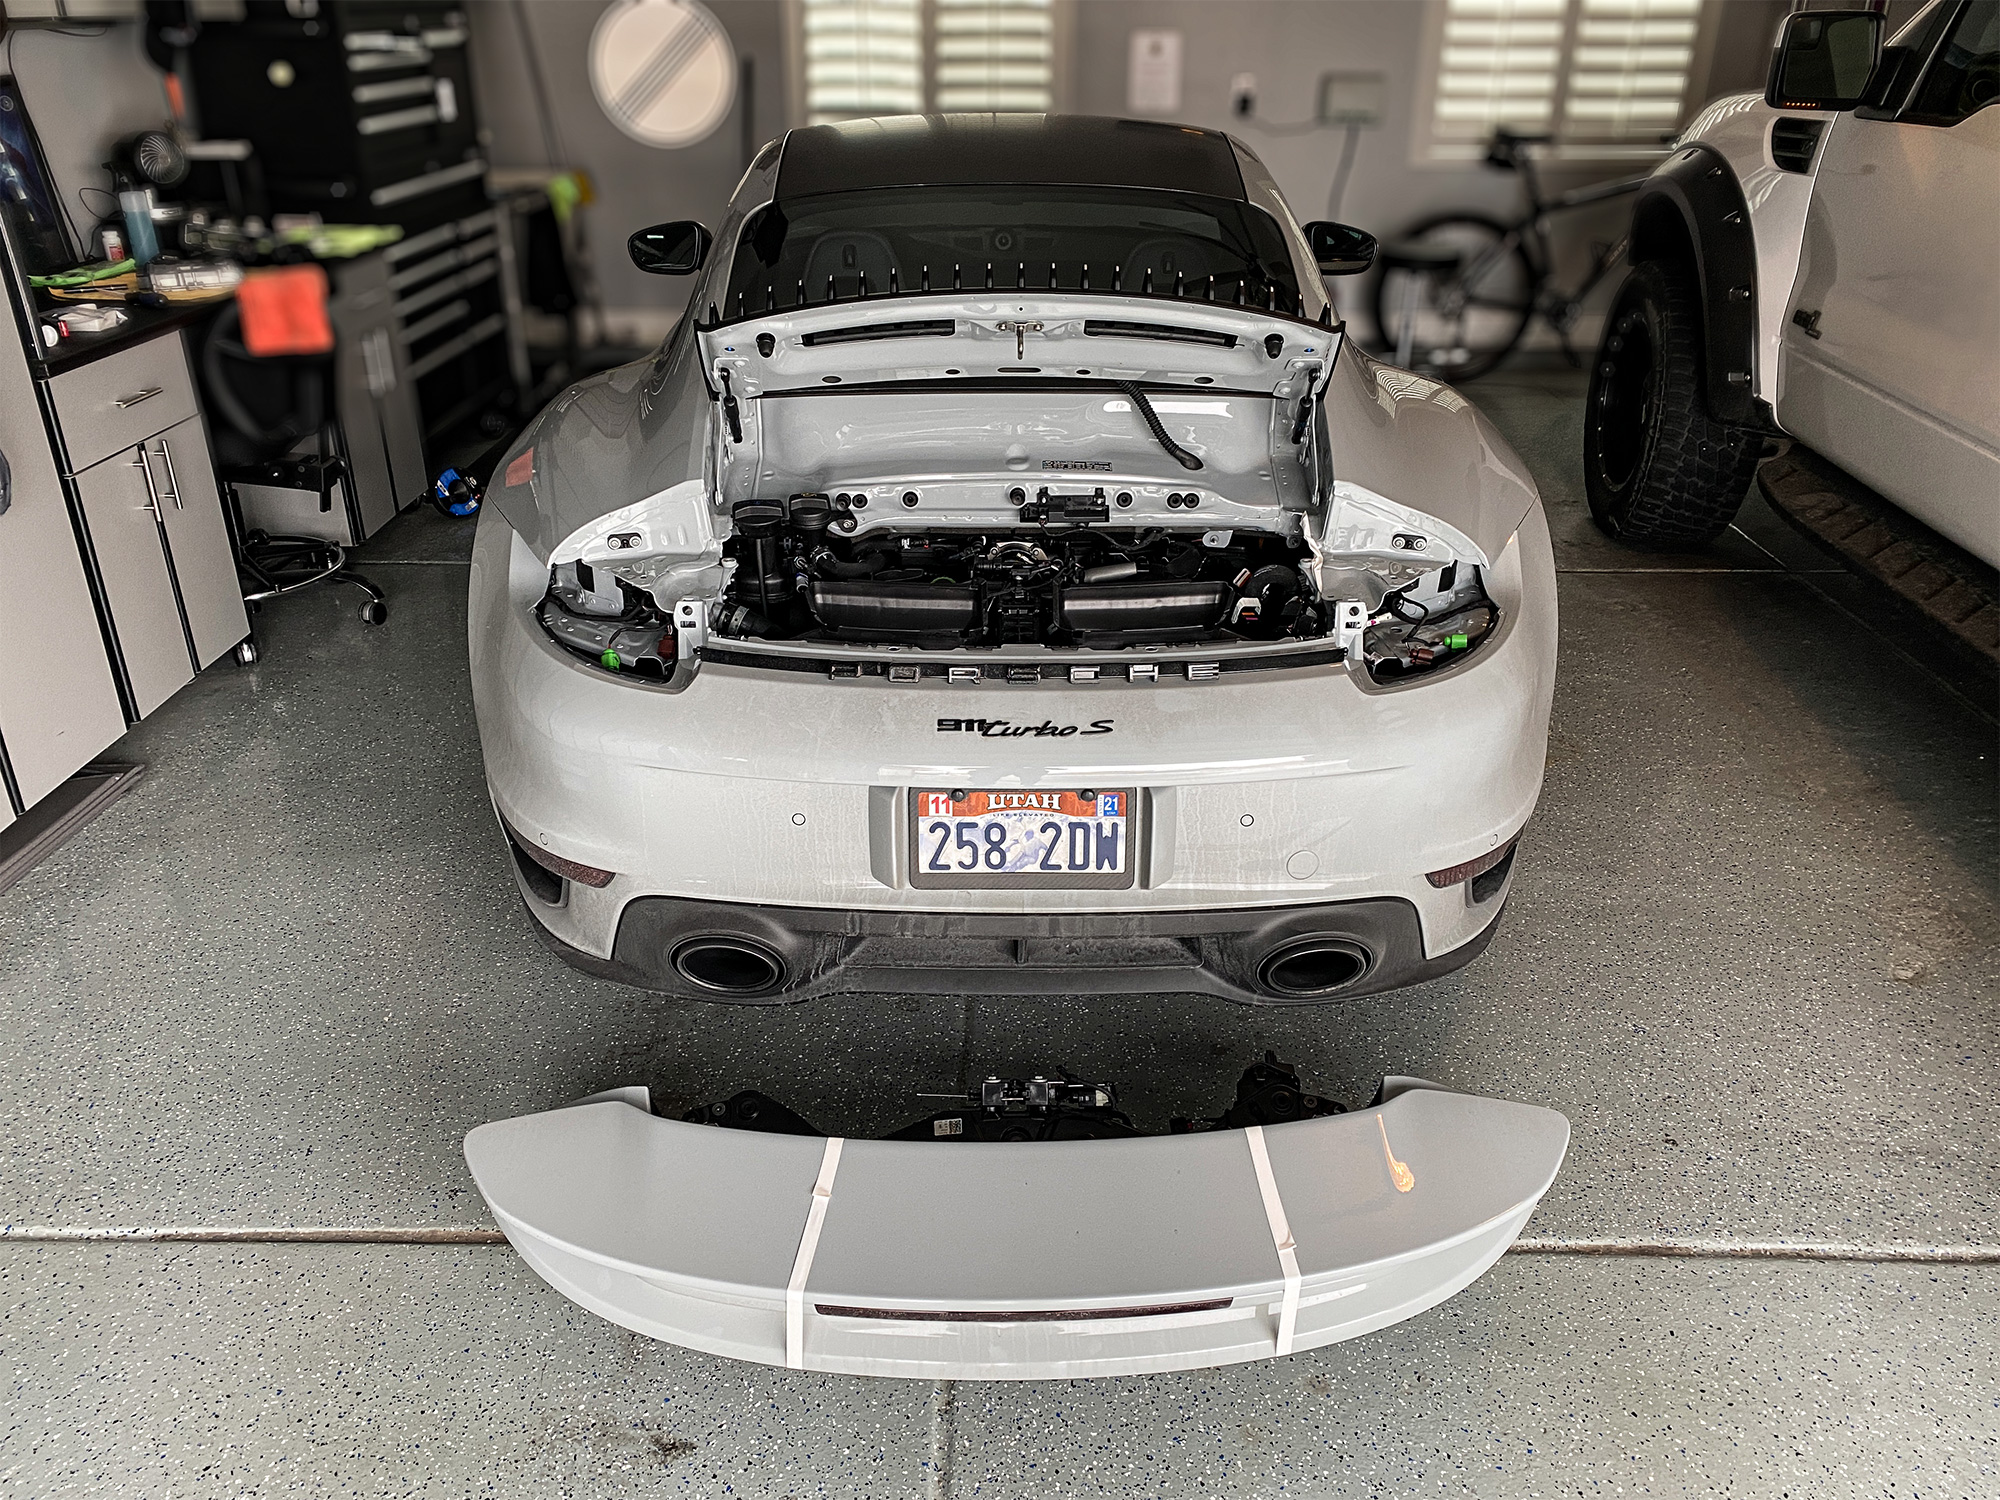
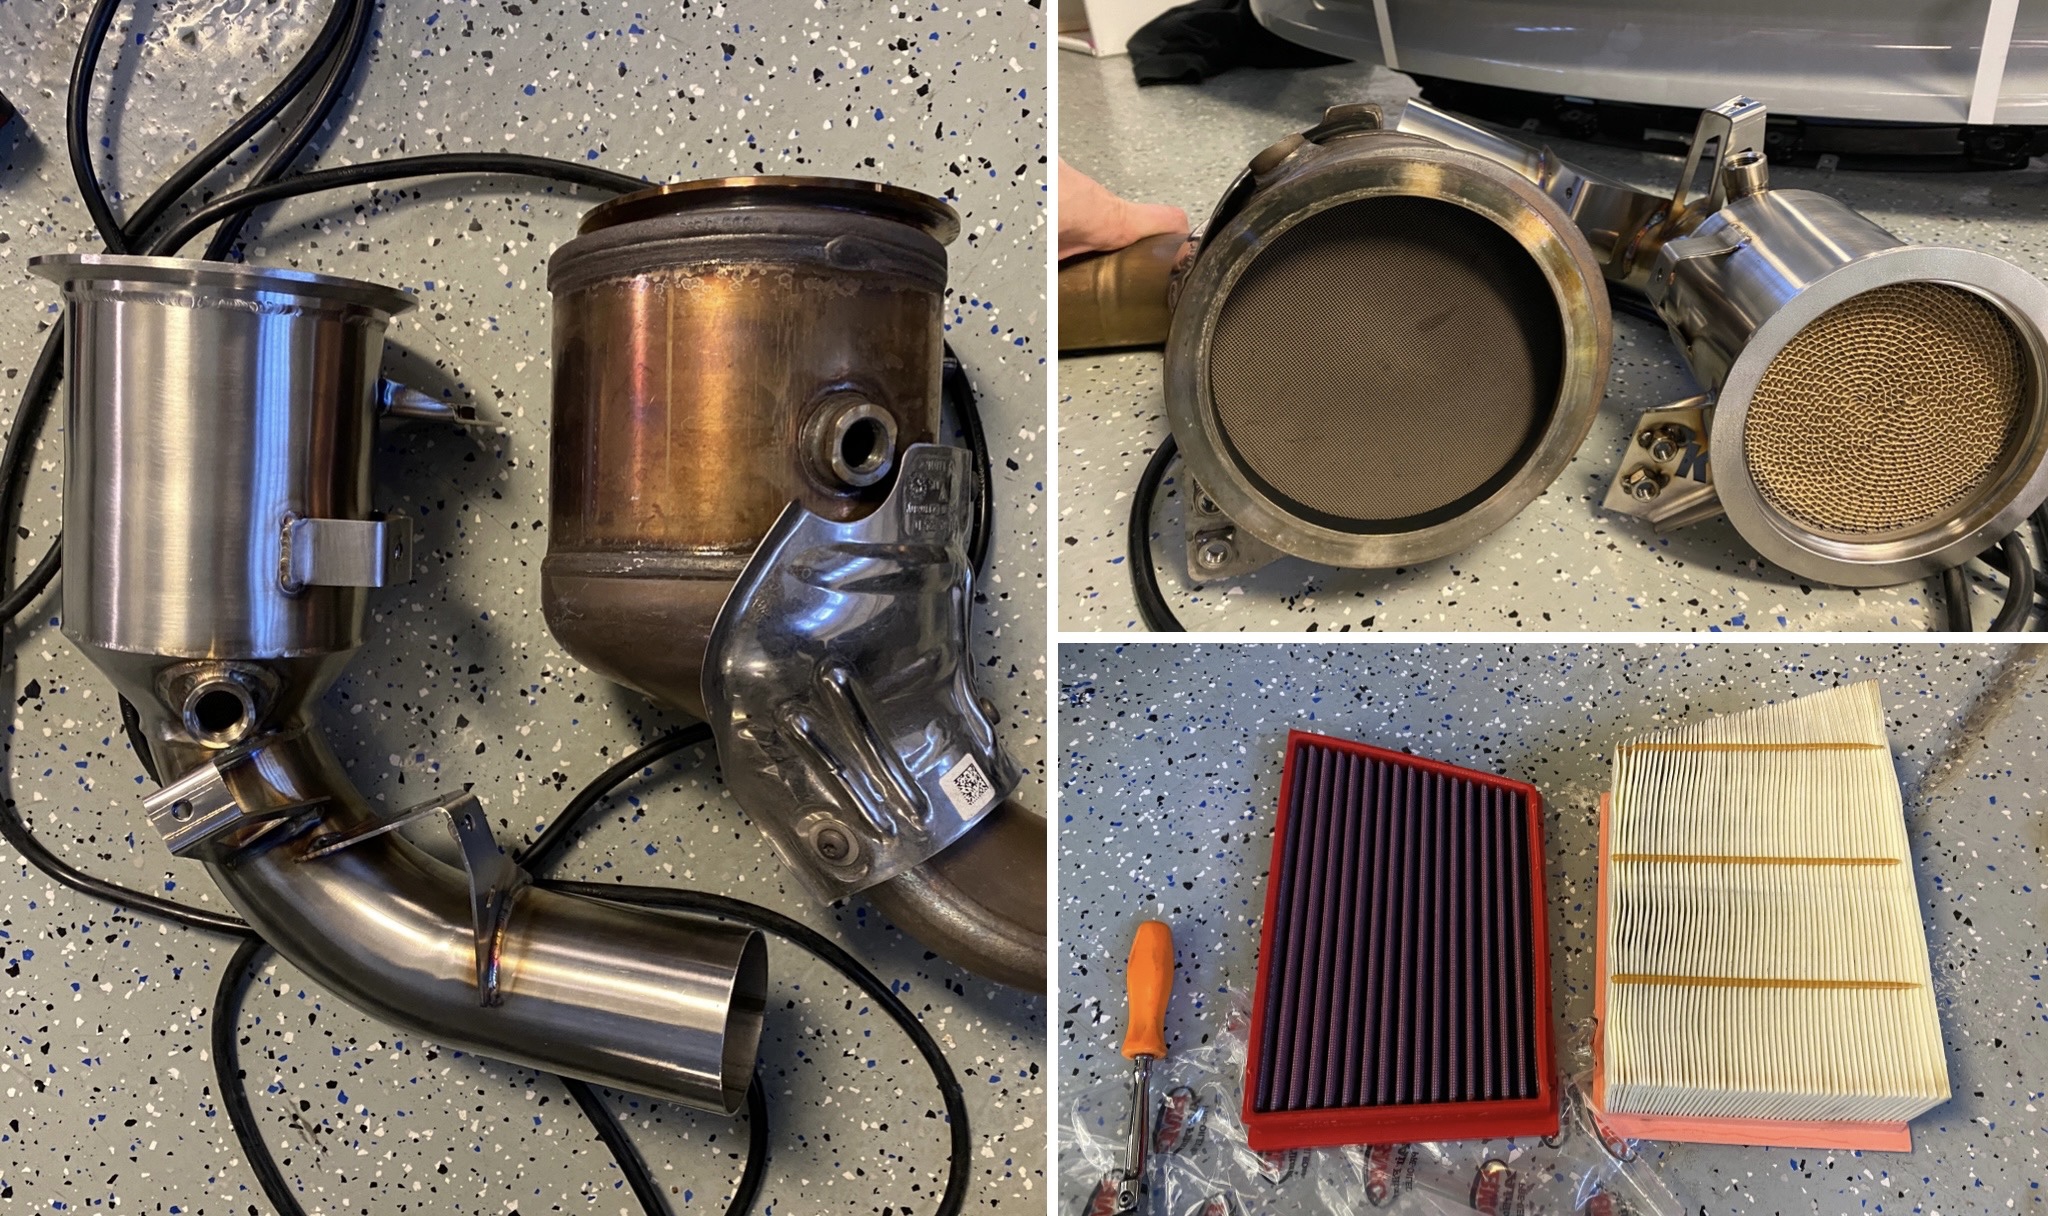
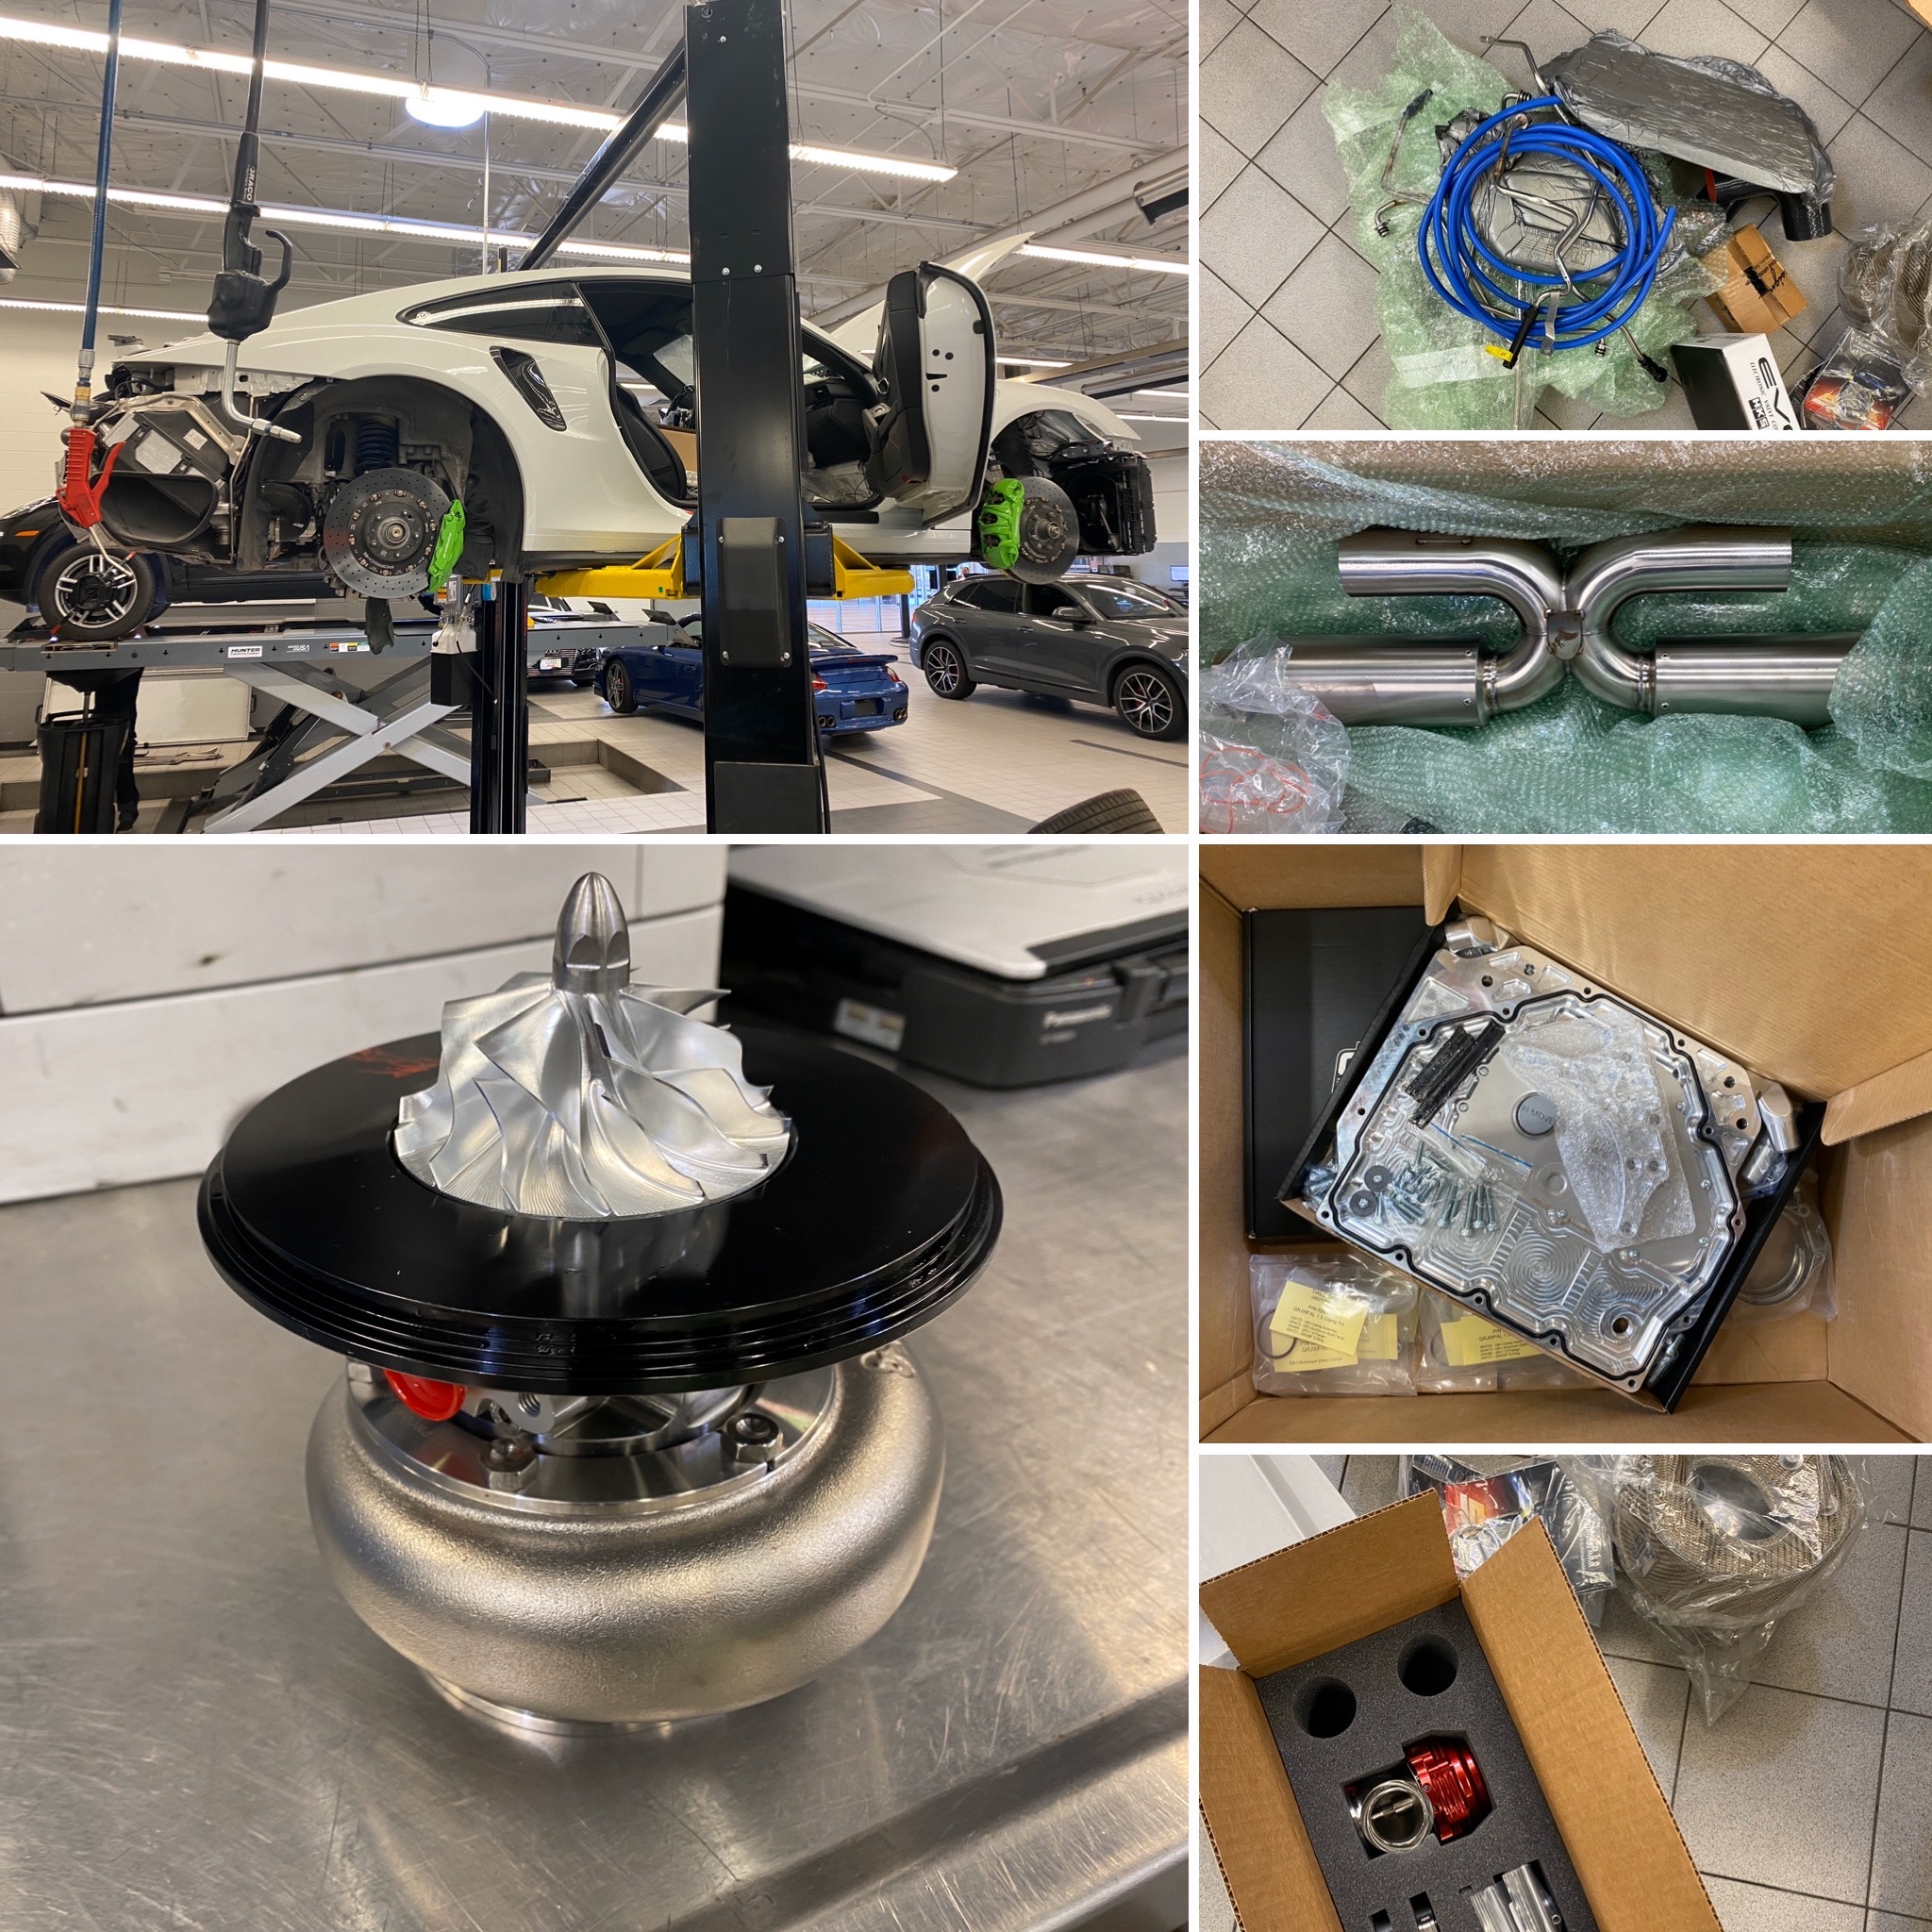
There’s something stupid inside of me that keeps wanting more. Is the 992 Turbo S fast? Hell yes. Can it be faster? Hell yes. Because I’m not what people would call “smart” I have been conned into pulling out my ECU, having it reflashed and adding in 100 cell catalytic converters. What do I hope to achieve? Power, friends. I’m looking for more power. One hundred horsepower more, to be precise.
Thank goodness Dagan seemed like he knew what he was doing.
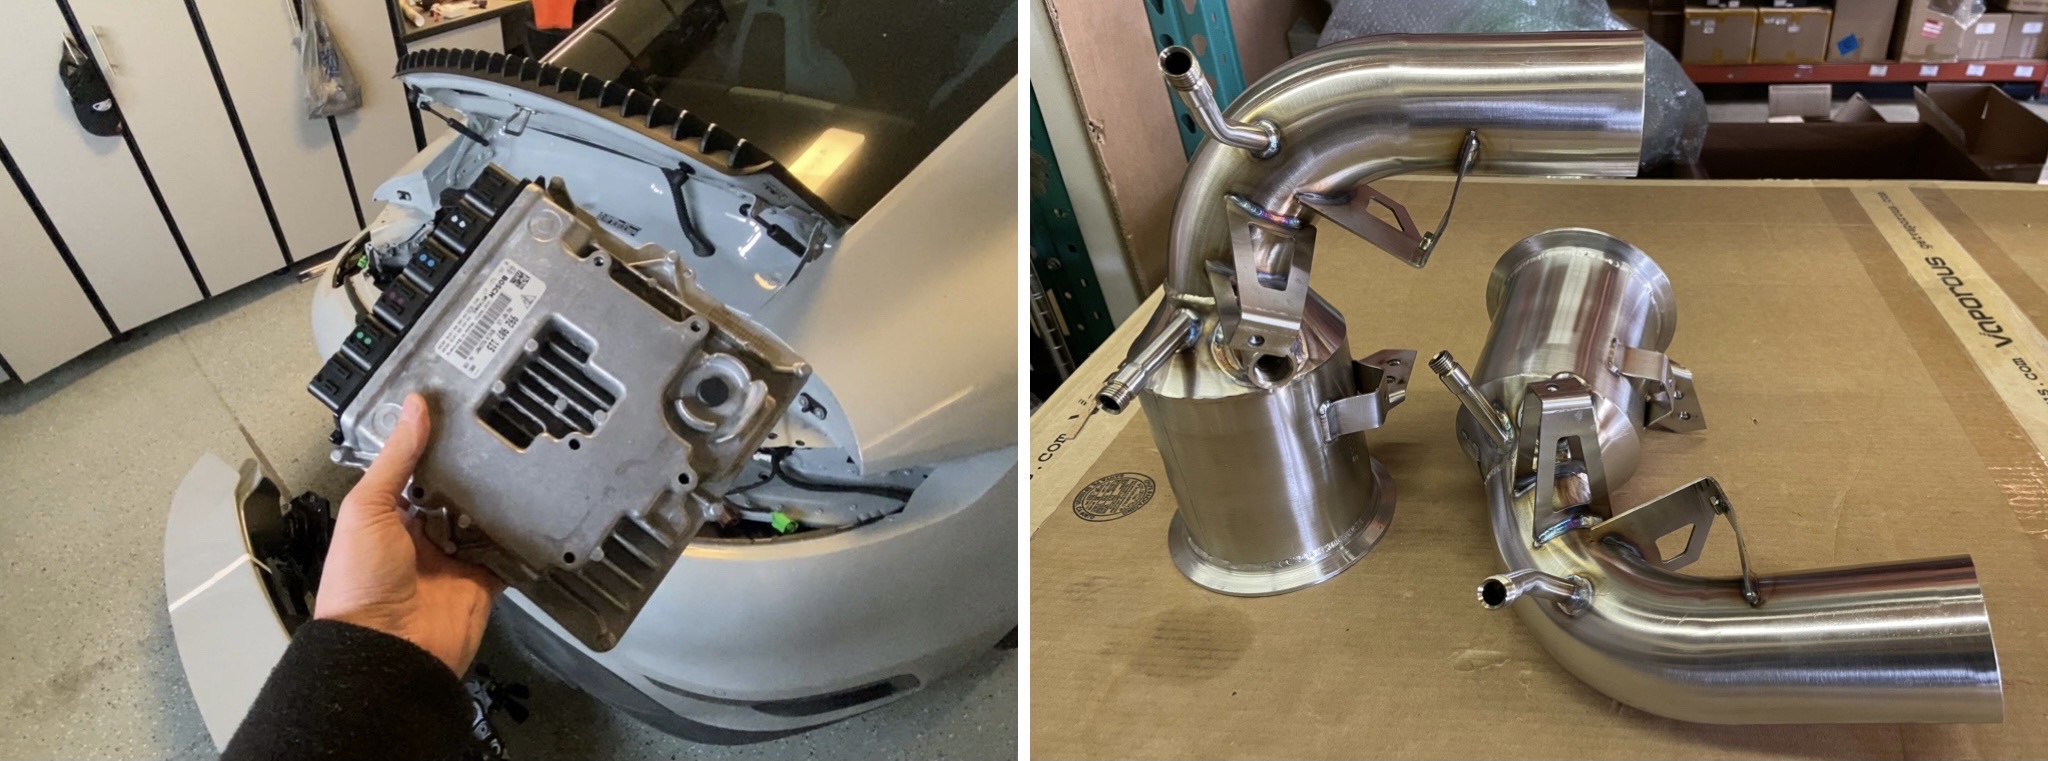
The ECU is out and in California waiting for some special sauce. I wonder when I’ll get it back 🤔
I’ve got VBOX stats for this car in it’s stock configuration, so I’ll be very curious to see where we end up following these modifications. I would think we’d be low tens here in Utah. We’ll see shortly.
Okay, so here’s the build progress:
We got the DME back and some new catalytic converters. Time to pump this thing up to the next level.
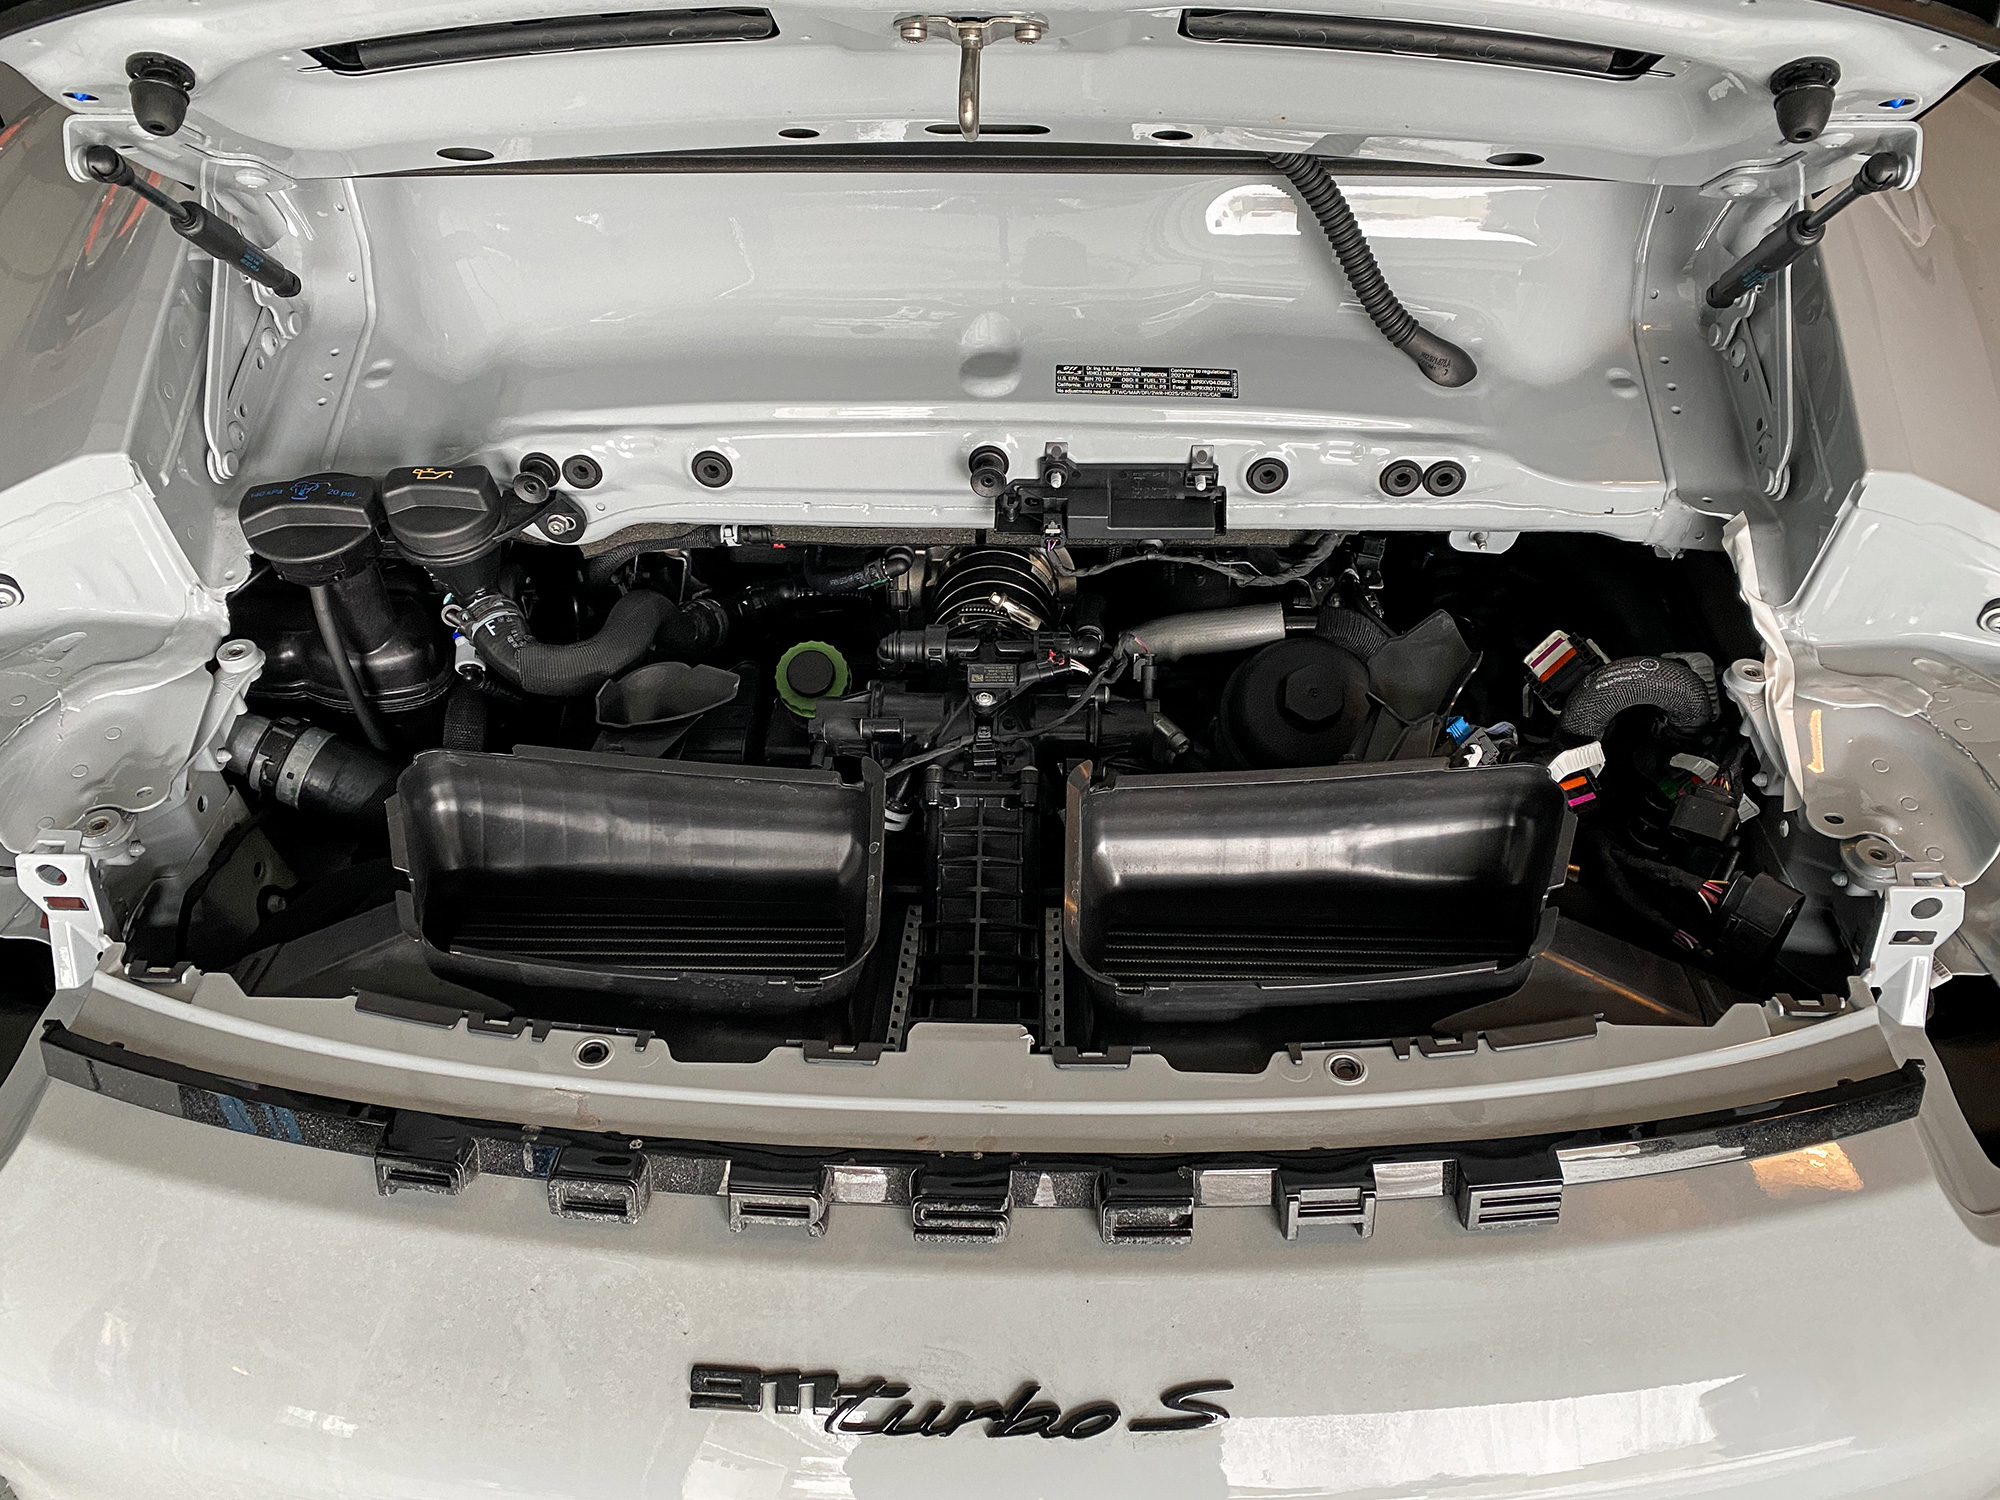
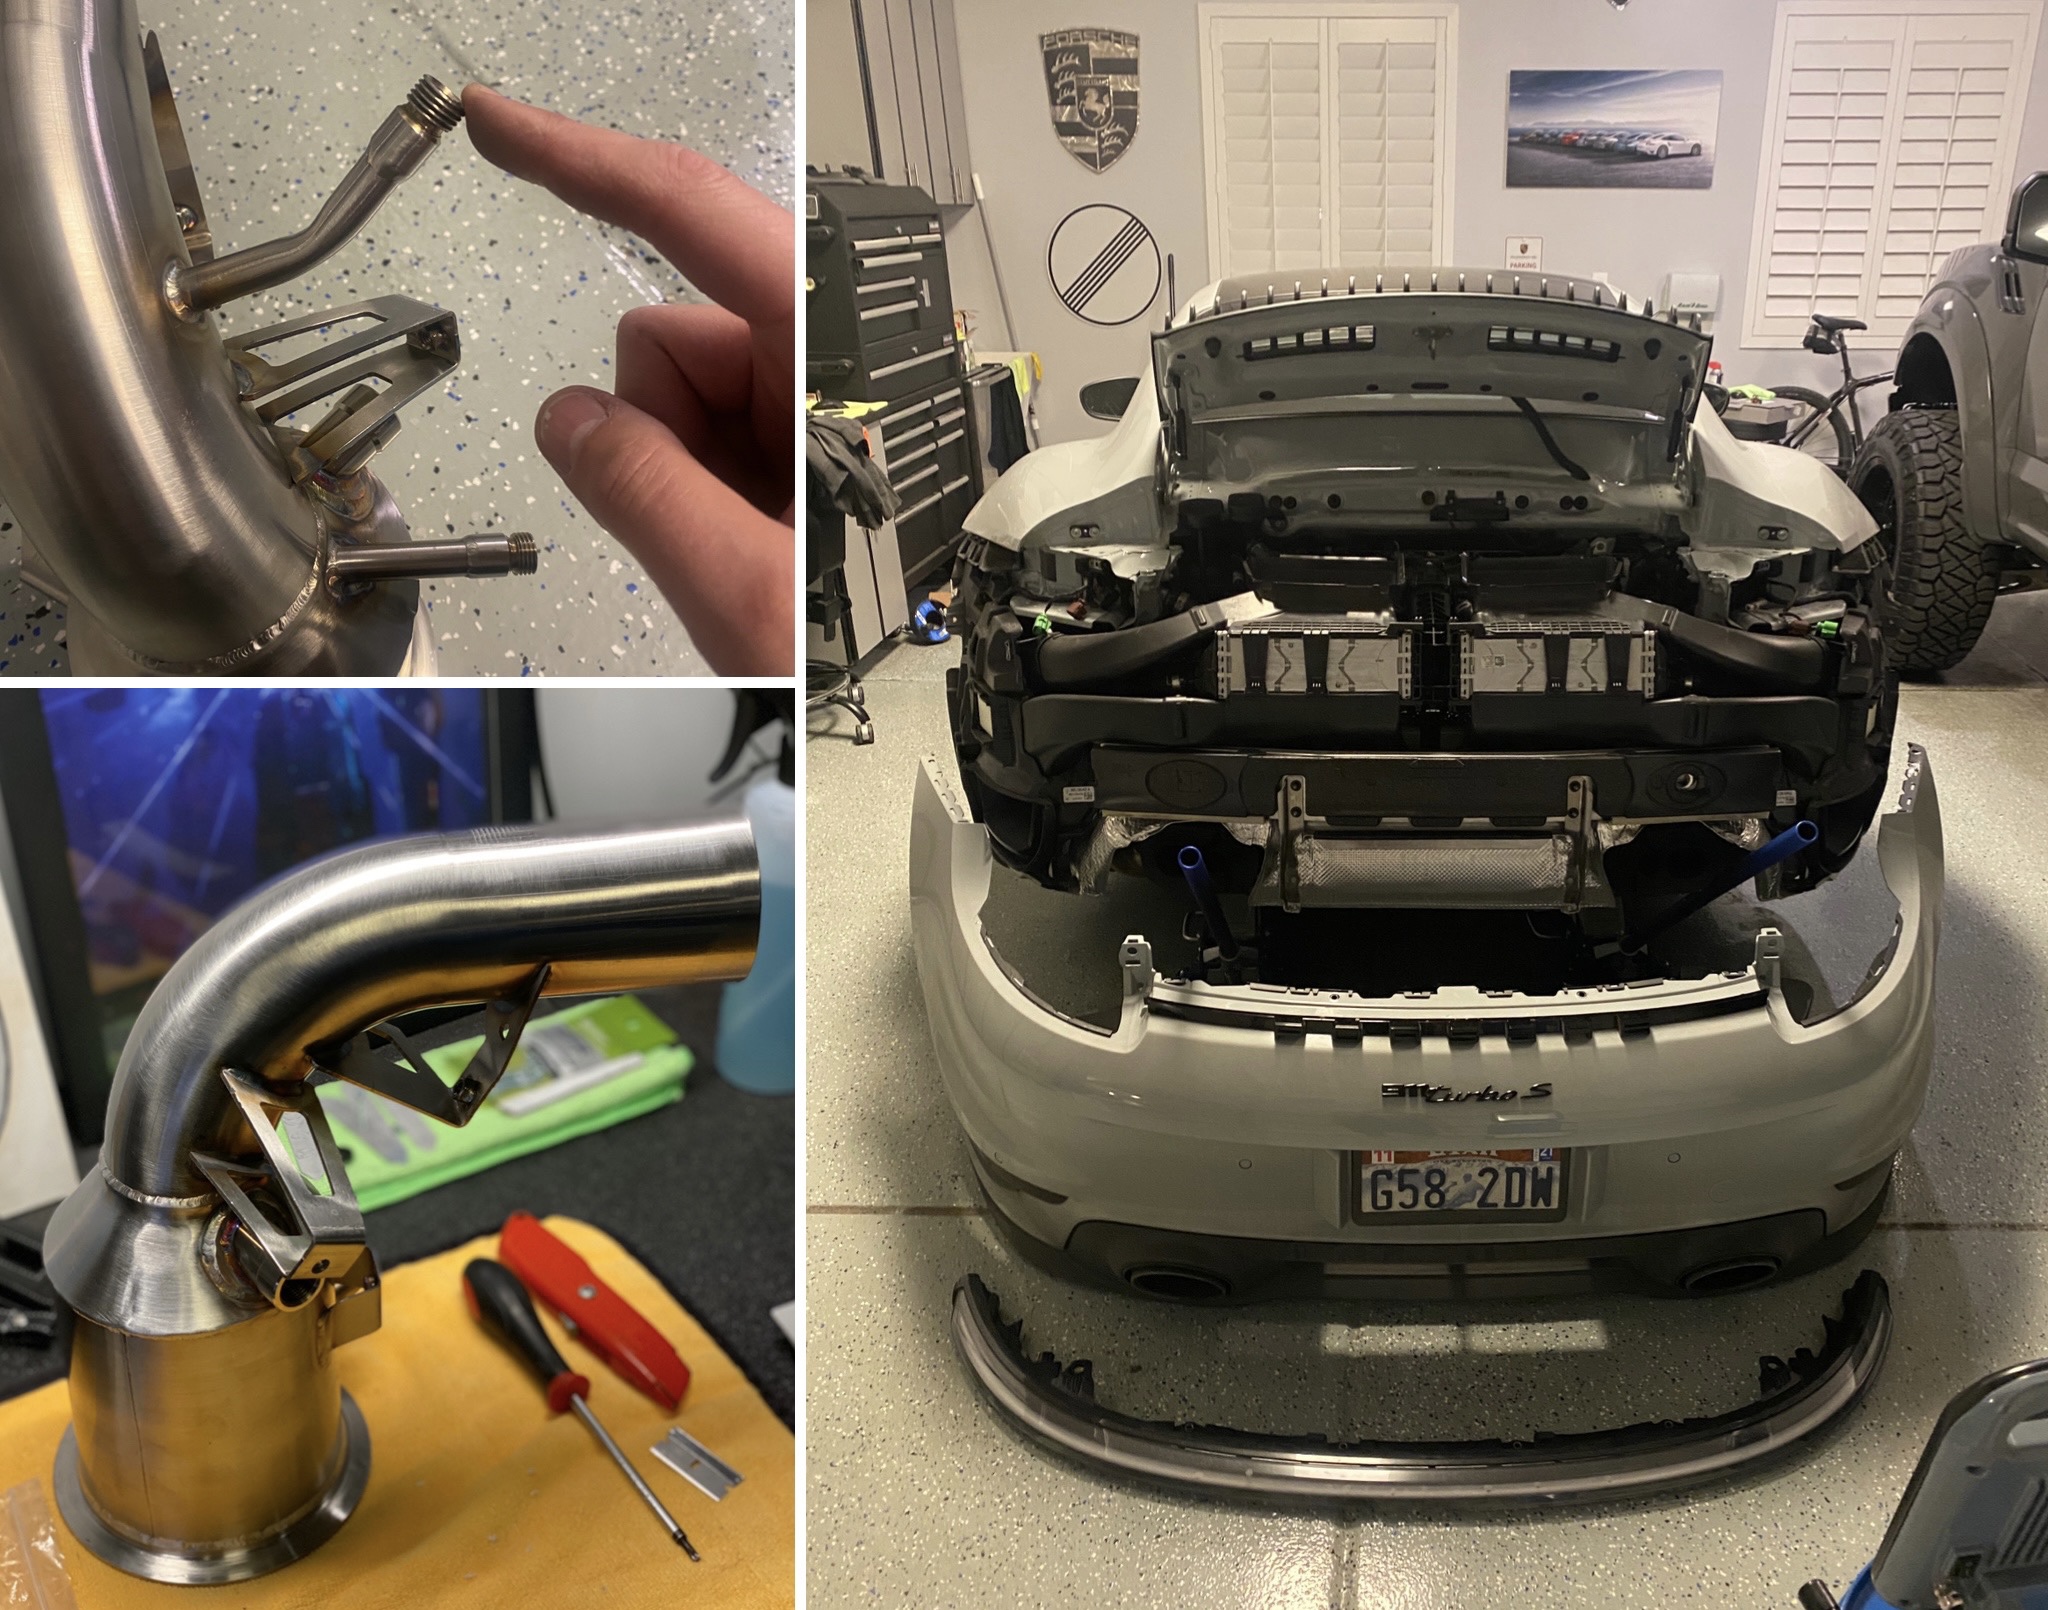
Turns out that the cats from Europe have weird tubes coming off of them- those had to go! So we put our project on hold until we could sort that out. Luxe hooked me up with an incredible welder (video below) and then we were ready for the install.
These are the aftermarket parts we put in- new 100 cell catalytic converters and BME air filters. The flow difference on these to cats should be insane.
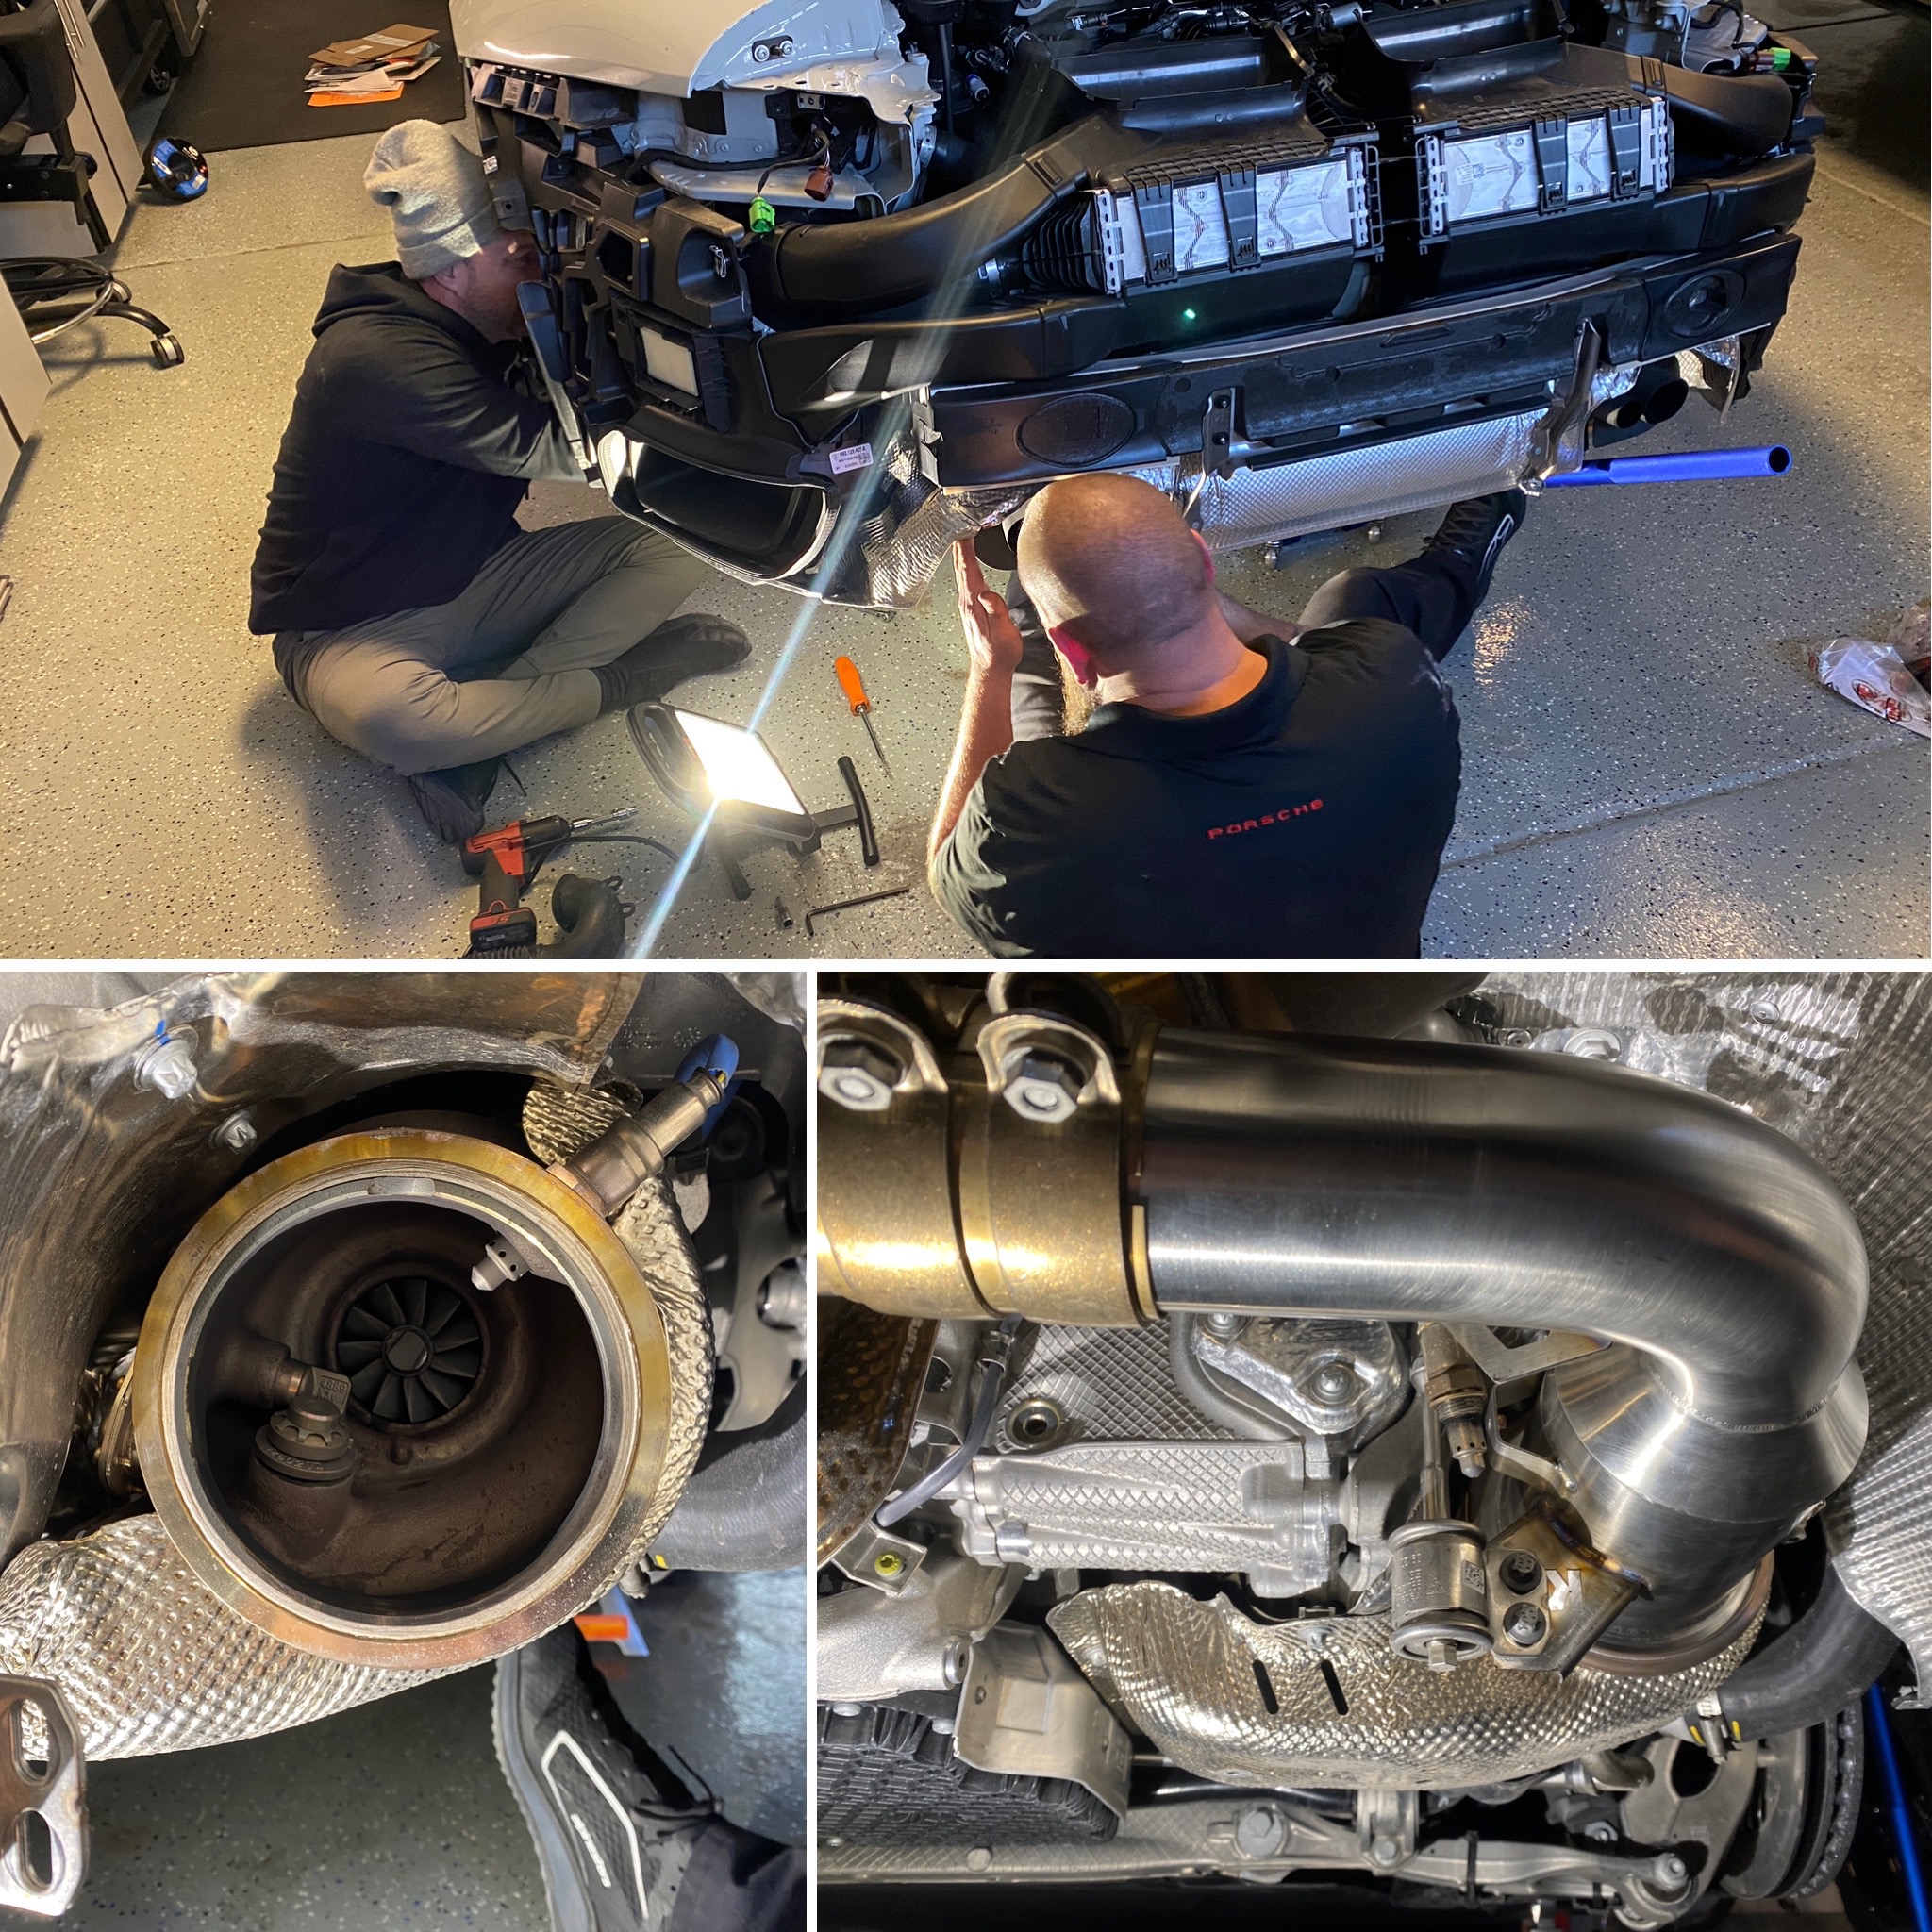
Dagan, Bryce and I (mostly Dagan) got the install done without incident and then we were ready to do some real world testing. The new cats give the exhaust a nice throaty sound and you can hear the turbo whistles a bit better- it’s perfect. However, it’s hard to feel a power difference in your butt dyno so before the weather got bad I snuck out my my favorite spot and did a few quarter mile runs with with my VBOX. Wow.
91 pump gas, damp roads, high flow cats and a tune got me down to 10.08 at almost 139 mph. That is nuts- it’s the fastest quarter mile I have personally run. If I launch harder (at 5K rpms instead of 4K) and hook I’m 100% sure I can break into the 9’s. A few years ago my 991 was fighting to get into the 10’s! I am so impressed with the 992 platform- a nearly stock nine second daily driver. Unreal. These mods aren’t cheap, but they’re fun! Hoping to get even quicker this spring as well 🤞🏼
I have undertaken another stereo installation! This time I partnered with Luxe Automotive and had the opportunity to work on this project with their 12-Volt master, Diego. On the surface this probably seems like a fairly simple install: Four speakers and an amplifier. Between the two of us (mostly Diego) there is well over 100 hours of work in this project… and there’s still more to do!
Stage 1 of the build is complete! Epic.
I am thrilled with the results. The volume can be cranked up and the sound and detail remain crystal clear and it doesn’t feel uncomfortable to the ears. No clipping, no distortion and a surprising amount of bass even without the subwoofer. Some may say it’s a crime, but it’s loud enough to overpower the car’s V12 engine noises which is exactly what I wanted for those occasions when I’m not driving around at 9K RPMs. Luxe was incredibly accommodating and let me help with the entire install.
Below is a quick montage of our stage one efforts:
Below is a breakdown on some of our thinking on the project (the time stamp info relates to the video).
0:05: The Sensonum system is bad- there’s really no other word for it. Specifically it’s bad because it drowns out the vocals, distorts at medium-high volumes and shoots out the most ear piercing shrillness I’ve ever heard in my life. The treble and bass adjustments do nothing to alleviate the problem. Perhaps the system is just terribly underpowered. At the very least poorly tuned. I am truly genuinely baffled as to how this system came to be in any car.
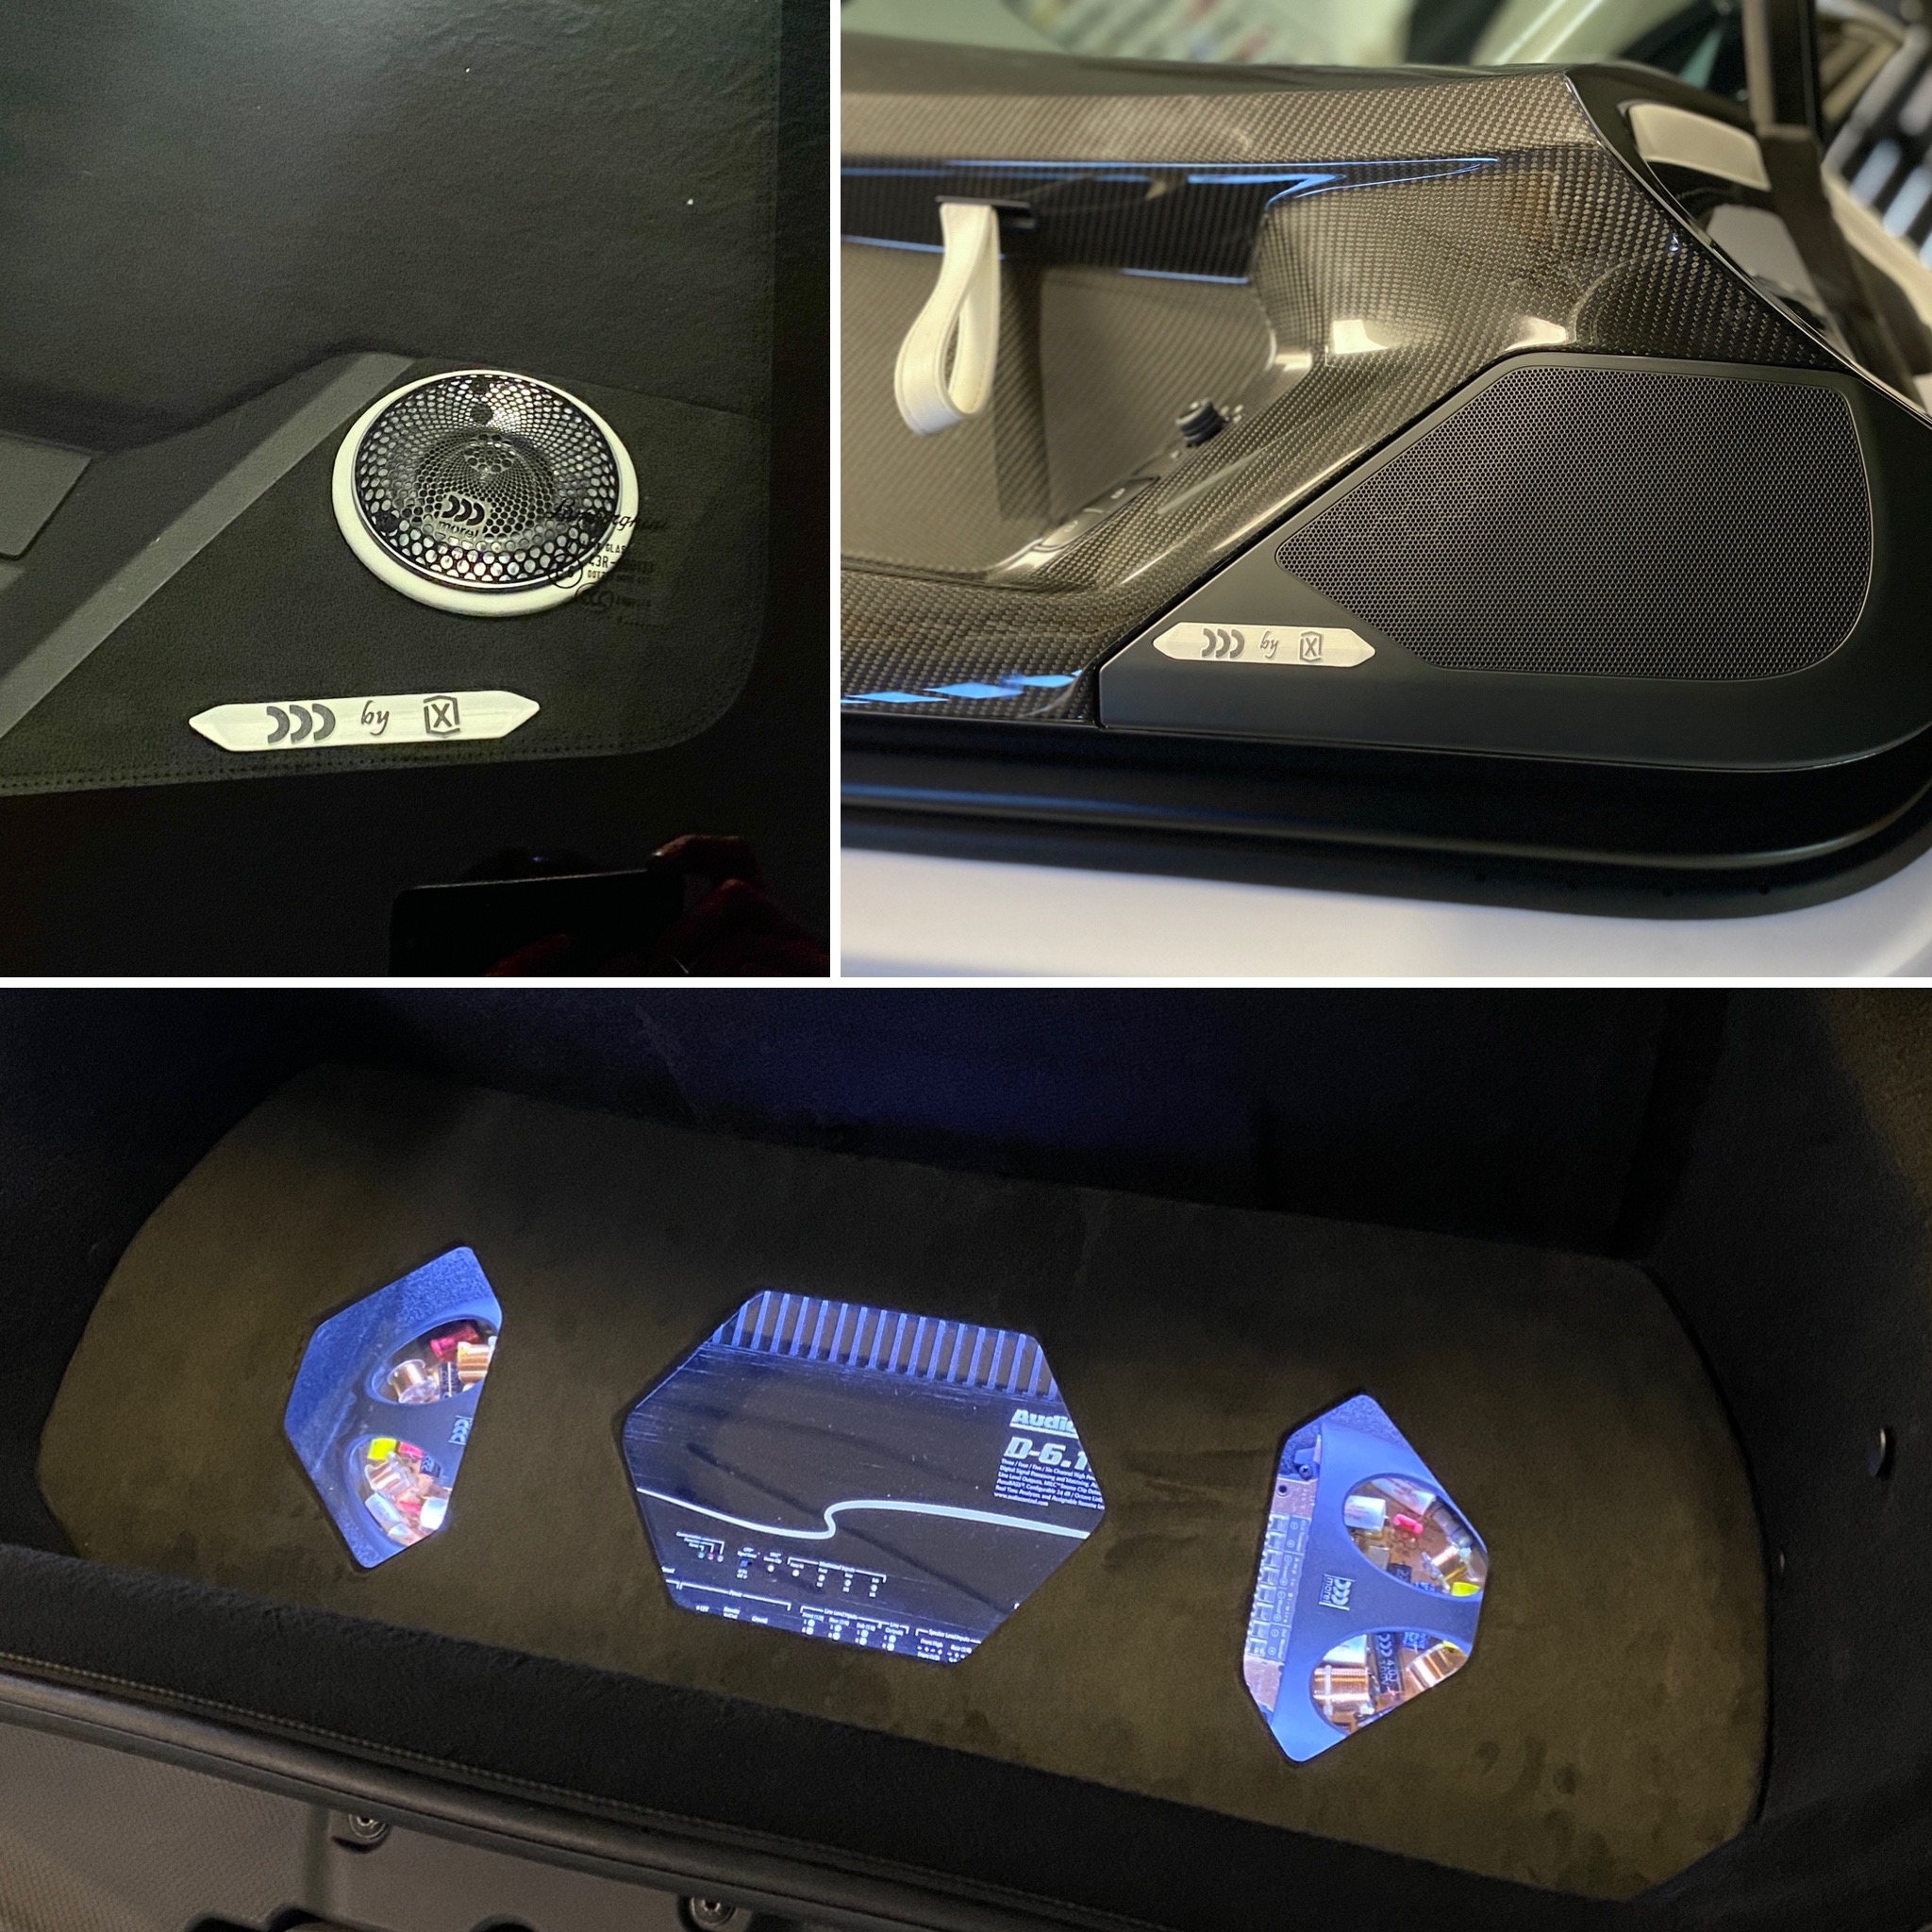
After fiddling with all of the hardware I realized the only real solution was to replace the amplifier. Of course, if we’re replacing the amplifier then we might as well replace the speakers. Originally I was planning to do a JL Audio C7 and VX-based build but Diego, over at Luxe Automotive, convinced me to try out Morel speakers and AudioControl for the amplification. The Morel Supremo component speakers consist of a 1.1 inch tweeter and a 6.5 inch mid driver as well as two crossovers (0:08). The amplifier is an AudioControl D-6.1200 (0:11- there is an additional amplifier pictured here which I’ll discuss later).
0:15: This video contains what is essentially “stage one” of the build. Originally we planned to include a subwoofer but after getting deeper into the project we realized it was more complicated than we had anticipated and so we broke it up into two parts. This first part is the installation of the four Morel speakers and the D-6 amplifier, along with the accompanying wiring and amp rack.
0:15: The first part of this video is showing the inside of the door panels. The carbon fiber covers have been removed at this point (as a side note- they are very easy to take off).
0:25: These are the stock speakers- nothing impressive. Eight inches of paper with a microscopic magnet. From what I understand the Sensonum system does not give you upgraded speakers, just a different amplifier.
0:28: We decided to remove the passenger seat from the car to make our work a bit easier. It’s probably possible to do an install like this without removing the seat but… why? Incidentally, you’ll need to reset the car’s airbag warning light after reinstallation.
0:32: You’ll need to pull out the frunk bucket (is that that official name?) so you can access the battery.
0:36: The amplifier is behind this trim piece in the back seat.
0:41:This is a picture of the amplifier and at this point I’ve cut all the wires in anticipation of the modifications we’re making. You would never want to cap wires together like this in a finished system. Fun fact here: if you look closely you can see that I wired some of the amped speaker wires backwards just for fun to see if it made any difference to the stock system. I don’t think it did.
0:44: It’s hard to see in this video but the speaker in the dash here are C5 JL Audio tweeters that I had installed previously (you can check out my last video to see more on that). They actually made a dent in the muddy vocals, although not enough to save the system.
0:46: You can see the original tweeters here. I had pulled off the factory harness (well, cut it off) when I installed the JL’s and we used them again for the Morel speakers.
0:53: Diego Was able to separate the original speakers from the stock housing- more on that in a moment though.
0:57: There was more disassembly than I had anticipated but thankfully almost everything in the Aventador is clip-based.
0:59: The component speakers are really beautiful and the crossovers striking as well. Because the AudioControl D-6 is a DSP amp we didn’t have to use the Morel crossovers but we really wanted to display them and there are still some advantages to using analog components in a build like this.
1:08: This is some of our wiring. I was really impressed with the Stinger line of products.
1:14: Those badges were tough to get off. Lost an hour of my life to those guys.
1:24: The Acoustics inside of the Aventador aren’t great and the SVJ, in particular, is especially bad with its carbon fiber door panels. The doors needed a sound barrier application but you have to be cognizant of how much weight you add to the scissor doors. They still need to open easily and stay up.
1:33: All the cables were run through the factory firewall; that’s always the right way to do it (thankfully Diego didn’t listen to my ideas about how we could half-ass things).
1:37: We used the original OEM speaker mounts and made adapters. We did a couple prototypes and Diego put together a simple and elegant plate adapter (which you will see shortly). We had watched an install that Brian (Brian’s Custom Audio) had done with beautiful aluminum mounts but for the sake of simplicity and weight we opted not to go that route. There was also the fact that no one would ever really get to see the mounts that discouraged us as well.
1:48: This is an interesting moment here. What we’re doing is actually testing to see if sound is coming out of the head unit directly and if the volume is controlled at the head unit or factor amp level. Originally we discussed leaving the factory amplifier in place and then running the signal into the AudioControl D-6 (they can accept high voltage signal inputs). However, we determined that the head unit was outputting a useable line level signal and we could completely remove the factory amplifier. This is why you see me flipping off the unit here in this next clip. Whatever is happening inside this amp is not good and removing it was a highlight for me. I’ll also mention that there were some CanBus wires going into the amplifier and we were initially worried that there was some kind of functionality loss that would occur, but there has been nothing ascertainable.
1:54: Given that we’re working on an SVJ (a racecar) it was important to me to not add too much weight to the vehicle. This is another reason why we took a harder look at the subwoofer situation. We wanted to create something that was removable both on the sub and the amplifier level in case the car needed to perform at a higher level (like a day at the track). Ultimately with the D-6 amp, the rack, speakers, Sound Shield and cabling, we probably added about twenty five pounds of weight to the car (the sub, sub amp and box would have been another thirty).
Incidentally we lost the stock amp and the frunk divider (which is made out of metal and is about four pounds) so the net increase to the car is probably a little more than twenty pounds.
2:10: The wiring job in this car is top notch. Wrapped, clean, solid. No shortcuts on this one (well, you could argue that butt connectors are shortcut but I’d have to roll my eyes). Kudos to Diego for his meticulousness.
2:24: These are the plate adapters that I had mentioned earlier. They’re really just two rings that are seated together and then the speaker fits inside. I’m really happy with how these turned out.
2:58: This is the amp and crossover layout that will sit at the bottom of the frunk (on a removable rack).
3:03: Remember to do basic testing to make sure your polarities are correct. With a system like this you really want to hook things up correctly.
3:04: This video wanders around a bit because we worked on a bunch of different things at once and it’s just filmed in sequential order (for the most part). This is just a quick shot of the stock tweeter harnesses with the wiring from the JL Audio Tweeters (removed for the Morel install), the Morel tweeters and the fuse install (put it close to your battery), In retrospect I wish I’d found something better to include than these ugly lookin harnesses. I hope no one thinks we used them they way they looked in the video- that wiring & soldering was removed.
3:14: We hooked everything up to take it for a quick test drive (not a literal test drive). I should have picked a better clip for here (one that shows there is some audio signal). As I mentioned the audio control amplifier offers a lot of customizable functions like a thirty band graphic equalizer and time alignment. You can configure everything from a computer via a USB port and you can buy an optional Bluetooth adapter, which we did, so you can even use your phone.
3:21: This is the speaker in the door with the trim back on. After the grill is reinstalled you can’t see it at all- a shame. We looked at some options to redo the grill but ultimately we just left of alone for now.
3:23: This is Alcantara – which is like a synthetic suede – which we used to cover the stock tweeter trim. The tweeter install ended up being a bit trickier than we had anticipated. You can see how we had originally intended to seat the tweeter directly on the alcantara. These tweeters are incredibly deep and this ended up being a issue- more on that shortly.
3:46: Here’s Diego cutting into the dash. In addition to being thick, the Morel tweeters are quite wide and we had to remove some of the dash plastic so they would fit. For me this was actually the most nerve-wracking part of the build. One tiny slip and you could be dragging your router bit across the dash, scraping a window or cutting into a seat.Thankfully nothing like that happened. However, after cutting out the dash we realized there was a structural bar that ran right below where the tweeter sits making the area very shallow. Too shallow for the Morel tweeters…
3:51: What you see here is the creation of some acrylic ring spacers. After being covered in white leather they added a little more than 1/4 of an inch of depth and allowed the tweeters to seat into the dash. In my opinion this ended up being a kind of a happy accident because I really like the white leather accents on the dash.
4:07: The amp rack has base has been finished- the holes for the wiring are done and the top design is brewing.
4:13: This is the AudioControl knob and the installation became another fun adventure. After searching around for a good place to put it we finally decided it had to go on the center console. Diego upped the ante and ran the two LED lights (which indicate amplifier functions) into the console vents- a fantastically effective but subtle location.
4:32: This is a quick shot of a Photoshop mockup of the new speaker badges we were imagining on the car. After getting the design done in CAD we 3D printed a set of badges and opted to paint them for the time being. In stage two we’ll mill them out of titanium and do a bronze anodization to match the interior stitching. For now the 3D printed and painted badging looks just fine.
4:43: Here’s a look at the final wiring on the amplifier and crossovers.
4:55: The amplifier cover turned out great- a lot of thought and effort went into it. Some people might not realize that a lot of the shapes in the Aventador are hexagonal. The gas lid, intake grates, wheel design and even the ignition cover. The amp rack is sort of an homage to this design aesthetic. The rack itself is MDF with plexiglass underneath. The MDF is covered with Alcantara and the interior is lit with white LED lights.
5:24: After deliberating about the best way to have the covering seated in the front of the vehicle Diego opted for a pull strap (he did his own sewing on that strap!).
5:27: Overall we are very happy with how this project turned out. I really like the additional white accents on the dash. And looking into the frunk is a glorious treat.
I absolutely understand that for some people a vehicle stereo isn’t all that important. Most SVJ owners probably don’t spend a lot of time in their cars listening to music- they have a glorious V12 that they keep at 9000 RPMs. I like that too. Sometimes.
It’s hard to convey just how good this upgrade sounds by talking about it. Similarly it would be difficult to demonstrate fidelity by playing audio clips. Considering that we’re working with a 4 speaker system my personal opinion is that the outcome is incredible. The Morel and AudioControl components produce a level of clarity, detail, and richness that I seldom hear in any vehicle audio systems (the amount of bass that the mids deliver is impressive).
Phase 2 will be our effort to install a subwoofer and an additional sub amp and have those both be removable and installable in just a matter of minutes. There are some engineering details to figure out but I think that it will be a fun project! Additionally we will be doing one other fun (obnoxious?) upgrade but I won’t spoil the surprise just yet. Bravo Diego and Luxe. Thanks for letting me be a part of such a cool upgrade!
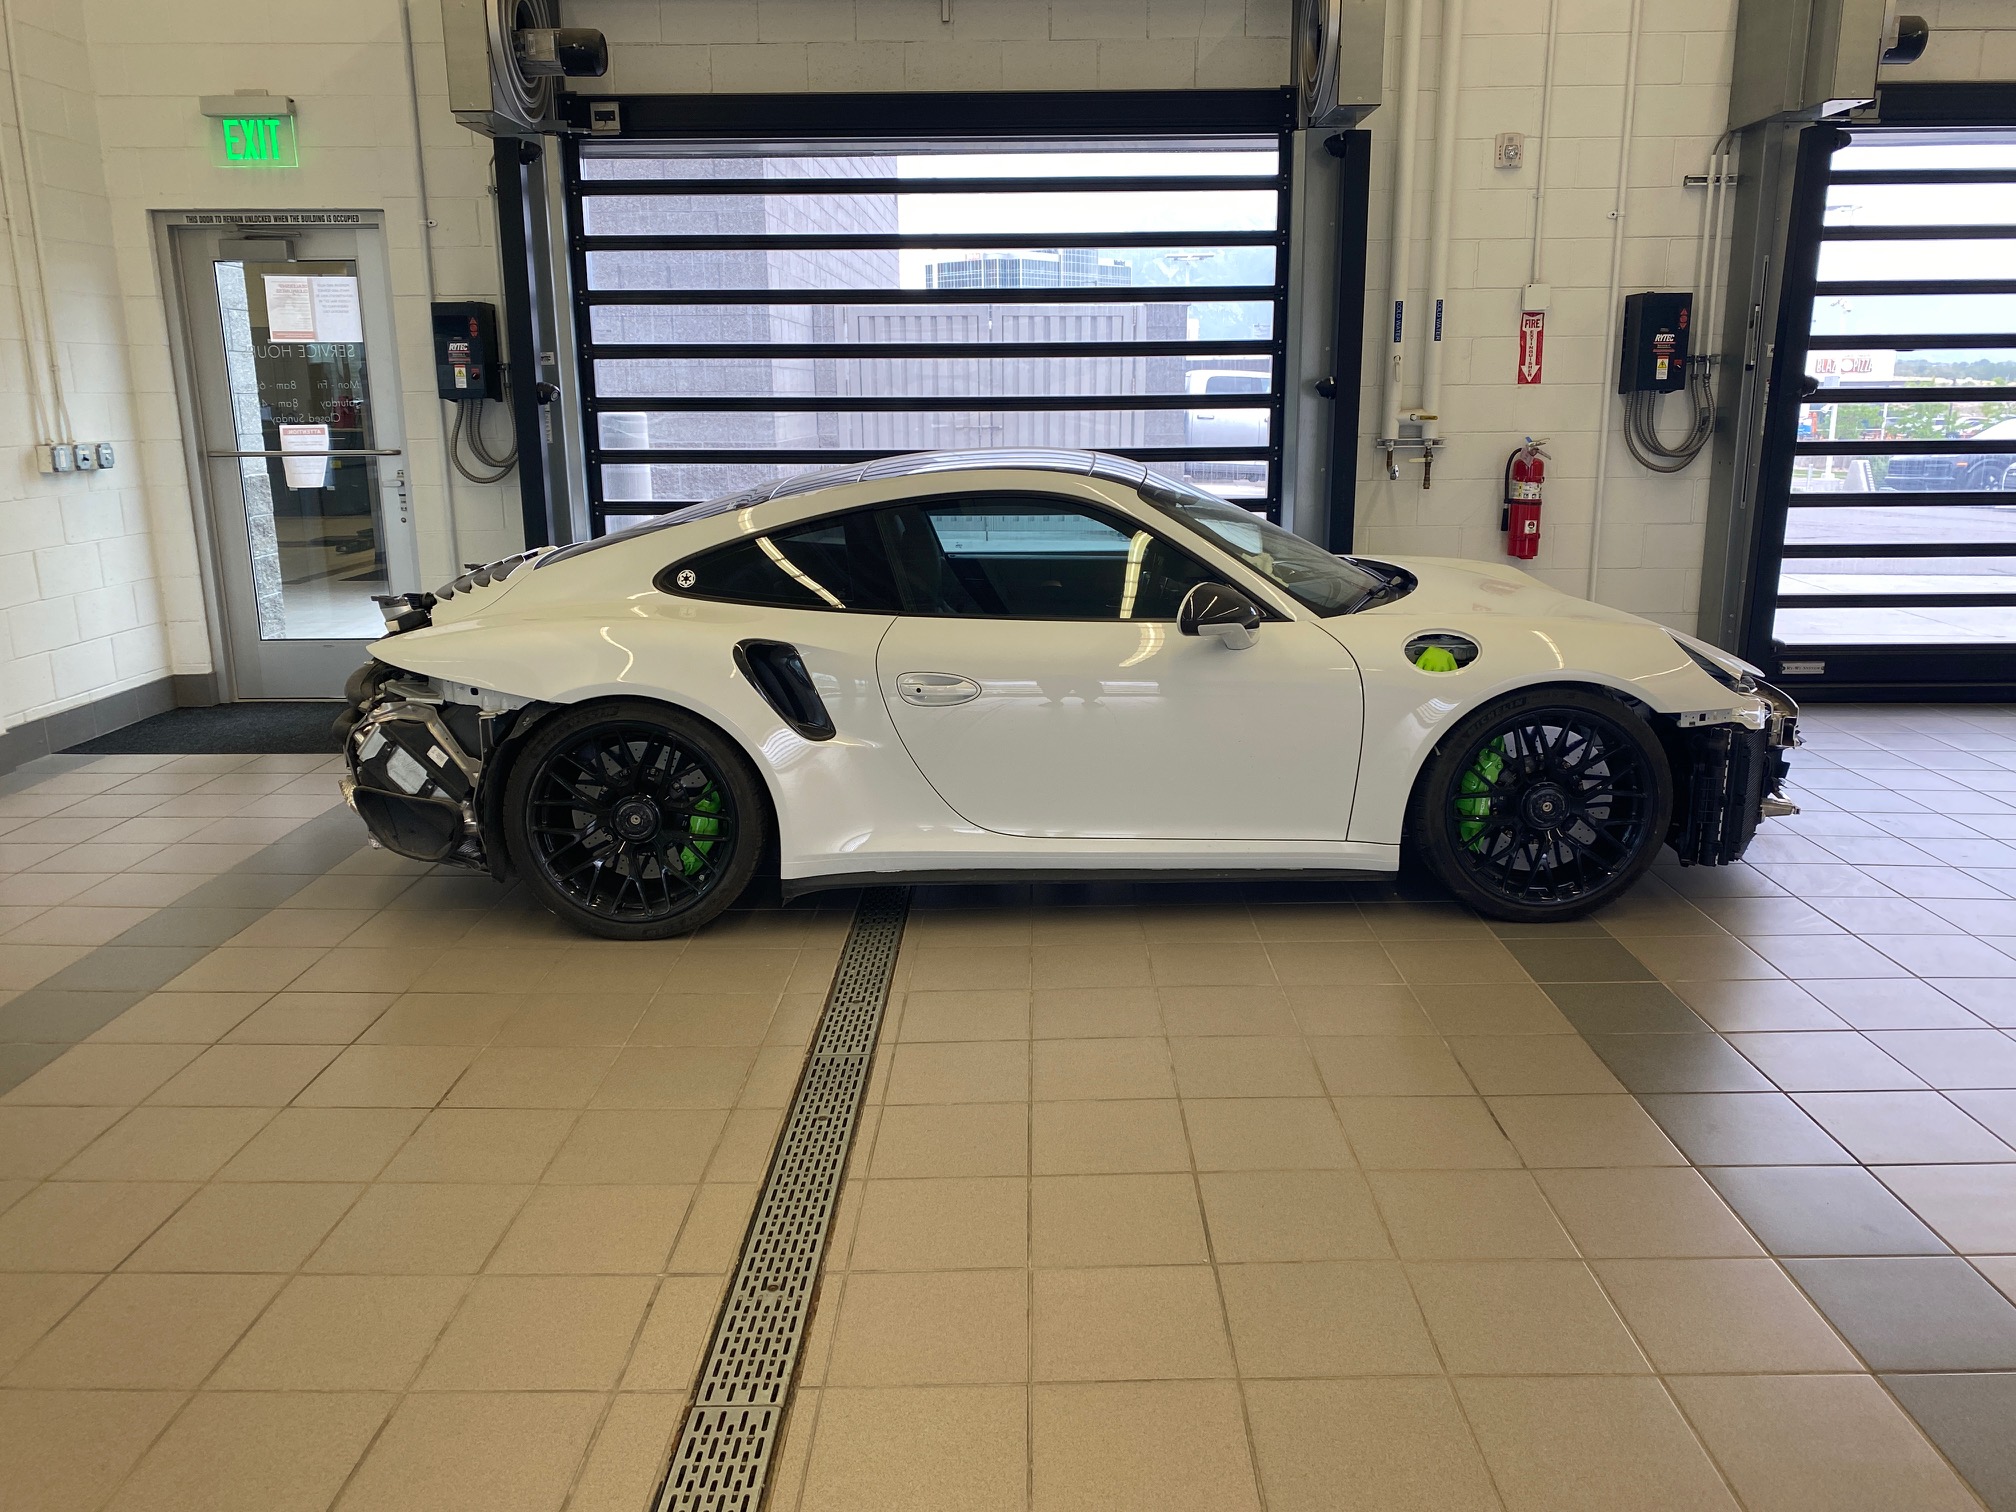
This is a post I’ve spent six months contemplating. I still don’t really want to write it, but I feel the need to chronicle parts of my car’s resurrection. Let’ start at the beginning (I’ll make this quick)…
Back in September of 2019 I crashed my Porsche Turbo S. It wasn’t a bad crash- I was driving in on unfamiliar county roads, didn’t realize the road turned, hit a sign and rolled off a small hill. No one was injured. The police decided to get involved and my car was impounded. I was charged with several crash-related crimes. Not my best month.
Eventually I got my car back. It was taken to Alpine Auto Renovations, in SLC, to assess and repair the body damage.
I hired a lawyer, Stephen Fraizer, and worked to get get my charges sorted out.
On 12/12/2019 I got word that that my car would be fixed. The total damages came in around $70,000. Ouch. That’s quite a bill for hitting a sign (although rolling off the hill didn’t help).
In January of 2019 Stephen let me know that the court had agreed to drop the reckless driving charge if I agreed to plead guilty to leaving the scene, pay the fine and take an online traffic course. I made the plea in abeyance; So long as I’m not found guilty of additional crimes in 2019, the charge will be dismissed. I took what ended up being a six hour online course (admittedly, one that I needed). With the legal troubles out of the way my focus returned to the car.
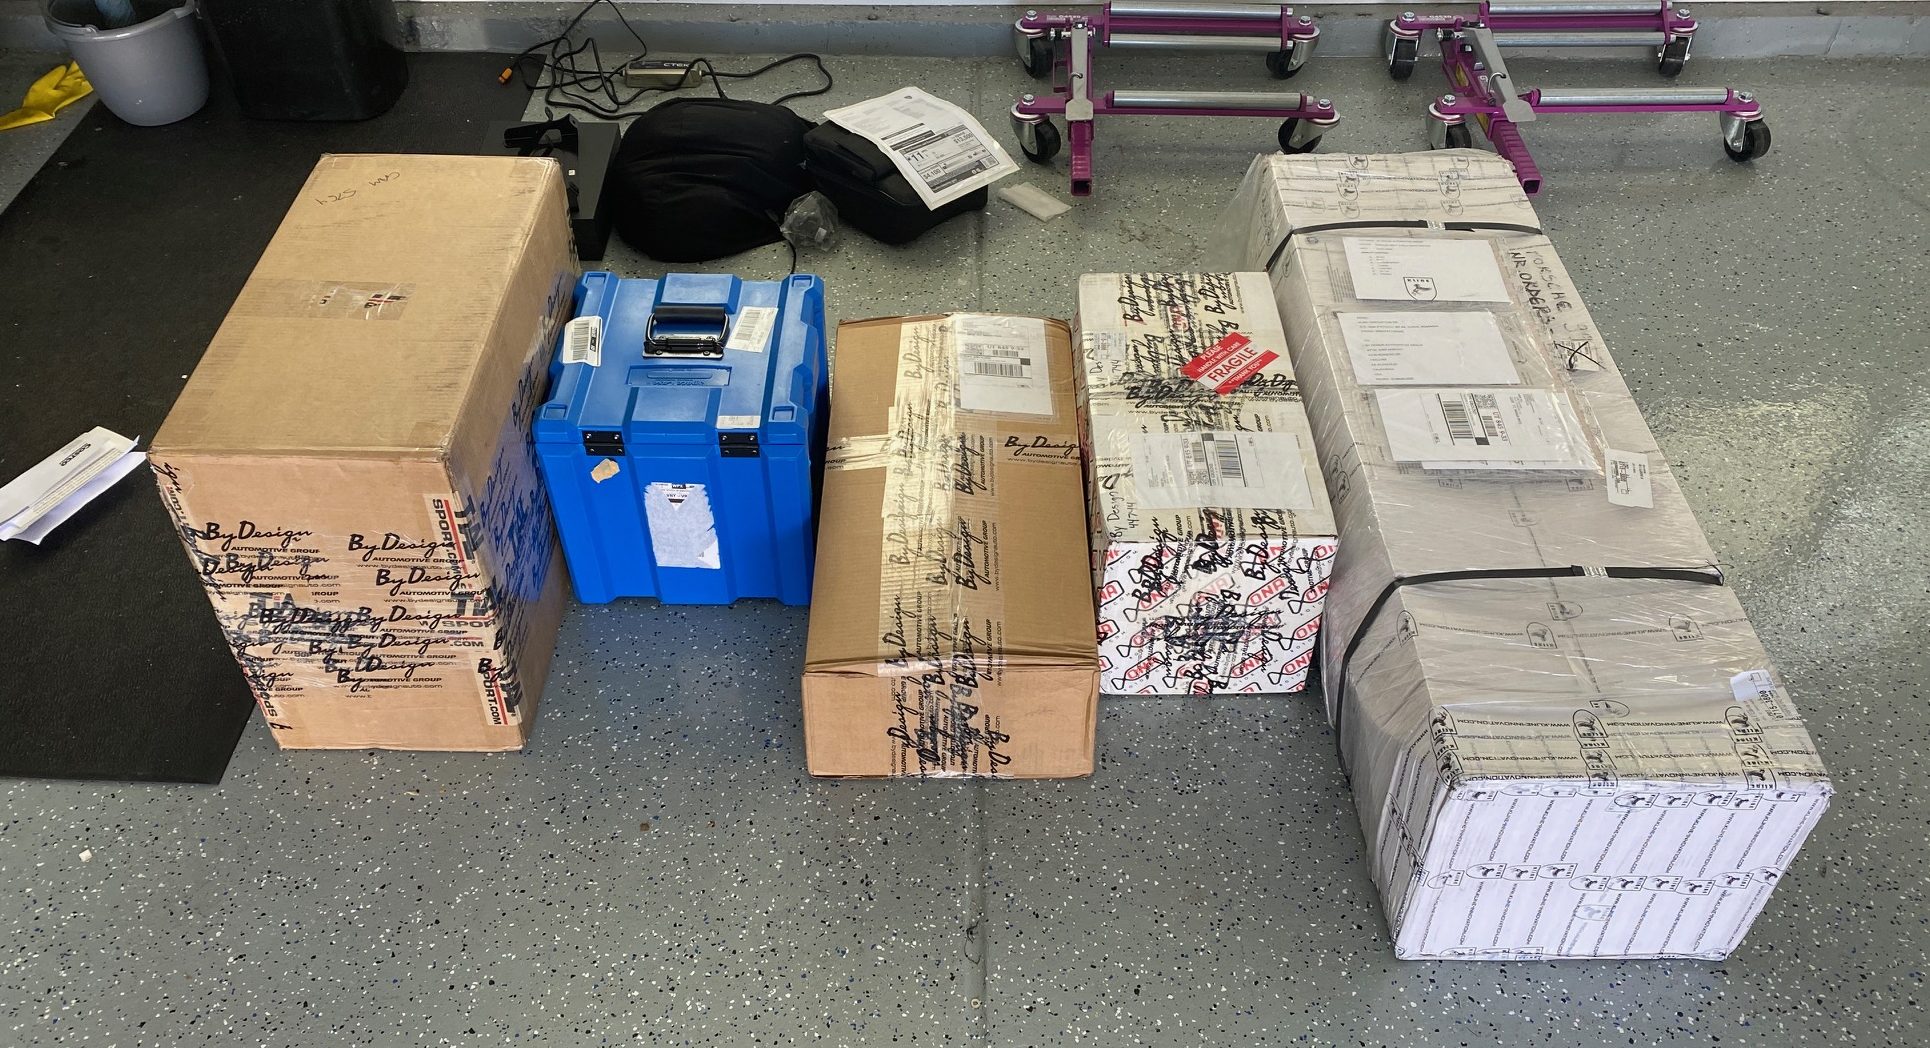
Time passed. Parts were ordered, installed and painted. And in between each step it felt like an eternity. Even now, looking forward, all I can see is an endless tunnel.
The car is now up at Lehi Porsche for airbag replacement, suspension component replacement and some power-related goodies. However, I don’t even know when we’ll be able to start on the rest of the work. Currently there is a raging COVID-19 pandemic. One of the companies I’m working with, ByDesign, is in California and they are dealing with a lion’s share of the corona virus difficulties. The state is under a “shelter in place” order, businesses are closed, things feel bleak.
Here at home I just got word that my mechanic, Dagan, will be out of commission for six weeks following back surgery. No one else can touch my car though so that will have to wait. People over projects and parts.
I’m hoping to start work on my YouTube “Resurrection” series next month (really in just a few days at this point). I don’t know if there will be a happy ending in time for the Limitless event, but hopefully it will make for some good entertainment. (7/11/2020- I’ve had zero time to work on my YouTube channel)
Maybe I’ll email my insurance company and see if there’s any kind of relief from this situation. Knowing what I know right now, I might have opted to total the car instead of pushing for a repair. Hindsight. On the other hand, waiting won’t kill me, and good things come to those who wait, right?
Update 4-25-2020: We’re working our way through the crisis here in Utah pretty well. I think, overall, we’ve managed the corona virus appropriately. There is nothing my insurance can do for me at this point; My only option is to move forward. Dagan is recovering well and parts for the car’s next transformation have finally arrived. Let’s see if we can bust this out before Limitless in June. If there is a Limitless…
Update: 5/22/2020 – Dagan can come back to work on June 10th (he actually wasn’t able to come back until the end of June). I don’t think there’s any way to get the build done before the event. It doesn’t help that there’s really no Limitless audience this year- it’s not worth it to push hard to run a car that no one will get to enjoy. So… I’m okay to wait on the build and do it right. She’s nestled safely at Lehi Porsche for the time being. I miss this girl… but she’ll be back, better than ever.
She’s very patient.
July 15, 2020: We had a little scare / hiccup. Dagan was able to start working on the car last Wednesday and discovered we’re missing some parts to get it put back together (some not bid out, some not ordered and some returned by mistake). Some of the missing items were interior pieces (i.e. dash) so there was some concern that they might not be immediately available. In the worst case we were worried that insurance wouldn’t cover additional costs and the car could still be totaled.
However, it sounds like the insurance authorized the missing pieces and labor costs and the repairs are moving forward 😅
Ten months in… don’t I get a break at some point? And look at all these awesome parts… they’ve been waiting around for three months to get installed (finally got them unboxed when I thought they were going to get put in). Not a fun year for cars. Grrr.
Of of the most constant struggles of my life has certainly been to actually understand the relationship and functions of torque and horsepower (along with its cousins: watts, amps and voltage… but that’s for another time). When you modify car components to increase power, the evaluation almost always revolves around how acceleration within a specific measurement (i.e. distance) has been affected.
Here’s are the fundamentals:
Horsepower is the total power output of an engine, while torque measures the “turning/torquing ability” of the engine. Practically, torque is a better measurement of how quickly your car will accelerate, while horsepower (relative to weight) is a better measure of your car’s top speed
This is one of the best explanations of torque and horsepower that I’ve come across:
If you watched the video now it all makes sense 😭😂
I even decided to leave a comment:
This is a great explanation. Although horsepower is Torque x RPM ÷ 5252 (which is the magical point where torque and horsepower lines cross on graph). Also in the car racing example there were certain parameters left out (i.e. the race’s distance). It is possible that the car with less horsepower and more torque could actually win a very short race. The discussion about gearing in this example is confusing because gearing can alter torque. All things being equal the one with more power will eventually be quicker.
Torque is force x distance Horsepower is force x distance x RPM / constant
so, more specifically, Horsepower = torque X RMP / 5252 (this is the point where torque and horsepower lines cross on a graph).
I made my comment above because I felt the video slightly misrepresented things @ 3:15. It’s really not a big deal but it could be slightly confusing for those of us truly looking for the light.
Below I’ve also posted an interesting comment made on this video by Martyn M. I have edited parts of the story for brevity and clarity, but the content is intact.
Torque is a turning force. It is measured in either Newton Metres, or Lbs Feet. In this example we will just keep things simple. Think of torque as brute strength.
Horse Power is a method of measuring how much work is done in a given time.
You need torque, multiplied by how many revolutions per minute, that torque is applied, to work out how much horsepower is achieved in a set time.
This is the way I think of it…
There are two piles of bricks, one hundred in each pile, and they need moving up a fairly steep hill on a building site.
A muscle man and a marathon runner challenge each other to a race, to see who can move a pile of the bricks the fastest.
The chap with a lot of muscle and strength is big and immensely strong but heavy and quite slow ( (we will think of it as having lots of torque). He is quite capable of scooping up a whole load of bricks and carrying them up the hill. He might carry 20 bricks at once and slowly walk (at low revs) up the hill. He could move all the bricks in 5 trips and take 10 minutes.
The seriously fit runner, who is light and fast on his feet might only carry 5 bricks and sprints up and down the hill. He has a low amount of muscle (or torque) but his legs can run (or perform revolutions) at a much faster rate. It takes the runner 20 trips to move the bricks. Also in 10 minutes
Now if they both complete the task in the same time, then they have both done equal amounts of WORK (which can be measured in Horsepower or Kilowatts) then it’s a draw.
However, if the muscle man could carry 25 bricks per trip, at the same pace, he completes the task in 4 trips, and in just 8 mins. He will have put out more horsepower. He carries bricks at a slow pace compared to the runner, but by applying more torque, each rpm is doing more work. Then it’s just a case of multiplying the two together. Torque x RPMs.
However, the runner, still only carrying 5 bricks, refuses to be beaten. He hasn’t got the strength (or torque) to carry more than 5 bricks, but he can pick up the pace so he runs faster. He finishes the task in 7 mins. His body, although weaker at lifting, has now worked harder, because his low amount of torque, could be multiplied by very high revs.
Keep this example in mind and think of your car engine. Horsepower is simply a way of measuring work done in a given time. It is not a unit of force, or a measure of how fast it can travel. The ability of an engine to provide power is achieved either by applying large amounts of torque at low revs, or applying lower amounts of torque at high revs.
The amount of gratitude and praise for this post is surprising because ultimately I think it misrepresents the relationship of torque and horsepower (unintentionally). Based on this story, both machines (brick movers) accomplish the same amount of work in the same time period. But I think he confuses the issue at some point during his explanation and arrives at the conclusion that both the muscle man and the runner have accomplished the same amount of work in the same amount of time and so their horsepower is equal. It is not. In this example the work being done has been erroneously broken into impossible parts.
The power an engine produces is called horsepower. In mathematical terms, one horsepower is the power needed to move 550 pounds one foot in one second, or the power needed to move 33,000 pounds one foot in one minute.
A car cannot be moved in 100 pieces arriving at it’s ultimate destination over any period of trips. Am I thinking about this incorrectly? I’d value any insights into this matter- there’s just something here that I can’t completely wrap my head around…
Another question I’ve been thinking about is this: When you alter the gearing in vehicle you can change the torque but you cannot change the horsepower. Why is this?
Let’s say your vehicle makes 600 ft lbs of torque @ 7500 rpms. Your horsepower output would be 600 x 7500 / 5252 (the point where torque and horsepower lines cross on a graph). This gives you around 856 HP. You can change the gearing on your car to give you more lower end torque. Let’s say you make an adjustment that gives you 650 ft lbs @ 6900 RPMS. How much horsepower do you have? Yes- the same. The theory here is that you’ll be faster inside of a certain window (in this case up to a certain speed you’ll be quicker).
All things being equal, one could probably make a simplistic assessment that horsepower is the definitive measurement of power. If you’re obsessed with top speed then that is the number that matters. If all you care about is how quick your car feels off the line then you’ll need more low end torque (and this, of course, is why measurement of peak output don’t paint the whole picture).
An engine only produces peak horsepower and torque at certain ranges. You can take a snapshot of the car’s maximum output but this doesn’t always give you the true picture of a car’s power over the entire output range (I’m probably misusing the term “power” here…).
I think this is why, in theory, a car purported to have “600 hp & 500 lbs of torque” could be “beaten” (in a shorter race and absent any considerations of weight or aerodynamics) by a car with “550 hp and 480 lbs of torque.” This is why people take their cars to the the track and put them on dynometers; You need a physical application of the engine’s power to really appreciate their real world performance.
And speaking of real world performance (I alluded to it above) but there are no many more factors than just horsepower and torque to take into account when you’re trying to make assessments. A car’s weight, drag and even friction could play a part in a car losing to a less powerful competitor.
Anyway… quite a rabbit hole. The amount of information about horsepower and torque online is truly overwhelming and the debate about what’s more important and the misunderstandings about their relationships will probably continue forever (they are both important). As for me- I’m just going to live my life by the stopwatch. No one can argue about time*.
*They can argue about who robbed them, why they were robbed, what went wrong, etc, but they cannot argue about how long a particular race event took (except in the absence of any accurate timing device). Ah… who am I kidding. Time is relative, right?
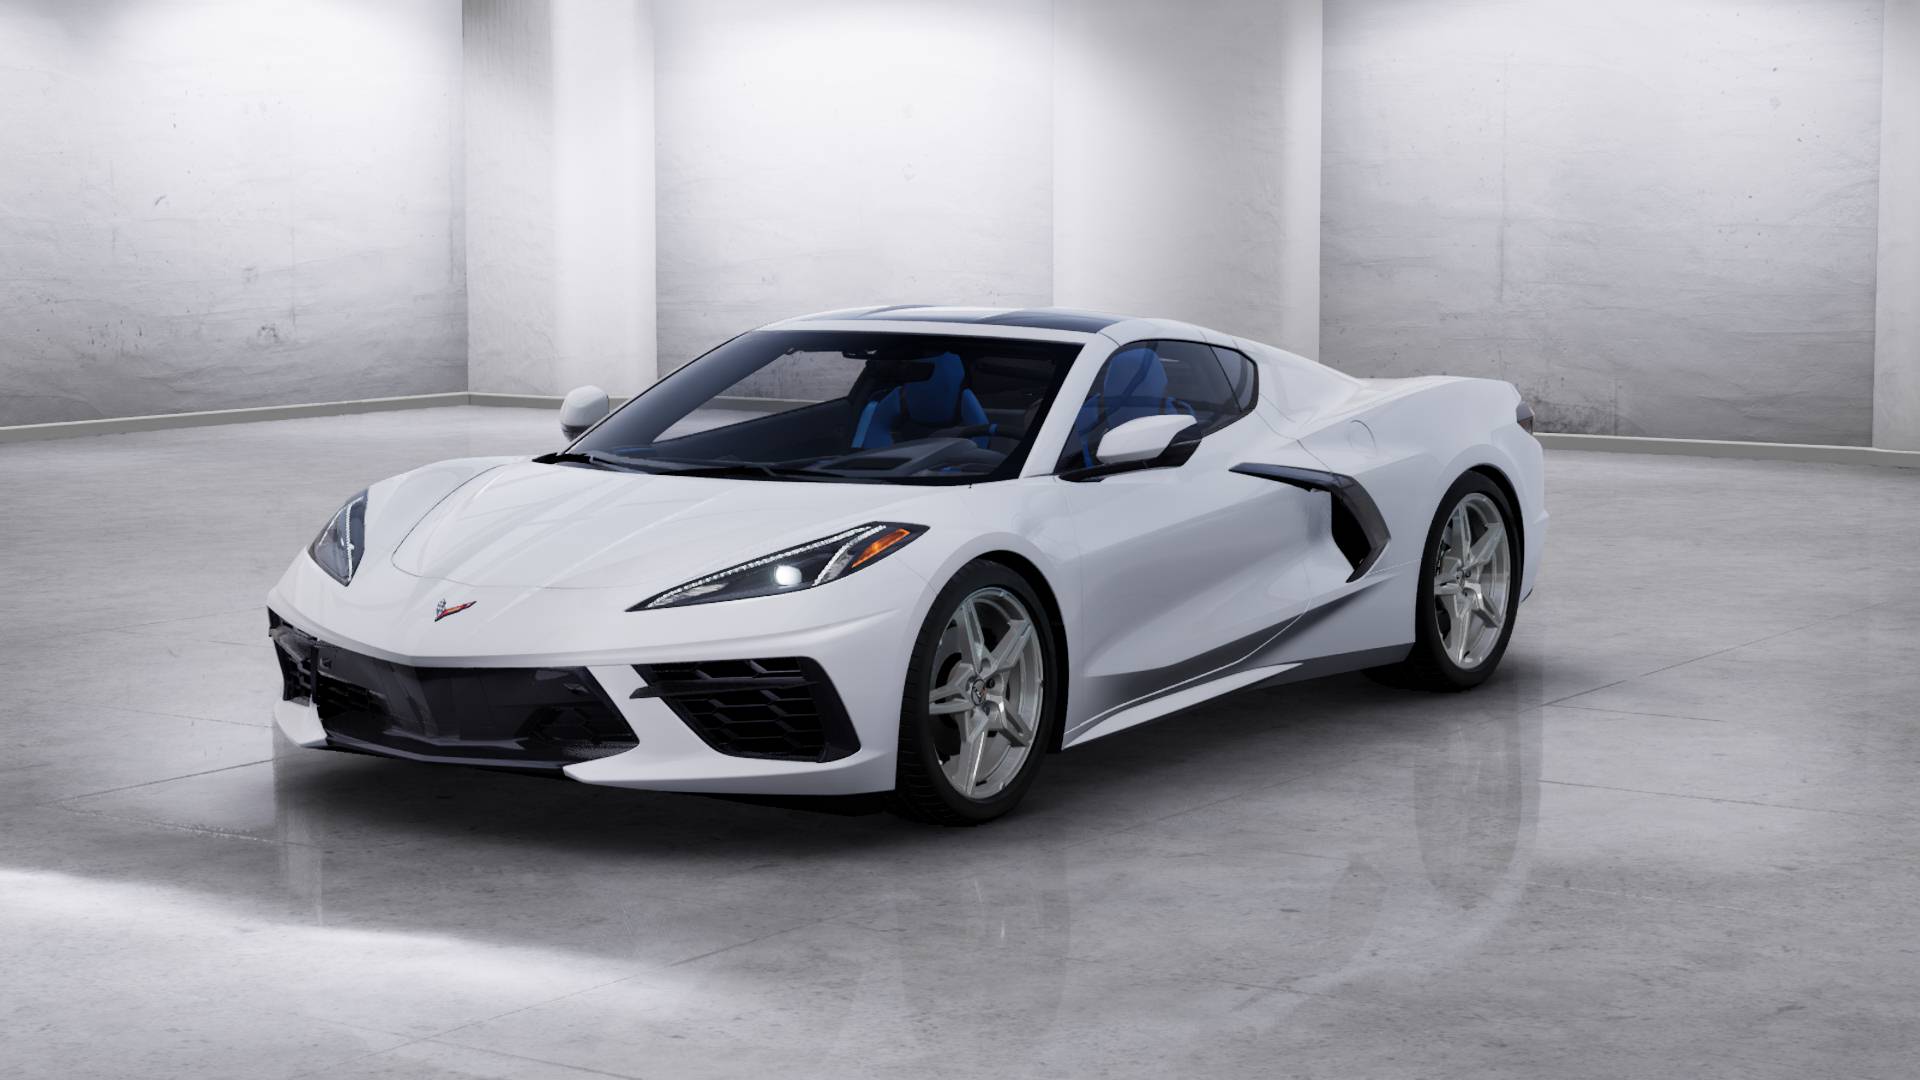
Wow. I wasn’t prepared for how awesome the new C8 turned out to be. A mid-engine Corvette that looks like a Ferarri and that starts under $60K? Bravo Chevrolet.
Thus far they have released the Stingray model (the basic coupe) and have rolled out a Z51 performance package. Despite “only” having 490 HP the performance statistics appear impressive (0-60 in less than three seconds). At some point Chevrolet will release a higher horsepower model (maybe a Z06?) and that’s when I’ll start taking a serious look again at the Corvette.
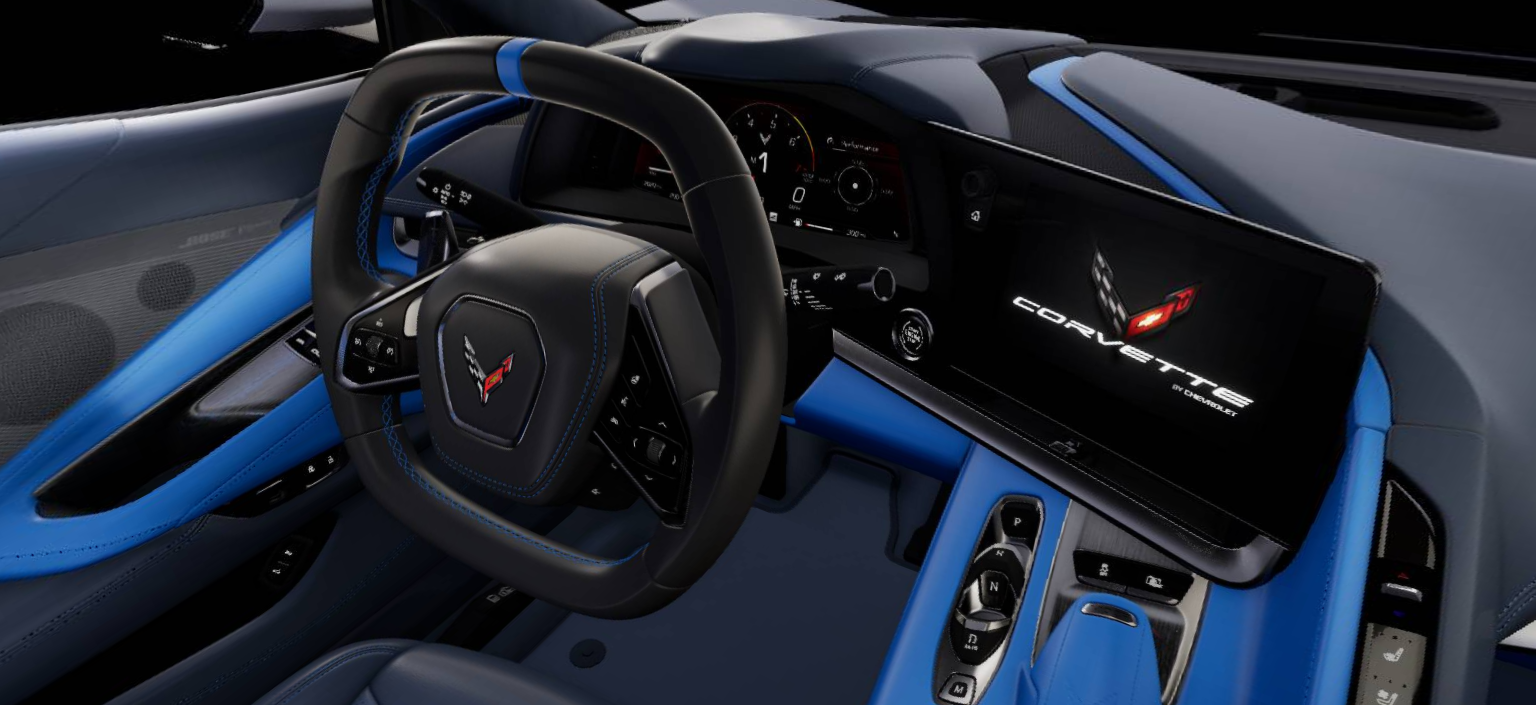
I really like the customization options Chevy is offering. A blue interior would be fun. Here are a few pictures from the configuration tool:
Freak, Cam. Is every post on your blog about some car crap! Hey, thanks for noticing. But it’s not just about cars- it’s about health. Many of you know I’m big into weight loss. I think this video may help people lose weight quickly and safely. It’s not a diet, it’s a lifestyle change.
So you want to lose a bit of weight, eh? A lithium battery might be just what you need! They’re not cheap, but the weight reduction is legitimate. Spoiler: I knocked off forty three pounds by switching from a lead-acid to a lithium battery. Forty three pounds! This video also demonstrates the removal & installation process of the battery in a Porsche 991 Turbo (as always it was more difficult than I thought it would be):
If you watched the video then you’ll know I had to do a bit of cosmetic surgery, but I’d call the operation a success. So far the battery works as advertised- weighs less, starts right up and the car drives great. I have negated he additional weight added by with methanol kit (& actual methanol) and my fire extinguisher. As I mentioned before, they are pricey, but a lithium battery is a pretty easy win!
7/13/2019: I decided to remove the battery when there’s no current concern about weight reduction. A couple of times in the last month I’ve had the PCM cut out followed by multiple dash errors (i.e. steering fault, PDCC fault, etc). I think this may be related to the battery but I’m not certain (seems like some type of power surge / drop). I removed it today and reinstalled my tune so we’ll see how things play out.
Safety first! I have never kept a fire extinguisher in any car I’ve owned. Even though I’ve never had a car fire I’ve often considered installing in some type of fire suppression device. With the addition of methanol into my car I figure I’d better not push my luck too and so…
I picked up a Rennline fire extinguisher mount for my 991 along w/ a 2.5 lb H&R Performance extinguisher w/ Halguard (if you’re interested you can get your own here). I opted for a Halguard model – this shoots out a fire suppression gas as opposed to a fine powder (not big on powders after I had a fire extinguisher blow up at work once).
The install was a bit more complicated than I imagined but I’m pleased with the results:
Helpful Hint: If you install a similar setup in your car I’d recommend a bit of practice. You’ll need to be able to release the holding clips and remove the extinguisher from its cradle quickly all while sitting in an adjacent seat. When fighting a fire, remember the P.A.S.S. acronym. Pull the pin. Aim at base (closer proximity is better). Squeeze the trigger. Sweep side to side. Hopefully you don’t have a fire in your car (or anywhere you don’t want one) but it never hurts to be prepared.
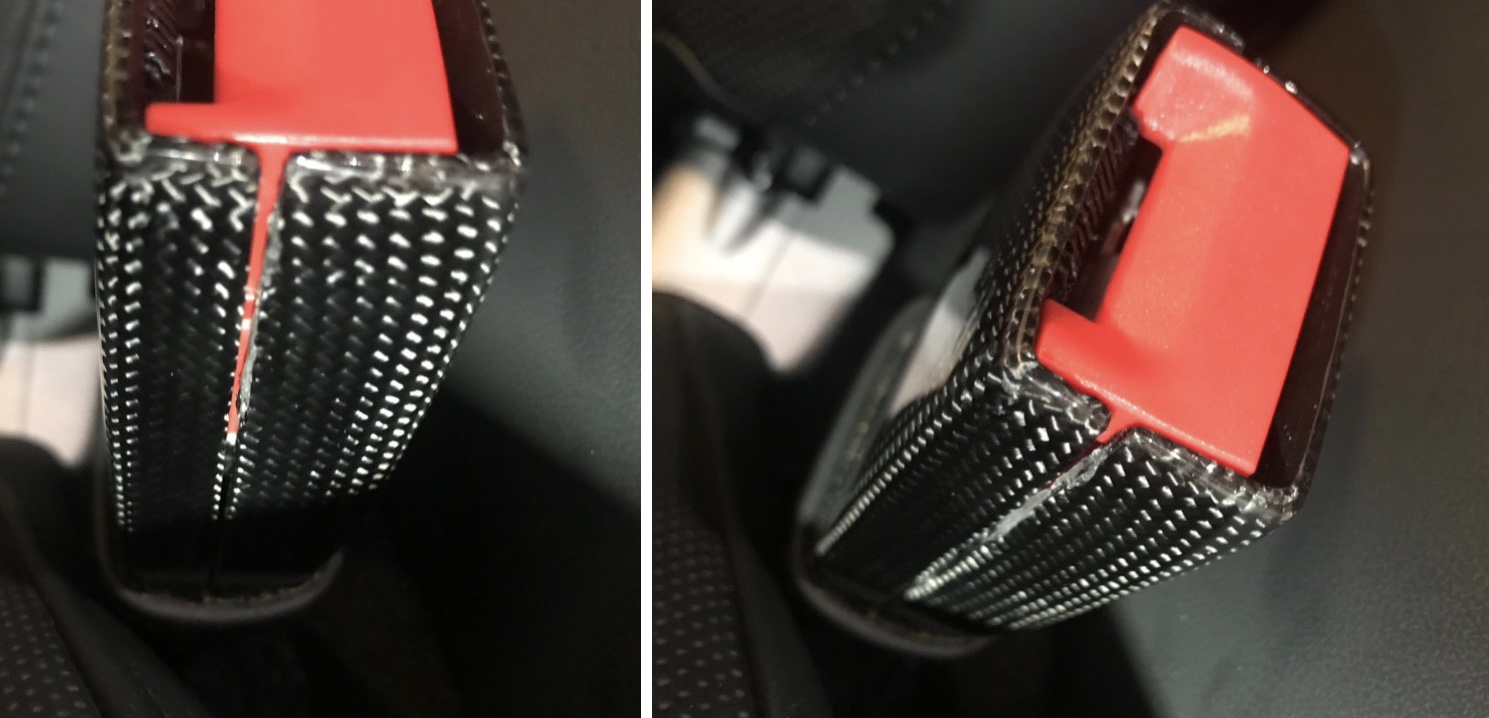
These MACarbon seat belt buckles have been a bit of a headache for me. I had to modify the covers for the two rear buckles before they would fit. A recurring warning light forced me to replace the front passenger side buckle altogether. And then the new buckle promptly “broke” apart (the two parts of the housing separated and it’s much worse where the belt is attached and there’s tension). I’m not sure if I’d buy / install these parts again.
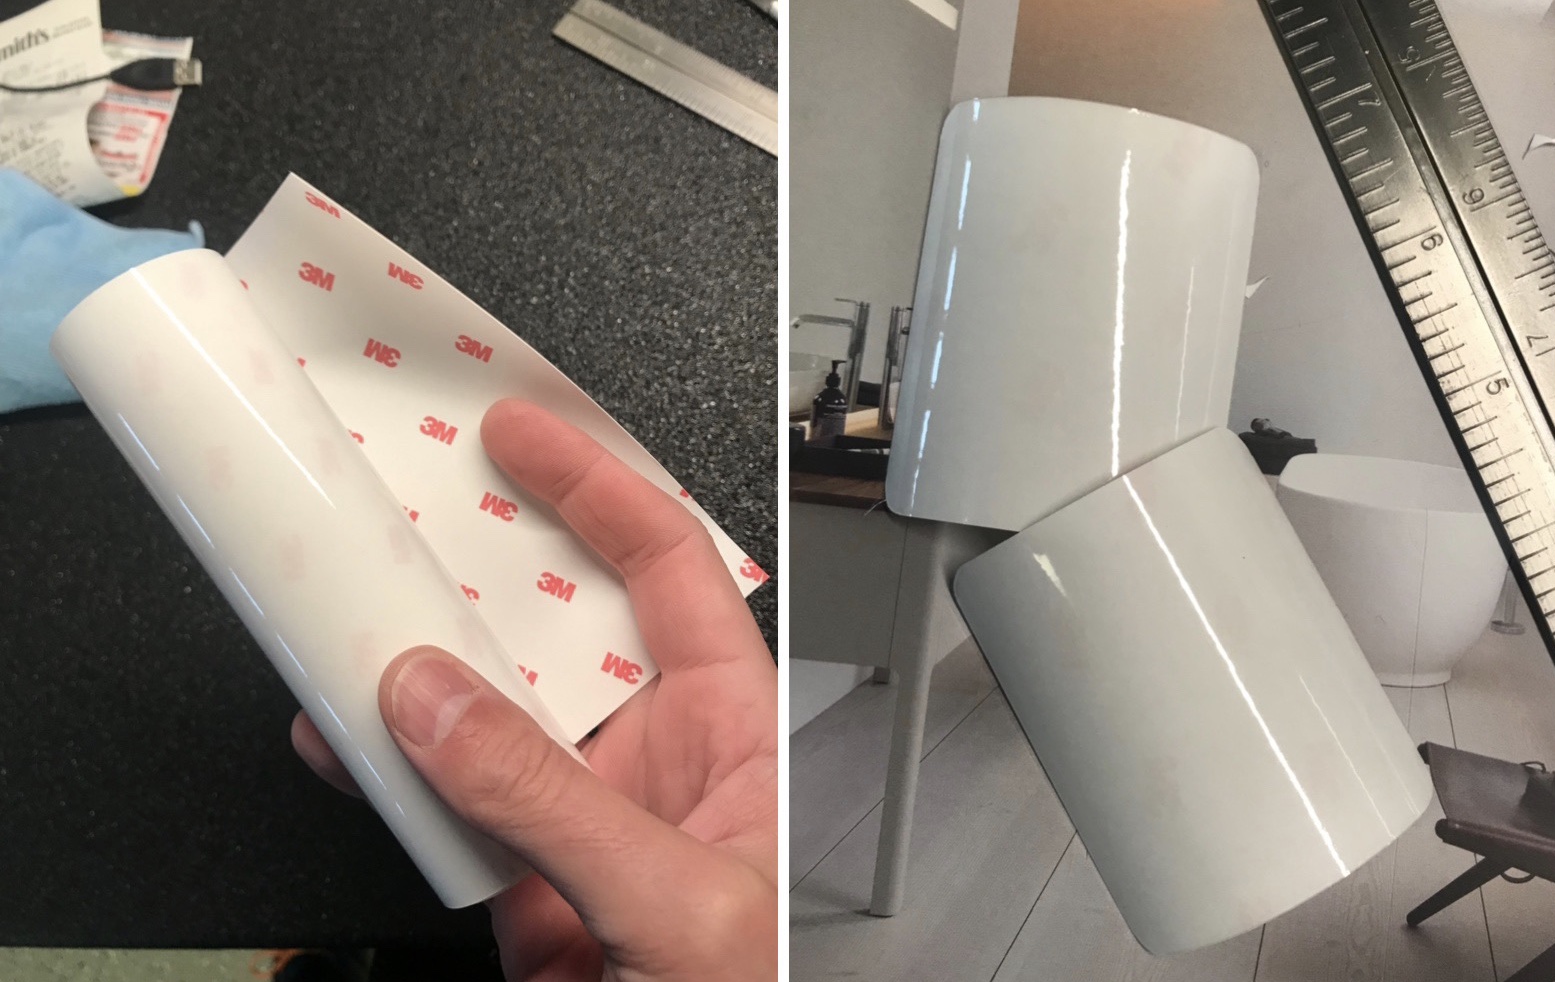
Regardless, I’m a guy that looks for solutions. The first thing I tried was epoxy. I glued the halves back together but they came apart again shortly after transporting a passenger. I considered a number of different options before settling on some 3M adhesive- the same stuff you might cover the exterior of your car with. I cut out a couple of sections and did some test fitting.
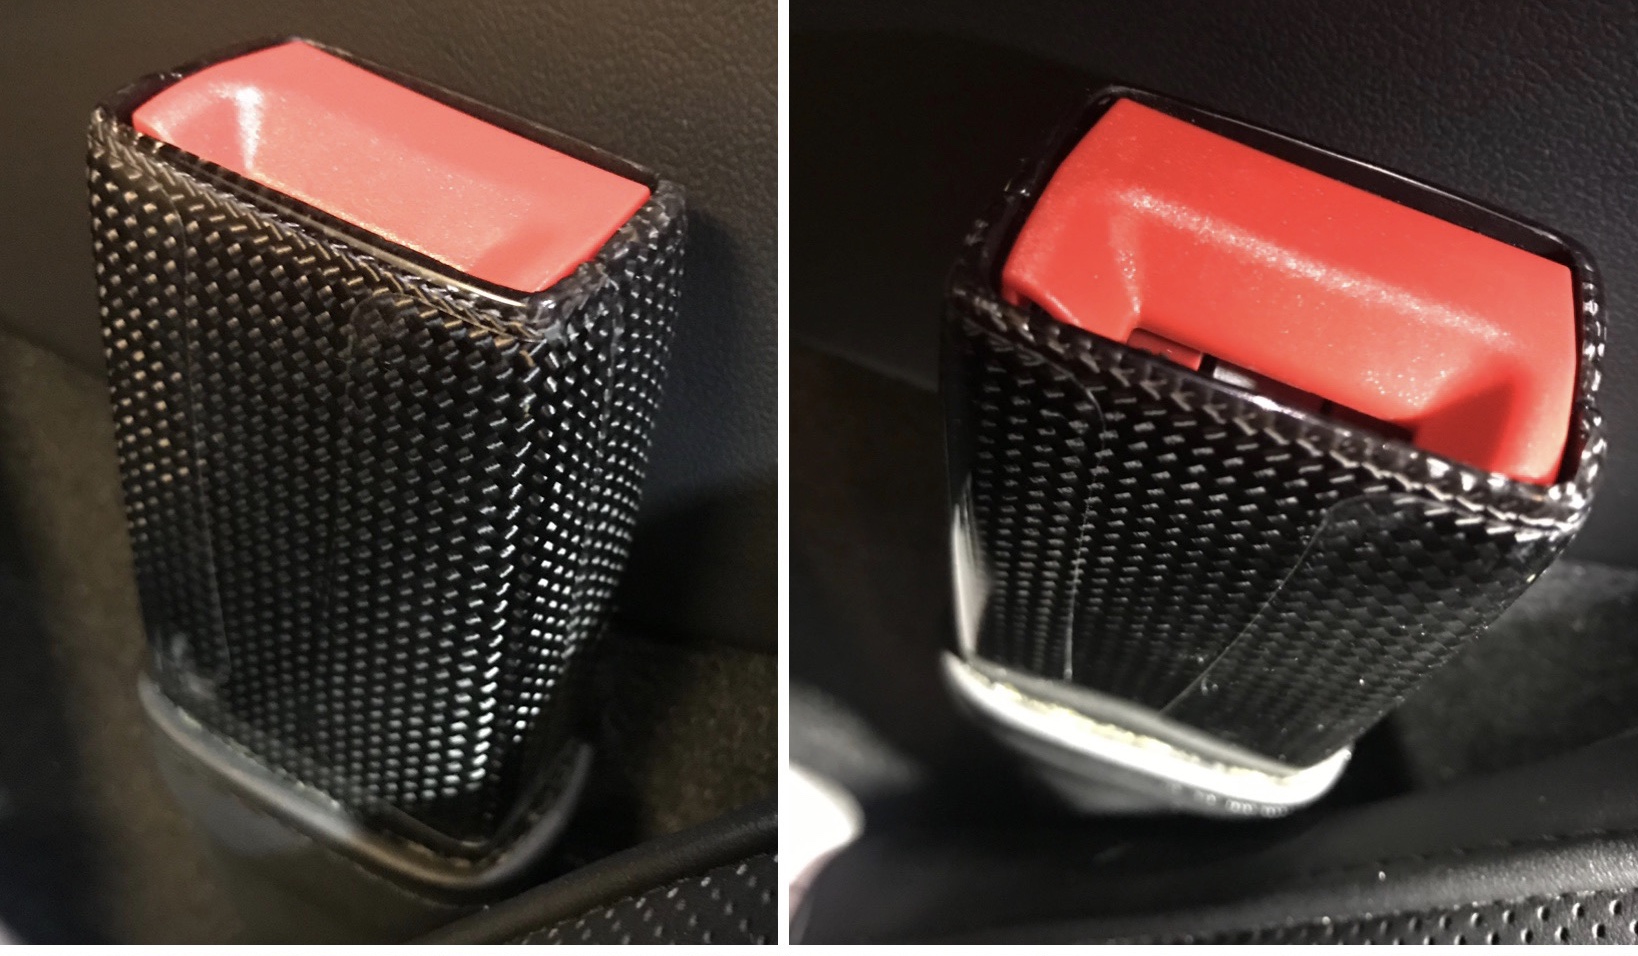
Originally I had just intended the fitting to be temporary but the 3M seemed to be exceptionally strong and the installation went fairly well (you can see the lines in the pictures but in real life it’s very hard to see where the film is at all).
One of the back seat belt buckles also had a case that was coming apart so I applied the 3M there as well. I suppose my next step will be to see how well the film works over the coming months (I’m worried about its ability to stick and the potential of stretching). In the meantime this appears to be a quick and elegant solution for anyone with a similar problem (and not just limited to seatbelts folks– you can wrap this clear 3M film around pretty much anything).