Thermostat Confusion? I Have the (a) Solution!

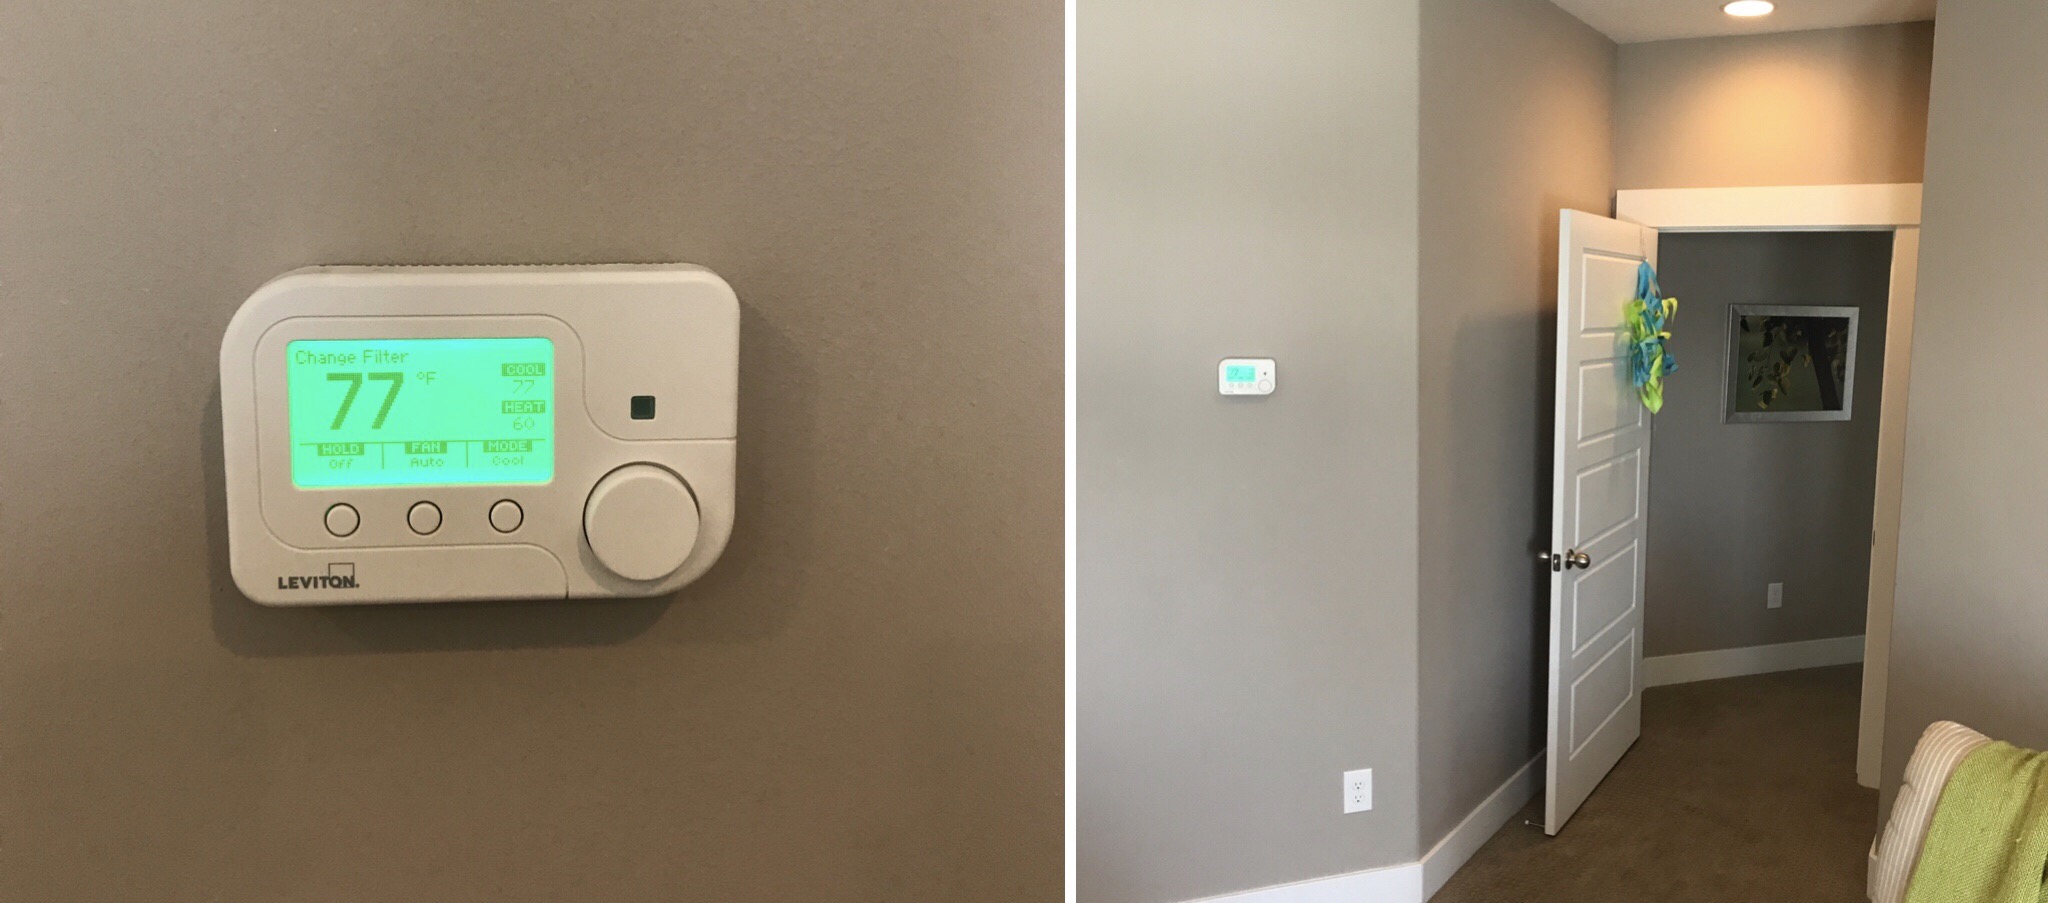
One thing I like about our home is that each level has its own thermostat and can be independently regulated (makes for more efficient cooling and heating and it actually cuts electrical costs). Thermostat technology has come a long way, however if your thermostat is in the wrong location it can cost you money and cause perpetual discomfort.

Situation: Our upstairs thermostat is in the hallway. With no hallway air vents the temperature around that thermostat is mostly dictated by whatever makes its way up from the main floor.

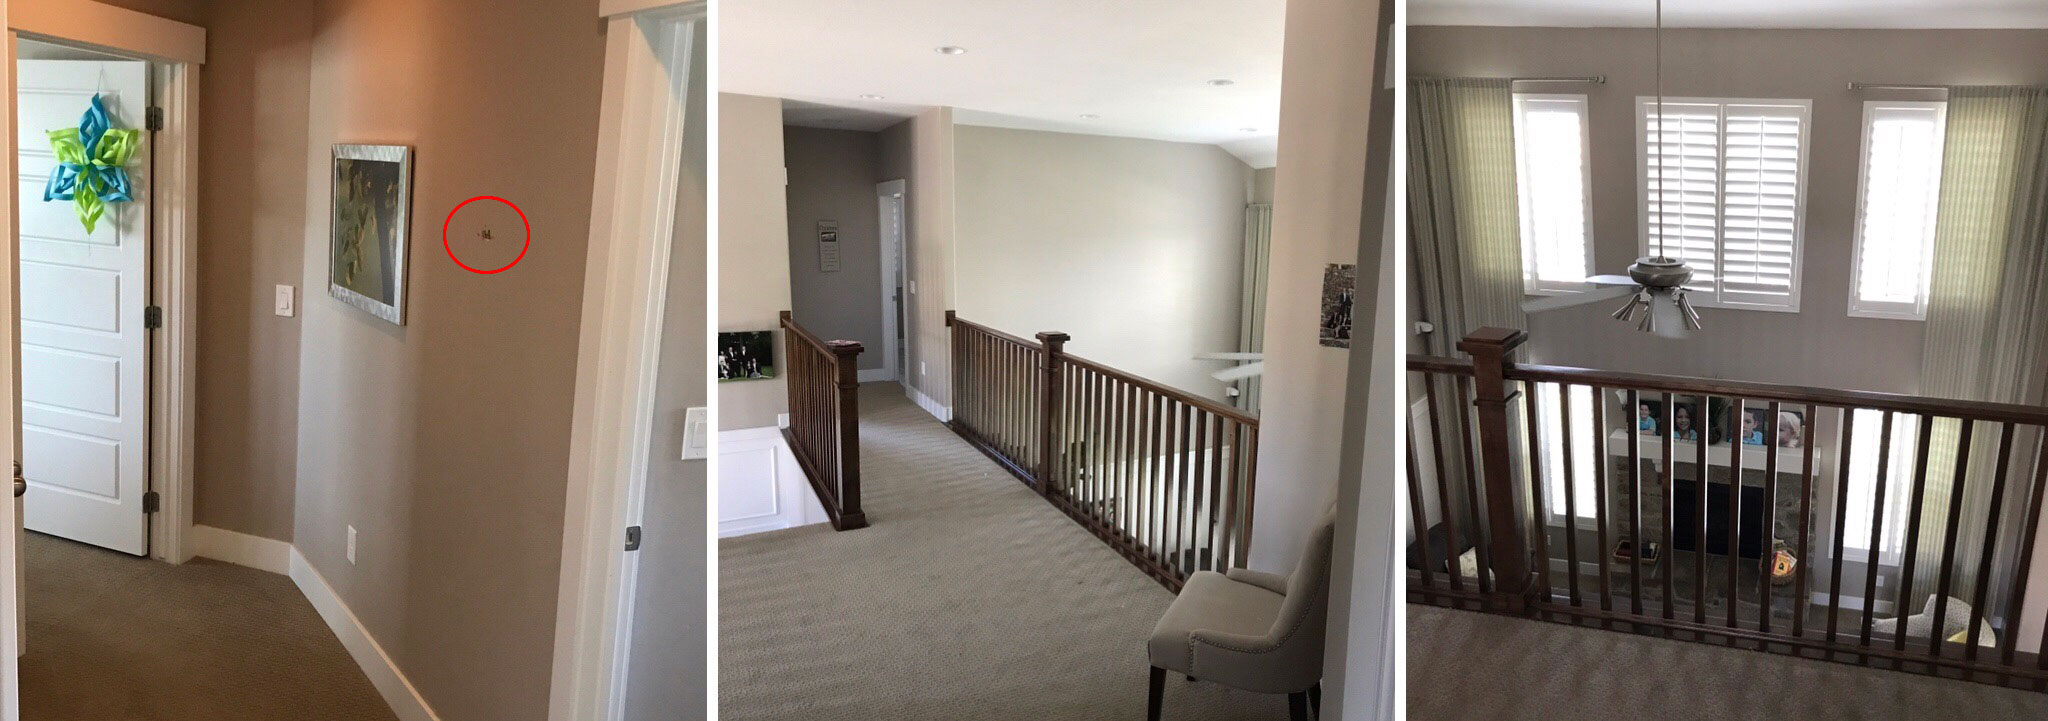
The old thermostat location was not ideal. Air from downstairs would heat and cool the hallway where the thermostat was located. When in use the downstairs fireplace caused a huge temperature discrepancy.

Summer Situation: In summer the upstairs AC will run and run until the hallway cools to whatever temperature the thermostat has been set to. Since the air has to spill out of the bedrooms and into the hallway to reach the thermostat by that time all the bedrooms are too cold.

Winter Situation; In winter the warm air from downstairs keeps the upstairs hallways warn as well. The net effect is that the bedrooms are left unheated if the thermostat is set to a normal heating range. If we compensate by making our heating threshold higher than normal the upstairs AC will run and run until the hallway warms to this temperature. Since the air has to spill out of the bedrooms and into the hallway to reach the thermostat by that time all the bedrooms are too warm.

Solution: My wife pointed out that if we moved the thermostat into the bedroom that would solve all our problems. Since we use an automated system to control our temperature having it in our bedroom isn’t a big deal because others rarely need to adjust it. And thus was the thermostat moved. And there was there peace in the land.

That was all a long-winded way of saying this: If you have a two story home and separate thermostats (main and upstairs) make sure your upstairs thermostat is placed correctly. One alternative option to relocating the thermostat is to use one with a remote sensor.

Bounce House Trampoline Birthday Invite 6 x 4 Template

It seems that more and more kids are doing “bounce house” trampoline birthday parties. My son just had one and my wife recruited me to make the invite. I’ve posted a blank copy below and it’s high enough resolution that it prints out nicely at 4 x 6. We had ours printed at Costco and then we just mailed them out (you can put address info & stamp n the other side). If you feel lazy and don’t want to make a card feel free to use mine. I’ve left the text section of the card blank so you can enter your own text, put a sticker on the card with the info or even hand write the invite.

LiquidArt Fountain Mountain Spring – Install & Operation

Once again, I have decided to undertake a project for no particular reason- I  just get enamored with an idea sometimes. In this case I was thinking about how much I like the noise of our fountain (probably because a friend just installed a very nice water feature in his yard) and how cool it would be to hear the sound of a fountain while sitting on our front porch. All of a sudden BOOM! I had to put in a front porch fountain.

The first step was picking a location and that was easy since there was only one place to put a water feature. I wasn’t a huge fan of the bushes in front of our porch so I was happy to rip a few out to make room. The next step was finding something that would fit look nice and not be too loud. I remembered seeing some fountains at Costco last year so I looked on their website and came across a model called the  LiquidArt Fountain Mountain Spring. I liked the shape, a pondless bubbler was just right and the price was pretty good (much less than buying it direct).

I placed my order and it came within less than a week (shipping from Oregon via a freight company). As soon as it arrived I took actual measurements (it’s 2″ larger than advertised- a tight fit) and started digging. I naively assumed I could just shovel out a few wheelbarrow fulls of dirt and I’d be all set. Not quite. I think all told I ended up emptying five pretty big loads. I dug the hole a bit deeper than needed so I could lay down a couple inches of gravel.

Deciding on a height was more difficult that I thought it would be. I ended up trying to seat the fountain two inches below the side walk to accommodate the rocks I was planning to get (I’m hoping the weight of the water and fountain won’t cause it to sink at all, but I’m mentally prepared to pull it out and readjust it if necessary). After getting the water reservoir installed and cleaned out* I placed the grid on top, placed the pump inside, ran the pump hose through the grill, overlaid the mesh and placed the “rock” (orienting it was tricky and I ended up changing it several times after seeing the actual water flow). Aside digging the hole that was the best part (sarcasm).

*Quite a bit of dirt fell into the water reservoir. The only way I could think to get it out was to vacuum it up. I used this an an opportunity to acquire a new Shop Vac (quite happy with this model). Sweet!

After the main fountain components were situated it was time to get some landscaping rocks. We live right by an American Stone so I headed over to see what they had. Turns out their selection is pretty massive (it was my first time there). Here’s how it works: You weigh in your vehicle and then go fill it up with rocks (keep track of what you get). Then you go a weigh in again and pay for your selection (according to your weight difference). They don’t really cater to jobs as small as mine but I managed to get what I needed. I’m not going to win any awards for landscaping / fountain design, but it turned out pretty nice (I wish I hadn’t pruned the bush on the left quite so much).

Below is a quick video of the fountain running. I think it’s quite relaxing. In fact I would be on my porch right now if allergies weren’t ravaging my body.

Overall: 8/10 – The LiquidArt kit is comprehensive, well designed and attractive. My only two gripes are minimal. 1) The PVC pipe that comes out of the top of the rock isn’t too attractive. I feel like that could have been flush with the surface. 2) Install wasn’t anything close to 3 hours, as described by the instructions.


Porsche 991 Turbo S – Exclusive Series

Porsche has just announce their 2018 Turbo S Exclusive Series. If you have any interest in this car I’d say the very first step is to head over to the Porsche website to read through the features section. Also take a few minutes to watch the live stream of fan controlled robots crawling around the car:

I have often fantasized about the perfect Turbo S and so I have a few thoughts on this release:

Q. Can I even get one?
A. It’s hard to say at this point. Look what happened with the 911R. They all went to folks who’d bought a 918. I’m hopeful the average Porsche fan gets a crack at these, but history doesn’t seem to be on our side.

Update: The Turbo S Exclusive Editions are being offered to people who have previously purchased a 918.

Q. Do I even want one?

A. I certainly find this car appealing, but I don’t think it’s a good fit for me (more on that later). They’ve done a lot here with carbon fiber and I do love that stuff. However, if Porsche would let me I’d just order parts from this car and install them onto my current car (I don’t think they’d like that). The price on this, while actually less than I expected, somehow seems like too much for what’s included (or not included). I am holding out for a 2020. I have a feeling that will be my next car.

Q. So, what’s the price?
A. One of these beauties start at a whopping $258K. How do they justify that? It’s limited, it’s got some cool upgrades (carbon fiber, a bit more power), more parts of the car are “hand made.” After talking with a local sales rep one thing that surprised me is that you sill have to add in options like the Burmester stereo or even the lane change assist (and you can even add more leather). For the price I feel like all the highest end options and every goody should be already included. But again, to be fair, the car is priced lower than I expected and not much more than a decked out current model Turbo S.

Here is brief picture tour of the car (all pictures are from Porsche.com).


Exclusive Series Turbo S – Front. Note the two stripes of exposed carbon fiber.

Exclusive Series Turbo S – Front Right

Exclusive SeriesTurbo S – Front Left

Exclusive Series Turbo S – Rear Right.

Exclusive Series Turbo S – Rear. Totally dig the carbon fiber valence and the aerokit.

Exclusive Series Turbo S – Wheel Detail. I really like the wheel design, but I’m not really digging the black calipers.

Exclusive Series Turbo S – Illuminated Door Sill Detail. You know I like this.

Exclusive Series Turbo S – Carbon Fiber Engine Cover Detail


Exclusive Series Turbo S – Cockpit


Exclusive Series Turbo S – Seats & Cockpit Side View


Exclusive Series Turbo S – Standard Color Options, Agate Grey Metallic, Golden Yellow Metallic & Carrara White Metallic

Q. Deal breakers?
First a confession- I’m a gold-hater (I’ve admitted this before on my blog and I’ve worked quite hard to remove any traces of gold from my current car). Thankfully the Exclusive Series comes in some other colors (the white looks really good to me). From what I can tell, however, all of these cars come with the gold/yellow wheel detail and interior accents. I freely admit that even with the gold I think the car looks great.

Sadly, there is no sunroof option on this car (understandable given the carbon fiber roof. For the time being, that would be a deal breaker. I know “purists” aren’t big into the sunroof scene (additional weight at the car’s highest point and all that) but it doesn’t seem like many people would want to race this Exclusive Series. Why not have a sunroof for the freaks like me?

My local sales guy also made a good point- when you have a “collectible” like this you’re going to be very wary while you’re driving it. Given how insane I am about the commodity I already own I’m sure it would diminish my driving enjoyment just a little (plus I don’t like to draw attention to myself).

In any event, I really enjoy looking at the pictures (makes me want to do a professional photoshoot with my car) and I definitely appreciate the work that has gone into this car. I hope all 500 owners really enjoy their Exclusive Series Turbo S cars!


O Internet, Internet, wherefore art thou Internet?

For some strange and unidentifiable reason there are areas in our home where the Internet simply doesn’t reach via Wi-Fi. The main floor office is one such example. Our primary router (a Nighthawk X6) is in the basement (in the mechanical room) and feeds the entire house and yard quite well. However, that particular network simply doesn’t function inside the office. I picked up a Night Hawk X8 router and set it up in the center of the office thinking it could feed the office and work it’s way out the main and upstairs floors. Not so! The X8’s newly created Wi-Fi network was limited almost exclusively to the office! Even though it was overkill, I left that situation alone for awhile because it got the job done and met our needs. But I knew one day that something would interrupt the status quo.

All was well until I we needed Wi-Fi in the garage (for a computer and the Rainbird Sprinkler box). In hindsight I should have just run an ethernet cable to the garage when we built the house. But I hadn’t (maybe you still can!). There was still a way to potentially run an ethernet cable to the garage though.There’s a network jack in my bedroom which shares a common wall with the garage attic. I could set up a switch and then push a line into the attic and then down into the garage. Realistically it sounded like too much work.

Here’s what I tried first: I picked up a NETGEAR – PowerLINE Wi-Fi 1000 Access Point and Adapter. I plugged one end into an outlet near my router and plugged a LAN cable from my Night Hawk X6 into the Netgear Access Point. I went out to the garage and plugged the receiving end into an outlet. Sure enough! They found each other and linked.  However, the internet indicator was red, denoting a poor connection (I think it ended up being 3-4 mbps). Not great. I was lamenting my problem to a friend who suggested moving the Nighthawk X8 into my bedroom against the common bedroom/garage wall. Huh… that made a lot of sense. Sometimes you need another set of eyes om a problem.

I started the process by moving the Net Gear 1000 into the office. If I repurposed the Night Hawk X8 then my office would need its router replaced. And what do you know? The 1000 linked up just fine from an office plug and after doing some testing I concluded that little Powerline 1000 could easily handle all the internet requirements of the office. Then I moved the NightHawk X8 upstairs. I connected it to the LAN jack behind my bed and stashed the Router beneath my nightstand for the time being.

In this new location the Night Hawk X8 appears to serve the garage much better than anything else I’ve tried (and it also works throughout the upstairs and main floor, minus the office- something’s wrong with that office…). I’m ending up with with about 20mbps download speeds which are quite sufficient. And the signal level seems very strong, and this is, in some ways, just as important as the speed. I really think the relocated Wi-Fi network will be a huge help moving forward.

Long story short: I solved  the Wi-Fi internet dead zone in my garage by moving my Night Hawk X8 to a better location. I added a Powerline 1000 unit to the office to provide Wi-Fi there in the absence of the X8. This was a cost effective purchase and a great example of successfully relocating existing assets. At some point I need to set up the networks so they are, for all intents and purpose, one large mesh network. Anyone want to help me figure that out?

Conclusion; 8/10 – NETGEAR – PowerLINE Wi-Fi 1000 Access Point and Adapter
Works well to create an additional Wifi hotspot. Claims gigabit speeds but it doesn’t seem particularly fast to me. Only broadcasts on 2.4 Ghz frequency (right?).

VidAngel vs. Disney – Federal Appeals Court

This morning I watched the oral arguments made by both Vid Angel and Disney in the federal appeals court. It’s available online for anyone who’s interested (in fact I’ll embed here on my blog):

For anyone not familiar with Vid Angel or the current situation here is a quick summary: Vid Angel is a filtering company that allows customers to purchase movies and stream edited versions to their homes. Disney, Warner Bros. Entertainment Inc., 20th Century Fox Film Corporation and Lucasfilm Ltd. LLC are suing Vid Angel claiming that their filtering / streaming service violates copyright laws. Back in December of 2016 an injunction was filed against Vid Angel (and later upheld), effectively shutting down their service. Today was an opportunity for Vid Angel to argue against the injunction in court.

While I enjoy most of what the aforementioned entertainment companies offers (i.e. characters, parks, merchandise, etc) and understand the value of IP, I would really like to see the current injunction lifted. I think the issue of copyright here (especially in relation to the Family Movie Act and the Digital Millennium Copyright Act) is extremely complex and needs the full focus of the courts to be understood. In between now and when that court battle is actually decided I believe that Vid Angel should be allowed to operate. I strongly believe they provide a needed service, I don’t believe there is financial harm being done to the studios* and I believe the studios aren’t being fair to the end consumer.

* For those who think Vid Angel needs to get streaming licenses I make the counterpoint that what Vid Angel does is essentially a streaming version of Redbox (not illegal). However, Redbox has an agreement to delay some releases, which I think is an acceptable compromise. I will also point out that Vid Angel attempted to obtain streaming licenses and was rebuffed. I, and many others, would happily pay more for the ability to watch licensed edited movies, but if studios disallow filtering companies from obtaining those licenses then…

Based on the arguments I saw I would guess that the injunction will stay in place, in some form or another. As I already mentioned the law on copyright is difficult to interpret, (and also of note much of it was created prior to digital streaming technology). What makes me the most upset is that movie studios pretend that they are not violating our right to censor content we have purchased. It’s like throwing someone in a trunk, dumping the trunk in a lake and telling the person in the trunk they “are free to do whatever they want.” I want, no I have, the right to censor what I watch. Vid Angel provides the technology to enable that right to be realized and I genuinely hope the courts can see that there’s no viable alternative.

Vid Angel just announced there’s some “Good News” coming June 13th, at 7pm. Fingers crossed, but I’m guessing it won’t be anything too dramatic.

BONUS: Sony Pictures recently announced that they are offering cleaner version of some their movies. Predictably some directors objected- “directors” like Seth Rogen. Leave it to people in Hollywood to try force their morally bankruptcy perspective on everyone. Thanks for being  a dick, Seth.  If Hollywood wants to make crass garage that’s their right. If I want to edit their crass garbage that’s my right. At least Sony recognizes not everyone watching movies is a degenerate (exaggerated for effect, obviously). FYI:  anyone who says “Just don’t watch those movies” absolutely misses the point.

Rainbird ESP-Me Wifi Sprinkler Control – Mini Review

I have been visiting with a friend who’s doing a major yard overhaul. One change he’s planning to make is to move his sprinkler system to a wireless setup so that watering can be controlled via a phone application. That sounded pretty good to me so I did some research to determine what I’d need to make a similar migration.

It turns out that I didn’t need much! I have Rainbird ESP-Me controller that was installed a couple of years ago when we put in our yard. I noticed that Rainbird offered a wireless module for this controller, however my particular unit was not compatible, due to it’s age. At first I priced out a new controller with the wifi module, but eventually I discovered that I only needed a new control panel (not the actual box with the station controllers).

A quick google search led me to YardOutlet.com. They offered a bundle package with the control panel and wifi module for about $130 with free shipping. They are located in Ogden Utah which seemed like a nice plus. I ordered Monday and, incredibly, I had my package on Tuesday. Whaaat? Everything came well packed and as advertised. Well done, Yard Outlet!

Replacing the panel was incredibly simple. All you have to do is unplug the harness, pop off the old control panel, put on the new one and plug it back in (I think I spent about a minute doing this). I reprogrammed my sprinklers from the panel and then set about linking the sprinkler controller with the Rainbird App.

Initially I had a little difficulty getting things to connect properly. I think part of that, in my case, was because the wifi in my garage is terrible (something I am working on fixing today). The Rainbird wifi module initially creates its own hotspot  and then, from the app, you move the module to your home network. Obviously at that point your phone needs to switch networks too and mine hadn’t which is probably another reason I got the error below. After a few tries everything seemed to be working and I was ready to try out the app.

After perusing the app my impressions are quite positive. It gives you all the same accessibility as the physical control panel. After you make adjustments you save them and the new program is written to your control box. Everything is fairly intuitive and you can even opt to have the app make watering adjustments based on the weather. The app control worked well on my wifi networks and via my cellular service (one thing to note- you can’t switch from a wifi network to LTE while you run the the Rainbird application- you have to close and restart the app for it to work properly).

Below is a quick demonstration of starting and stopping the sprinklers via the Rainbird application (complete with a silly kid in the background). Being able to control the sprinkler zones from my phone will make it infinitely easier to do testing and make repairs.

Overall, I think this is a very solid wifi sprinkler control set up, especially give how inexpensive it is. I’d give it my recommendation.

Overall: 8.5/10

BONUS: A friend pointed out that this system may be eligible for a rebate. It looks like by adding a rain sensor I could get up to 50% back for my purchase. I might just do that…

http://rebates.cuwcd.com/
https://www.rainbird.com/documents/turf/bro_ESP-Me_WiFi_en.pdf

BONUS 2: The RainBird app spends quite awhile getting the schedule and setting information when each connects to the sprinkler box. Originally I had thought this was because I had connected the unit to to a network with very low signal strength. I rearranged things and then connected the ESP-Me to a much better network. Sadly, the app’s load time was the same. I’m docking a half point for that.